Exadata Deployment with Elastic Configuration

Recently, for one of my customers, I had the chance to install a couples of Exadata X7-2 using the new Elastic Configuration. The major benefits of using Elastic Configuration consists in the possibility to acquire the Exadata Machine with almost any possible combination of Database Nodes and Storage Cells.

In the past we were used to standard Oracle pre-defined Exadata Machine configurations: Eighth Rack, Quarter Rack, Half Rack and Full Rack, which is still possible, but not flexible enough.

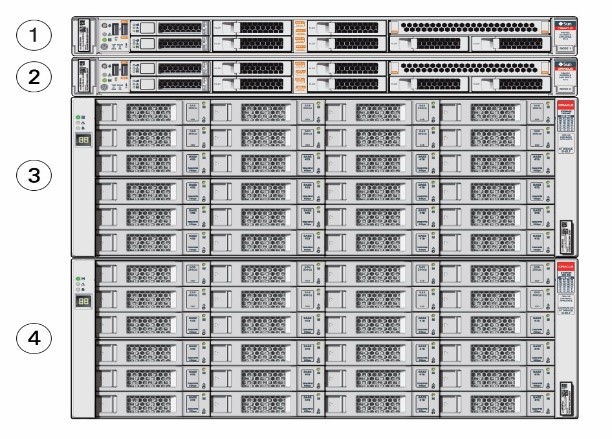
The pictures below highlight the differences between the two configurations:

Edadats_Classiv_vs_Elastic

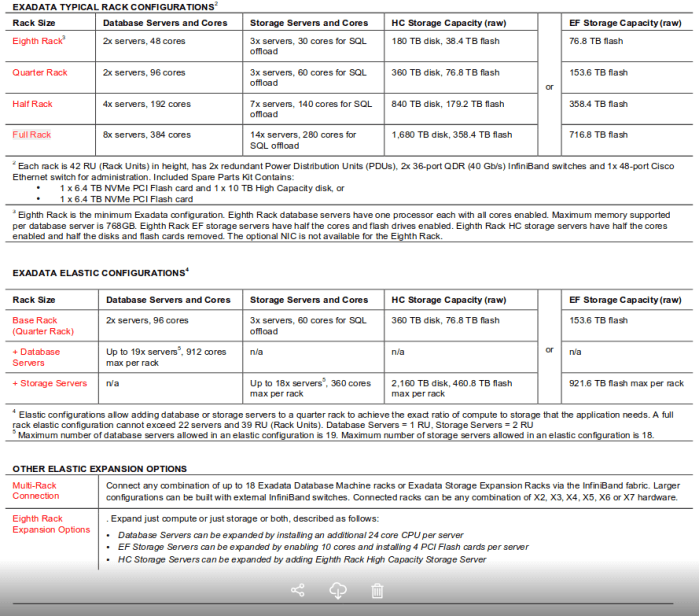
source: Oracle Data Sheet Exadata Database Machine X7-2


Deployment Exadata Elactic Configuration

The elastic configuration process automates the initial IP address allocations to databasenodes and storage cells, regardless the ordered configuration.  The Exadata Machine is connected to the InfiniBand switches using a standard cabling methodology which allows to determinate the node’s location in the rack. This information is therefore used when the nodes are powered up for the first time in order to assign the initial default IPs.

[root@exatest-iba0 ~]# ibhosts
Ca : 0x579b0123796ba0 ports 2 "node10 elasticNode 192.168.10.17,192.168.10.18 ETH0"
Ca : 0x579b01237966e0 ports 2 "node8 elasticNode 192.168.10.15,192.168.10.16 ETH0"
Ca : 0x579b0123844ab0 ports 2 "node6 elasticNode 192.168.10.11,192.168.10.12 ETH0"
Ca : 0x579b0123845e50 ports 2 "node5 elasticNode 192.168.10.7,192.168.10.8 ETH0"
Ca : 0x579b0123845fe0 ports 2 "node4 elasticNode 192.168.10.40,172.16.2.40 ETH0"
Ca : 0x579b0123845ea0 ports 2 "node3 elasticNode 192.168.10.9,192.168.10.10 ETH0"
Ca : 0x579b0123812b90 ports 2 "node2 elasticNode 192.168.10.1,192.168.10.2 ETH0"
Ca : 0x579b0123812970 ports 2 "node1 elasticNode 192.168.10.3,192.168.10.4 ETH0"
[root@exatest-iba0 ~]#


Because the Virtualization option was required,  it has to be activated at this stage:

[root@node8 ~]# /opt/oracle.SupportTools/switch_to_ovm.sh
2019-03-07 01:05:22 -0800 [INFO] Switch to DOM0 system partition /dev/VGExaDb/LVDbSys3 (/dev/mapper/VGExaDb-LVDbSys3)
2019-03-07 01:05:22 -0800 [INFO] Active system device: /dev/mapper/VGExaDb-LVDbSys1
2019-03-07 01:05:22 -0800 [INFO] Active system device in boot area: /dev/mapper/VGExaDb-LVDbSys1
2019-03-07 01:05:23 -0800 [INFO] Set active system device to /dev/VGExaDb/LVDbSys3 in /boot/I_am_hd_boot
2019-03-07 01:05:23 -0800 [INFO] Creating /.elasticConfig on DOM0 boot partition /boot
2019-03-07 01:05:34 -0800 [INFO] Reboot has been initiated to switch to the DOM0 system partition
Connection to 192.168.1.8 closed by remote host.
Connection to 192.168.1.8 closed.
✘


After the switch to OVM command it is time to reclaim the space initially used by the Linux bare metal Logical Volumes:

[root@node8 ~]# /opt/oracle.SupportTools/reclaimdisks.sh -free -reclaim
Model is ORACLE SERVER X7-2
Number of LSI controllers: 1
Physical disks found: 4 (252:0 252:1 252:2 252:3)
Logical drives found: 1
Linux logical drive: 0
RAID Level for the Linux logical drive: 5
Physical disks in the Linux logical drive: 4 (252:0 252:1 252:2 252:3)
Dedicated Hot Spares for the Linux logical drive: 0
Global Hot Spares: 0
[INFO ] Check for DOM0 with inactive Linux system disk
[INFO ] Valid DOM0 with inactive Linux system disk is detected
[INFO ] Number of partitions on the system device /dev/sda: 3
[INFO ] Higher partition number on the system device /dev/sda: 3
[INFO ] Last sector on the system device /dev/sda: 3509760000
[INFO ] End sector of the last partition on the system device /dev/sda: 3509759966
[INFO ] Remove inactive system logical volume /dev/VGExaDb/LVDbSys1
[INFO ] Remove logical volume /dev/VGExaDb/LVDbOra1
[INFO ] Extend logical volume /dev/VGExaDb/LVDbExaVMImages
[INFO ] Resize ocfs2 on logical volume /dev/VGExaDb/LVDbExaVMImages
[INFO ] XEN boot version and rpm versions are in sync
[INFO ] XEN EFI files will not be updated
[INFO ] Force setup grub
[root@node8 ~]#


Check the success of the reclaim disks procedure:

[root@node8 ~]# /opt/oracle.SupportTools/reclaimdisks.sh -check
Model is ORACLE SERVER X7-2
Number of LSI controllers: 1
Physical disks found: 4 (252:0 252:1 252:2 252:3)
Logical drives found: 1
Linux logical drive: 0
RAID Level for the Linux logical drive: 5
Physical disks in the Linux logical drive: 4 (252:0 252:1 252:2 252:3)
Dedicated Hot Spares for the Linux logical drive: 0
Global Hot Spares: 0
Valid. Disks configuration: RAID5 from 4 disks with no global and dedicated hot spare disks.
Valid. Booted: DOM0. Layout: DOM0.
[root@node8 ~]#


Upload the Oracle Exadata Database Machine Deployment Assistant configuration files to the database server, together with all software images, and run the One command procedure.

List of all Steps

[root@exatestdbadm01 linux-x64]# ./install.sh -cf TVD-exatest.xml -l
Initializing

1. Validate Configuration File
2. Update Nodes for Eighth Rack
3. Create Virtual Machine
4. Create Users
5. Setup Cell Connectivity
6. Calibrate Cells
7. Create Cell Disks
8. Create Grid Disks
9. Install Cluster Software
10. Initialize Cluster Software
11. Install Database Software
12. Relink Database with RDS
13. Create ASM Diskgroups
14. Create Databases
15. Apply Security Fixes
16. Install Exachk
17. Create Installation Summary
18. Resecure Machine
[root@exatestdbadm01 linux-x64]#


Run Step One to validate the setup

This example includes the creation of three different Clusters.

[root@exatestdbadm01 linux-x64]# ./install.sh -cf TVD-exatest.xml -s 1
Initializing
Executing Validate Configuration File
Validating cluster: Cluster-EFU
Locating machines...
Verifying operating systems...
Validating cluster networks...
Validating network connectivity...
Validating private ips on virtual cluster
Validating NTP setup...
Validating physical disks on storage cells...
Validating users...
Validating cluster: Cluster-PR1
Locating machines...
Verifying operating systems...
Validating cluster networks...
Validating network connectivity...
Validating private ips on virtual cluster
Validating NTP setup...
Validating physical disks on storage cells...
Validating users...
Validating cluster: Cluster-VAL
Locating machines...
Verifying operating systems...
Validating cluster networks...
Validating network connectivity...
Validating private ips on virtual cluster
Validating NTP setup...
Validating physical disks on storage cells...
Validating users...
Validating platinum...
Validating switches...
Checking disk reclaim status...
Checking Disk Tests Status....
Completed validation...

SUCCESS: Ip address: 10.x8.xx.40 is configured correctly
SUCCESS: Ip address: 10.x9.xx.55 is configured correctly
SUCCESS: Ip address: 10.x8.xx.41 is configured correctly
SUCCESS: Ip address: 10.x9.xx.56 is configured correctly
SUCCESS: Ip address: 10.x8.xx.45 is configured correctly
SUCCESS: Ip address: 10.x8.xx.46 is configured correctly
SUCCESS: Ip address: 10.x8.xx.44 is configured correctly
SUCCESS: Ip address: 10.x8.xx.43 is configured correctly
SUCCESS: Ip address: 10.x8.xx.42 is configured correctly
SUCCESS: 10.x8.xx.40 configured correctly on exatestceladm01.my.domain.com
SUCCESS: 10.x9.xx.55 configured correctly on exatestceladm01.my.domain.com
SUCCESS: 10.x8.xx.41 configured correctly on exatestceladm01.my.domain.com
SUCCESS: 10.x9.xx.56 configured correctly on exatestceladm01.my.domain.com
SUCCESS: 10.x8.xx.45 configured correctly on exatestceladm01.my.domain.com
SUCCESS: 10.x8.xx.46 configured correctly on exatestceladm01.my.domain.com
SUCCESS: 10.x8.xx.44 configured correctly on exatestceladm01.my.domain.com
SUCCESS: 10.x8.xx.43 configured correctly on exatestceladm01.my.domain.com
SUCCESS: 10.x8.xx.42 configured correctly on exatestceladm01.my.domain.com
SUCCESS: 10.x8.xx.40 configured correctly on exatestceladm02.my.domain.com
SUCCESS: 10.x9.xx.55 configured correctly on exatestceladm02.my.domain.com
SUCCESS: 10.x8.xx.41 configured correctly on exatestceladm02.my.domain.com
SUCCESS: 10.x9.xx.56 configured correctly on exatestceladm02.my.domain.com
SUCCESS: 10.x8.xx.45 configured correctly on exatestceladm02.my.domain.com
SUCCESS: 10.x8.xx.46 configured correctly on exatestceladm02.my.domain.com
SUCCESS: 10.x8.xx.44 configured correctly on exatestceladm02.my.domain.com
SUCCESS: 10.x8.xx.43 configured correctly on exatestceladm02.my.domain.com
SUCCESS: 10.x8.xx.42 configured correctly on exatestceladm02.my.domain.com
SUCCESS: 10.x8.xx.40 configured correctly on exatestceladm03.my.domain.com
SUCCESS: 10.x9.xx.55 configured correctly on exatestceladm03.my.domain.com
SUCCESS: 10.x8.xx.41 configured correctly on exatestceladm03.my.domain.com
SUCCESS: 10.x9.xx.56 configured correctly on exatestceladm03.my.domain.com
SUCCESS: 10.x8.xx.45 configured correctly on exatestceladm03.my.domain.com
SUCCESS: 10.x8.xx.46 configured correctly on exatestceladm03.my.domain.com
SUCCESS: 10.x8.xx.44 configured correctly on exatestceladm03.my.domain.com
SUCCESS: 10.x8.xx.43 configured correctly on exatestceladm03.my.domain.com
SUCCESS: 10.x8.xx.42 configured correctly on exatestceladm03.my.domain.com
SUCCESS: Ip address: 10.x8.xx.47 is configured correctly
SUCCESS: Ip address: 10.x9.xx.57 is configured correctly
SUCCESS: Ip address: 10.x8.xx.48 is configured correctly
SUCCESS: Ip address: 10.x9.xx.58 is configured correctly
SUCCESS: Ip address: 10.x8.xx.52 is configured correctly
SUCCESS: Ip address: 10.x8.xx.51 is configured correctly
SUCCESS: Ip address: 10.x8.xx.53 is configured correctly
SUCCESS: Ip address: 10.x8.xx.50 is configured correctly
SUCCESS: Ip address: 10.x8.xx.49 is configured correctly
SUCCESS: 10.x8.xx.47 configured correctly on exatestceladm01.my.domain.com
SUCCESS: 10.x9.xx.57 configured correctly on exatestceladm01.my.domain.com
SUCCESS: 10.x8.xx.48 configured correctly on exatestceladm01.my.domain.com
SUCCESS: 10.x9.xx.58 configured correctly on exatestceladm01.my.domain.com
SUCCESS: 10.x8.xx.52 configured correctly on exatestceladm01.my.domain.com
SUCCESS: 10.x8.xx.51 configured correctly on exatestceladm01.my.domain.com
SUCCESS: 10.x8.xx.53 configured correctly on exatestceladm01.my.domain.com
SUCCESS: 10.x8.xx.50 configured correctly on exatestceladm01.my.domain.com
SUCCESS: 10.x8.xx.49 configured correctly on exatestceladm01.my.domain.com
SUCCESS: 10.x8.xx.47 configured correctly on exatestceladm02.my.domain.com
SUCCESS: 10.x9.xx.57 configured correctly on exatestceladm02.my.domain.com
SUCCESS: 10.x8.xx.48 configured correctly on exatestceladm02.my.domain.com
SUCCESS: 10.x9.xx.58 configured correctly on exatestceladm02.my.domain.com
SUCCESS: 10.x8.xx.52 configured correctly on exatestceladm02.my.domain.com
SUCCESS: 10.x8.xx.51 configured correctly on exatestceladm02.my.domain.com
SUCCESS: 10.x8.xx.53 configured correctly on exatestceladm02.my.domain.com
SUCCESS: 10.x8.xx.50 configured correctly on exatestceladm02.my.domain.com
SUCCESS: 10.x8.xx.49 configured correctly on exatestceladm02.my.domain.com
SUCCESS: 10.x8.xx.47 configured correctly on exatestceladm03.my.domain.com
SUCCESS: 10.x9.xx.57 configured correctly on exatestceladm03.my.domain.com
SUCCESS: 10.x8.xx.48 configured correctly on exatestceladm03.my.domain.com
SUCCESS: 10.x9.xx.58 configured correctly on exatestceladm03.my.domain.com
SUCCESS: 10.x8.xx.52 configured correctly on exatestceladm03.my.domain.com
SUCCESS: 10.x8.xx.51 configured correctly on exatestceladm03.my.domain.com
SUCCESS: 10.x8.xx.53 configured correctly on exatestceladm03.my.domain.com
SUCCESS: 10.x8.xx.50 configured correctly on exatestceladm03.my.domain.com
SUCCESS: 10.x8.xx.49 configured correctly on exatestceladm03.my.domain.com
SUCCESS: Ip address: 10.x8.xx.54 is configured correctly
SUCCESS: Ip address: 10.x9.xx.59 is configured correctly
SUCCESS: Ip address: 10.x8.xx.55 is configured correctly
SUCCESS: Ip address: 10.x9.xx.60 is configured correctly
SUCCESS: Ip address: 10.x8.xx.58 is configured correctly
SUCCESS: Ip address: 10.x8.xx.60 is configured correctly
SUCCESS: Ip address: 10.x8.xx.59 is configured correctly
SUCCESS: Ip address: 10.x8.xx.57 is configured correctly
SUCCESS: Ip address: 10.x8.xx.56 is configured correctly
SUCCESS: 10.x8.xx.54 configured correctly on exatestceladm01.my.domain.com
SUCCESS: 10.x9.xx.59 configured correctly on exatestceladm01.my.domain.com
SUCCESS: 10.x8.xx.55 configured correctly on exatestceladm01.my.domain.com
SUCCESS: 10.x9.xx.60 configured correctly on exatestceladm01.my.domain.com
SUCCESS: 10.x8.xx.58 configured correctly on exatestceladm01.my.domain.com
SUCCESS: 10.x8.xx.60 configured correctly on exatestceladm01.my.domain.com
SUCCESS: 10.x8.xx.59 configured correctly on exatestceladm01.my.domain.com
SUCCESS: 10.x8.xx.57 configured correctly on exatestceladm01.my.domain.com
SUCCESS: 10.x8.xx.56 configured correctly on exatestceladm01.my.domain.com
SUCCESS: 10.x8.xx.54 configured correctly on exatestceladm02.my.domain.com
SUCCESS: 10.x9.xx.59 configured correctly on exatestceladm02.my.domain.com
SUCCESS: 10.x8.xx.55 configured correctly on exatestceladm02.my.domain.com
SUCCESS: 10.x9.xx.60 configured correctly on exatestceladm02.my.domain.com
SUCCESS: 10.x8.xx.58 configured correctly on exatestceladm02.my.domain.com
SUCCESS: 10.x8.xx.60 configured correctly on exatestceladm02.my.domain.com
SUCCESS: 10.x8.xx.59 configured correctly on exatestceladm02.my.domain.com
SUCCESS: 10.x8.xx.57 configured correctly on exatestceladm02.my.domain.com
SUCCESS: 10.x8.xx.56 configured correctly on exatestceladm02.my.domain.com
SUCCESS: 10.x8.xx.54 configured correctly on exatestceladm03.my.domain.com
SUCCESS: 10.x9.xx.59 configured correctly on exatestceladm03.my.domain.com
SUCCESS: 10.x8.xx.55 configured correctly on exatestceladm03.my.domain.com
SUCCESS: 10.x9.xx.60 configured correctly on exatestceladm03.my.domain.com
SUCCESS: 10.x8.xx.58 configured correctly on exatestceladm03.my.domain.com
SUCCESS: 10.x8.xx.60 configured correctly on exatestceladm03.my.domain.com
SUCCESS: 10.x8.xx.59 configured correctly on exatestceladm03.my.domain.com
SUCCESS: 10.x8.xx.57 configured correctly on exatestceladm03.my.domain.com
SUCCESS: 10.x8.xx.56 configured correctly on exatestceladm03.my.domain.com
SUCCESS: Validated NTP server 10.x3.xx.xx0
SUCCESS: Validated NTP server 10.x3.xx.xx1
SUCCESS: Required file /EXAVMIMAGES/onecommand/linux-x64/WorkDir/p28514222_122118_Linux-x86-64.zip exists...
SUCCESS: Required file /EXAVMIMAGES/onecommand/linux-x64/WorkDir/p28762988_12201181016GIOCT2018RU_Linux-x86-64.zip exists...
SUCCESS: Required file /EXAVMIMAGES/onecommand/linux-x64/WorkDir/p28762989_12201181016DBOCT2018RU_Linux-x86-64.zip exists...
SUCCESS: Required file config/exachk.zip exists...
SUCCESS: Found Operating system LinuxPhysical and configuration file expects LinuxPhysical on machine exatestceladm03.my.domain.com, machine type: storage
SUCCESS: Found Operating system LinuxPhysical and configuration file expects LinuxPhysical on machine exatestceladm02.my.domain.com, machine type: storage
SUCCESS: Found Operating system LinuxPhysical and configuration file expects LinuxPhysical on machine exatestceladm01.my.domain.com, machine type: storage
SUCCESS: Expected machine exatestdbadm01.my.domain.com to have OS Type of Linux Dom0, and found OsType LinuxDom0
SUCCESS: Expected machine exatestdbadm02.my.domain.com to have OS Type of Linux Dom0, and found OsType LinuxDom0
SUCCESS: NTP servers on machine exatestceladm02.my.domain.com verified successfully
SUCCESS: NTP servers on machine exatestceladm01.my.domain.com verified successfully
SUCCESS: NTP servers on machine exatestceladm03.my.domain.com verified successfully
SUCCESS: NTP servers on machine exatestdbadm01.my.domain.com verified successfully
SUCCESS: NTP servers on machine exatestdbadm02.my.domain.com verified successfully
SUCCESS: Sufficient memory for all the guests on database node exatestdbadm02.my.domain.com
SUCCESS: Sufficient memory for all the guests on database node exatestdbadm01.my.domain.com
SUCCESS: Expected machine exatestdbadm02.my.domain.com to have OS Type of Linux Dom0, and found OsType LinuxDom0
SUCCESS: Found Operating system LinuxPhysical and configuration file expects LinuxPhysical on machine exatestceladm01.my.domain.com, machine type: storage
SUCCESS: Found Operating system LinuxPhysical and configuration file expects LinuxPhysical on machine exatestceladm02.my.domain.com, machine type: storage
SUCCESS: Expected machine exatestdbadm01.my.domain.com to have OS Type of Linux Dom0, and found OsType LinuxDom0
SUCCESS: Found Operating system LinuxPhysical and configuration file expects LinuxPhysical on machine exatestceladm03.my.domain.com, machine type: storage
SUCCESS: NTP servers on machine exatestceladm03.my.domain.com verified successfully
SUCCESS: NTP servers on machine exatestceladm01.my.domain.com verified successfully
SUCCESS: NTP servers on machine exatestceladm02.my.domain.com verified successfully
SUCCESS: NTP servers on machine exatestdbadm02.my.domain.com verified successfully
SUCCESS: NTP servers on machine exatestdbadm01.my.domain.com verified successfully
SUCCESS: Sufficient memory for all the guests on database node exatestdbadm02.my.domain.com
SUCCESS: Sufficient memory for all the guests on database node exatestdbadm01.my.domain.com
SUCCESS: Found Operating system LinuxPhysical and configuration file expects LinuxPhysical on machine exatestceladm03.my.domain.com, machine type: storage
SUCCESS: Found Operating system LinuxPhysical and configuration file expects LinuxPhysical on machine exatestceladm02.my.domain.com, machine type: storage
SUCCESS: Found Operating system LinuxPhysical and configuration file expects LinuxPhysical on machine exatestceladm01.my.domain.com, machine type: storage
SUCCESS: Expected machine exatestdbadm02.my.domain.com to have OS Type of Linux Dom0, and found OsType LinuxDom0
SUCCESS: Expected machine exatestdbadm01.my.domain.com to have OS Type of Linux Dom0, and found OsType LinuxDom0
SUCCESS: NTP servers on machine exatestceladm03.my.domain.com verified successfully
SUCCESS: NTP servers on machine exatestceladm02.my.domain.com verified successfully
SUCCESS: NTP servers on machine exatestceladm01.my.domain.com verified successfully
SUCCESS: NTP servers on machine exatestdbadm01.my.domain.com verified successfully
SUCCESS: NTP servers on machine exatestdbadm02.my.domain.com verified successfully
SUCCESS: Sufficient memory for all the guests on database node exatestdbadm02.my.domain.com
SUCCESS: Sufficient memory for all the guests on database node exatestdbadm01.my.domain.com
SUCCESS: Switch IP 10.x9.xx.51 resolves successfully to host exatest-iba0.my.domain.com on node exatestceladm03.my.domain.com
SUCCESS:
SUCCESS: Switch IP 10.x9.xx.51 resolves successfully to host exatest-iba0.my.domain.com on node exatestceladm02.my.domain.com
SUCCESS: Switch IP 10.x9.xx.52 resolves successfully to host exatest-ibb0.my.domain.com on node exatestceladm03.my.domain.com
SUCCESS:
SUCCESS:
SUCCESS:
SUCCESS: Switch IP 10.x9.xx.52 resolves successfully to host exatest-ibb0.my.domain.com on node exatestceladm02.my.domain.com
SUCCESS:
SUCCESS: Switch IP 10.x9.xx.51 resolves successfully to host exatest-iba0.my.domain.com on node exatestceladm01.my.domain.com
SUCCESS: Switch IP 10.x9.xx.52 resolves successfully to host exatest-ibb0.my.domain.com on node exatestceladm01.my.domain.com
SUCCESS:
SUCCESS: X7 compute node exatestdbadm01.my.domain.com has updated Broadcom firmware
SUCCESS: X7 compute node exatestdbadm02.my.domain.com has updated Broadcom firmware
SUCCESS: Disk Tests are not running/active on any of the Storage Servers.
SUCCESS: Cluster Version 12.2.0.1.181016 is compatible with OL7 on exatestdbadm01
SUCCESS: Cluster Version 12.2.0.1.181016 is compatible with OL7 on exatestdbadm02
SUCCESS: Cluster Version 12.2.0.1.181016 is compatible with OL7 on exatestdbadm01
SUCCESS: Cluster Version 12.2.0.1.181016 is compatible with OL7 on exatestdbadm02
SUCCESS: Cluster Version 12.2.0.1.181016 is compatible with OL7 on exatestdbadm01
SUCCESS: Cluster Version 12.2.0.1.181016 is compatible with OL7 on exatestdbadm02
SUCCESS: Disk size 10000GB on cell exatestceladm01.my.domain.com matches the value specified in the OEDA configuration file
SUCCESS: Disk size 10000GB on cell exatestceladm02.my.domain.com matches the value specified in the OEDA configuration file
SUCCESS: Disk size 10000GB on cell exatestceladm03.my.domain.com matches the value specified in the OEDA configuration file
SUCCESS: Disk size 10000GB on cell exatestceladm04.my.domain.com matches the value specified in the OEDA configuration file
SUCCESS: Disk size 10000GB on cell exatestceladm05.my.domain.com matches the value specified in the OEDA configuration file
SUCCESS: Disk size 10000GB on cell exatestceladm06.my.domain.com matches the value specified in the OEDA configuration file
Successfully completed execution of step Validate Configuration File [elapsed Time [Elapsed = 250301 mS [4.0 minutes] Thu Mar 07 12:35:31 CET 2019]]
[root@exatestdbadm01 linux-x64]#


Execution of all remaining steps

Than, because we felt confident, we decide to invoke all remaining steps together:

root@exatestdbadm01 linux-x64]# ./install.sh -cf TVD-exatest.xml -r 1-18
...
..


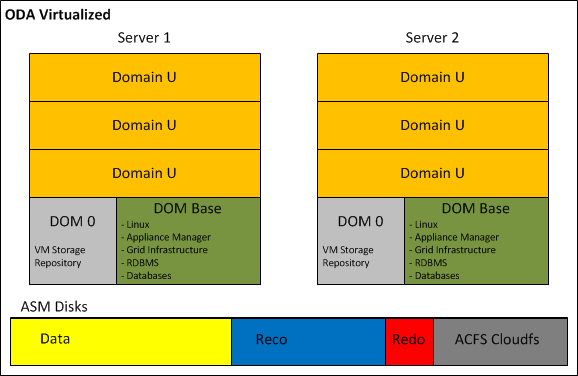
The final result is the Exadata Machine installed with six Oracle VMs, and three Grid Infrastructure clusters each one running a test RAC database.


Feedback of Modern Consolidated Database Environment


Since the launch of Oracle 12c R1 Beta Program (August 2012) at Trivadis, we have been intensively testing, engineering and implementing Multitenant architectures for our customers.

Today, we can provide our feedbacks and those of our customers!

The overall feedback related to Oracle Multitenant is very positive, customers have been able to increase flexibility and automation, improving the efficiency of the software development life cycles.

Even the Single-tenant configuration (free of charge) brings few advantages compared to the non-CDB architecture. Therefore, from a technology point of view I recommend adopting the Container Database (CDB) architecture for all Oracle databases.


Examples of Multitenant architectures implemented

Having defined Oracle Multitenant a technological revolution on the space of relational databases, when combined with others 12c features it becomes a game changer for flexibility, automation and velocity.

Here are listed few examples of successful architectures implemented with our customers, using Oracle Container Database (CDB):


  • Database consolidation without performance and stability compromise here.


  • Multitenant and DevOps here.


  • Operating Database Disaster Recovery in Multitenant environment here.


RHEL 7.4 fails to mount ACFS File System due to KMOD package

After a fresh OS installation or an upgrade to RHEL 7.4, any attempt to install ACFS drivers will fail with the following message: “ACFS-9459 ADVM/ACFS is not supported on this OS version”

The error persists even if the Oracle Grid Infrastructure software includes the  Patch 26247490: 12.2 ACFS MODULE ERRORS & CRASH DURING MODULE LOAD & UNLOAD WITH OL7U4 RHCK.


This problem has been identified by Oracle with  BUG 26320387 – 7.4 kmod weak-modules not checking kABI compatibility correctly

And by Red Hat  Bugzilla bug:  1477073 – 7.4 kmod weak-modules –dry-run changed output format missing ‘is compatible’ messages.

root@oel7node06:/u01/app/12.2.0.1/grid/crs/install# /u01/app/12.2.0.1/grid/bin/acfsroot install
ACFS-9459: ADVM/ACFS is not supported on this OS version: '3.10.0-514.6.1.el7.x86_64'

root@oel7node06:~# /sbin/lsmod | grep oracle
oracleadvm 776830 7
oracleoks 654476 1 oracleadvm
oracleafd 205543 1


The current Workaround consists in downgrade the version of the kmod  RPM to  kmod-20-9.el7.x86_64.

root@oel7node06:~# yum downgrade kmod-20-9.el7


After the package downgrade the ACFS drivers are correcly loaded:

root@oel7node06:~# /sbin/lsmod | grep oracle
oracleacfs 4597925 2
oracleadvm 776830 8
oracleoks 654476 2 oracleacfs,oracleadvm
oracleafd 205543 1


New Oracle version (12.2.0.1) old BUG!


In June 2016 I posted the following BUG: Bug on Oracle 12c Multitenant & PDB Clone as Snapshot Copypromising to post an update once the version 12cR2 is available, because in the service request, originally opened with the version 12.1.0.2 Oracle stated that the bug would be fixed in 12cR2.

I was so impatient, that just few hours after the general availability of the Oracle Database 12c Release 2  I created a new cluster and tested the resolution.


For the record, it states that the resolution of this bug is important for one of my clients, where we have implemented the snapshot PDB on the application development lifecycle.


So let’s see if the bug has been fixed!

SQL*Plus: Release 12.2.0.1.0 Production on Wed Mar 1 21:06:54 2017

Copyright (c) 1982, 2016, Oracle. All rights reserved.

Connected to:
Oracle Database 12c Enterprise Edition Release 12.2.0.1.0 - 64bit Production


SQL> CREATE PLUGGABLE DATABASE PDBACFS1_SNAP1 from PDBACFS1 SNAPSHOT COPY;

Pluggable database created.

SQL> ALTER PLUGGABLE DATABASE PDBACFS1_SNAP1 OPEN instances=all;

Pluggable database altered.

SQL> select CON_ID, NAME, OPEN_MODE, SNAPSHOT_PARENT_CON_ID from v$pdbs where NAME in ('PDBACFS1','PDBACFS1_SNAP1');

 CON_ID     NAME               OPEN_MODE  SNAPSHOT_PARENT_CON_ID
---------- ------------------- ---------- ----------------------
 5          PDBACFS1            READ WRITE
 6          PDBACFS1_SNAP1      READ WRITE               <-- This should be 5 but is NULL

2 rows selected.


To a certain point of view progress has been made, in version 12.1.0.2 the column SNAPSHOT_PARENT_CON_ID was always zero (0) now is null!

I’m sorry for my customer, I’ll keep testing hoping …


Oracle DB stored on ASM vs ACFS

Nowadays a new Oracle database environment with Grid Infrastructure has three main storage options:

  1. Third party clustered file system
  2. ASM Disk Groups
  3. ACFS File System

While the first option was not in scope, this blog compares the result of the tests between ASM and ACFS, highlighting when to use one or the other to store 12c NON-CDB or CDB Databases.

The tests conducted on different environments using Oracle version 12.1.0.2 July PSU have shown controversial results compared to what Oracle  is promoting for the Oracle Database Appliance (ODA) in the following paper: “Frequently Asked Questions Storing Database Files in ACFS on Oracle Database Appliance


Outcome of the tests

ASM remains the preferred option to achieve the best I/O performance, while ACFS introduces interesting features like DB snapshot to quickly and space efficiently provision new databases.

The performance gap between the two solutions is not negligible as reported below by the  AWR – TOP Timed Events sections of two PDBs, sharing the same infrastructure, executing the same workload but respectively using ASM and ACFS storage:

  • PDBASM: Pluggable Database stored on  ASM Disk Group
  • PDBACFS:Pluggable Database stored on ACFS File System


PDBASM AWR – TOP Timed Events and Other Stats

topevents_asm

fg_asm


PDBACFS AWR – TOP Timed Events and Other Stats

TopEvents_ACFS.png

fg_acfs


Due to the different characteristics and results when ASM or ACFS is in use, it is not possible to give a generic recommendation. But case by case the choise should be driven by business needs like maximum performance versus fast and efficient database clone.


New to Oracle Multitenant?

Multitenant is the biggest architectural change of Oracle 12c and the enabler of many new database options in the years to come. Therefore I have decided to write over the time, few blog posts with basic examples of what should be done and not in a multitenant database environment.


Rule #1   – What should not be done

If you are a CDB DBA, always pay attention to which container you are connected to and remember that application data should be stored on Application PDB only!

Unfortunately this golden rule is not-enforced by the RDBMS, but it is left in our responsibility as shown on the example below:

oracle@lxoel7n01:~/ [CDB_TEST] sqlplus / as sysdba

SQL*Plus: Release 12.1.0.2.0 Production on Wed Sep 21 18:28:23 2016

Copyright (c) 1982, 2014, Oracle. All rights reserved.


Connected to:
Oracle Database 12c Enterprise Edition Release 12.1.0.2.0 - 64bit Production
With the Partitioning, Automatic Storage Management, OLAP, Advanced Analytics
and Real Application Testing options

CDB$ROOT SQL>
CDB$ROOT SQL> show user
USER is "SYS"
CDB$ROOT SQL> show con_name

CON_NAME
------------------------------
CDB$ROOT


Once connected to the ROOT container let see if I can mistakenly create an application table:

CDB$ROOT SQL> CREATE TABLE EMP_1
(emp_id NUMBER,
emp_name VARCHAR2(25),
start_date DATE,
emp_status VARCHAR2(10) DEFAULT 'ACTIVE',
resume CLOB); 2 3 4 5 6

Table created.

CDB$ROOT SQL> desc emp_1
 Name                                Null?    Type
 ----------------------------------- -------- ----------------------------
 EMP_ID                                        NUMBER
 EMP_NAME                                      VARCHAR2(25)
 START_DATE                                    DATE
 EMP_STATUS                                    VARCHAR2(10)
 RESUME                                        CLOB


CDB$ROOT SQL> insert into emp_1 values (1, 'Emiliano', sysdate, 'active', ' ');

1 row created.

CDB$ROOT SQL> commit;

Commit complete.


CDB$ROOT SQL> select * from emp_1;

EMP_ID     EMP_NAME                  START_DAT EMP_STATUS RESUME
---------- ------------------------- --------- ---------- ----------------
 1          Emiliano                  21-SEP-16 active

CDB$ROOT SQL> show con_name

CON_NAME
------------------------------
CDB$ROOT

The answer is “YES” and the consequences can be devastating…


Rule #2   – Overview of Local and Common Entities

Non-schema entities can be created as local or common.  Local entities exist only in one PDB similar to a non-CDB architecture, while Common entities exist in every current and future container.

List of possible Local / Common entities in a Multitenant database:

  • Users
  • Roles
  • Profiles
  • Audit Policies

All Local entities are created from the local PDB and all Common entities are created from the CDB$ROOT container.

Common-user-defined Users, Roles and Profiles require a standard database prefix, defined by the spfile parameter COMMON_USER_PREFIX:

SQL> show parameter common_user_prefix

NAME                              TYPE        VALUE
--------------------------------- ----------- -----------------
common_user_prefix                string      C##


Example of Common User creation:

SQL> CREATE USER C##CDB_DBA1 IDENTIFIED BY PWD CONTAINER=ALL;

User created.


SQL> SELECT con_id, username, user_id, common

  2  FROM cdb_users where username='C##CDB_DBA1'  ORDER BY con_id;

    CON_ID USERNAME                USER_ID COMMON
---------- -------------------- ---------- ------
         1 C##CDB_DBA1               102    YES
         2 C##CDB_DBA1               101    YES
         3 C##CDB_DBA1               107    YES
         4 C##CDB_DBA1               105    YES
         5 C##CDB_DBA1               109    YES
         ...


Example of Local user creation:

SQL> show con_name

CON_NAME
------------------------------
MYPDB

SQL> CREATE USER application IDENTIFIED BY pwd CONTAINER=CURRENT;

User created.

If we try to create a Local User from the CDB$ROOT container the following error occurs: ORA-65049: creation of local user or role is not allowed in CDB$ROOT

SQL> show con_name

CON_NAME
------------------------------
CDB$ROOT

SQL> CREATE USER application IDENTIFIED BY pwd   CONTAINER=CURRENT;

CREATE USER application IDENTIFIED BY pwd   CONTAINER=CURRENT

                                      *

ERROR at line 1:
ORA-65049: creation of local user or role is not allowed in CDB$ROOT


Rule #3  – Application should connect through user-defined database services only

We have been avoiding to create user-defined database services for many years, sometimes even for RAC databases. But in Multitenet or Singletenant architecture the importance of user-defined database service is even greater. For each CDB and PDB Oracle is still automatically creating a default service, but as in the past the default services should never be exposed to the applications.


To create user-defined database service in stand-alone environment use the package DBMS_SERVICE while connected to the corresponding PDB:

BEGIN
 DBMS_SERVICE.CREATE_SERVICE(
     SERVICE_NAME     => 'mypdb_app.emilianofusaglia.net',
     NETWORK_NAME     => 'mypdb_app.emilianofusaglia.net',
     FAILOVER_METHOD  =>
     ...
      );
 DBMS_SERVICE.START_SERVICE('mypdp_app.emilianofusaglia.net ');
END;
/

The database services will not start automatically after opening a PDB!  Create a database trigger for this purpose.


To create user-defined database service in clustered environment use the srvctl utility from the corresponding RDBMS ORACLE_HOME:

oracle@oel7n01:~/ [EFU1] srvctl add service -db EFU \
> -pdb MYPDB -service mypdb_app.emilianofusaglia.net \
> -failovertype SELECT -failovermethod BASIC \
> -failoverdelay 2 -failoverretry 90


List all CDB database services order by Container ID:

SQL> SELECT con_id, name, pdb FROM v$services ORDER BY con_id;

    CON_ID NAME                                     PDB
---------- --------------------------------------- -----------------

         1 EFUXDB                                   CDB$ROOT   <-- CDB Default Service 
         1 SYS$BACKGROUND                           CDB$ROOT   <-- CDB Default Service 
         1 SYS$USERS                                CDB$ROOT   <-- CDB Default Service 
         1 EFU.emilianofusaglia.net                 CDB$ROOT   <-- CDB Default Service 
         1 EFU_ADMIN.emilianofusaglia.net           CDB$ROOT   <-- CDB User-defined Service  
         3 mypdb.emilianofusaglia.net               MYPDB      <-- PDB Default Service 
         3 mypdb_app.emilianofusaglia.net           MYPDB      <-- PDB User-defined Service  

7 rows selected.


EZCONNECT to a PDB using the user-defined service:

sqlplus <username>/<password>@<host_name>:<local-listener-port>/<service-name>
sqlplus application/pwd@oel7c-scan:1522/mypdb_app.emilianofusaglia.net


Rule #4  –  Backup/Recovery strategy in Multitenant

As database administrator one of the first responsibility to fulfil is the “Backup/Recovery” strategy. The migration to multitenant database, due to the high level of consolidation density requires to review existing procedures. Few infrastructure operations, like creating a Data Guard or executing a backup, have been shifted from per-database to per-container consolidating the number of tasks.

RMAN in 12c covers all CDB, PDB backup/restore combinations, even though the best practice suggests to run the daily backup at CDB level, and in case of restore needed, the granularity goes down to the single block of one PDB.  Below are reported few basic backup/restore operations in Multitenant environment.


Backup a full CDB:

RMAN> connect target /;
RMAN> backup database plus archivelog;


Backup a list of PDBs:

RMAN> connect target /;
RMAN> backup pluggable database mypdb, hrpdb plus archivelog;


Backup one PDB directly connecting to it:

RMAN> connect target sys/manager@mypdb.emilianofusaglia.net;
RMAN> backup incremental level 0 database;


Backup a PDB tablespace:

RMAN> connect target /;
RMAN> backup tablespace mypdb:system;


Generate RMAN report:

RMAN> report need backup pluggable database mypdb;


Complete PDB Restore

RMAN> connect target /;
RMAN> alter pluggable database mypdb close;
RMAN> restore pluggable database mypdb;
RMAN> recover pluggable database mypdb;
RMAN> alter pluggable database mypdb open;


Rule #5  –  Before moving to Multitenant

Oracle Multitenant has introduced many architectural changes that force the DBA to evolve how databases are administered. My last golden rule suggests to thoroughly study the multitenant/singletenant architecture before starting any implementation.

During my experiences implementing multitenant/singletenant architectures, I found great dependencies with the following database areas:

  • Provisioning/Decommissioning
  • Patching and Upgrade
  • Backup/recovery
  • Capacity Planning and Management
  • Tuning
  • Separation of duties between CDB and PDB


Bug on Oracle 12c Multitenant & PDB Clone as Snapshot Copy

While automating the refresh of the test databases on Oracle 12c Multitenant environment with ACFS and PDB snapshot copy, I encountered the following BUG:

The column SNAPSHOT_PARENT_CON_ID of the view V$PDBS shows 0 (zero) in case of PDBs created as Snapshot Copy.

This bug prevents to identify the parent-child relationship between a PDB and its own Snapshots Copies.

The test case below explains the problem:

SQL> CREATE PLUGGABLE DATABASE LARTE3SEFU from LARTE3 SNAPSHOT COPY; 
 
 Pluggable database created. 
 
 SQL> select CON_ID, NAME, OPEN_MODE, SNAPSHOT_PARENT_CON_ID from v$pdbs where NAME in ('LARTE3SEFU','LARTE3'); 
 
 CON_ID      NAME          OPEN_MODE  SNAPSHOT_PARENT_CON_ID 
 ---------- -------------- ---------- ---------------------- 
 5          LARTE3         READ ONLY  0 
 16         LARTE3SEFU     MOUNTED    0  <-- This should be 5
 
 2 rows selected. 

A Service Request to Oracle has been opened, I’ll update this post once I have the official answer.

Update from the Service Request: BUG Fixed on version 12.2

The “Great” ODA overwhelming the Exadata

Introduction

This article try to explain the technical reasons of the Oracle Database Appliance success, a well-known appliance with whom Oracle targets small and medium businesses, or specific departments of big companies looking for privacy and isolation from the rest of the IT. Nowadays this small and relatively cheap appliance (around 65’000$ price list) has evolved a lot, the storage has reached an important capacity 128TB raw expansible to 256TB, and the two X5-2 servers are the same used on the database node of the Exadata machine. Many customers, while defining the new database architecture evaluate the pros and cons of acquiring an ODA compared to the smallest Exadata configuration (one eight of a Rack). If the customer is not looking for a system with extreme performance and horizontal scalability beyond the two X5-2 servers, the Oracle Database Appliance is frequently the retained option.

Some of the ODA major features are:

  • High Availability: no single point of failure on all hardware and software components.
  • Performance: each server is equipped with 2×18-core Intel Xeon and 256GB of RAM extensible up to 768GB, cluster communication over InfiniBand. The shared storage offers a multi-tiers configuration with HDDs at 7.2K rpm and two type of SSDs for frequently accessed data and for database redo logs.
  • Flexibility & Scalability: running RAC, RAC One node and Single Instance databases.
  • Virtualized configuration: designed for offering Solution in-a-box, with high available virtual machines.
  • Optimized licensing model: pay-as-you-grow model activating a crescendo number of CPU-cores on demand, with the Bare Metal configuration; or capping the resources combining Oracle VM with the Hard Partitioning setup.
  • Time-to-market: no-matter if the ODA has to be installed bare metal or virtualized, this is a standardized and automated process generally completed in one or two day of work.
  • Price: the ODA is very competitive when comparing the cost to an equivalent commodity architecture; which in addition, must be engineered, integrated and maintained by the customer.


At the time of the writing of this article, the latest hardware model is ODA X5-2 and 12.1.2.6.0 is the software version. This HW and SW combination offers unique features, few of them not even available on the Exadata machine, like the possibility to host databases and applications in one single box, or the possibility to rapidly and space efficiently clone an 11gR2 and 12c database using ACFS Snapshot.


ODA HW & SW Architecture

Oracle Database Appliance is composed by two X5-2 servers and a shared storage shelf, which optionally can be doubled. Each Server disposes of: two 18-core Intel Xeon E5-2699 v3; 256GB RAM (optionally upgradable to 768GB) and two 600GB 10k rpm internal disks in RAID 1 for OS and software binaries.

This appliance is equipped with redundant networking connectivity up to 10Gb, redundant SAS HBAs and Storage I/O modules, redundant InfiniBand interconnect for cluster communication enabling 40 Gb/second server-to-server communication.

The software components are all part of Oracle “Red Stack” with Oracle Linux 6 UEK or OVM 3, Grid Infrastructure 12c, Oracle RDBMS 12c & 11gR2 and Oracle Appliance Manager.


ODA Front view

Components number 1 & 2 are the X5-2 Servers. Components 3 & 4 are the Storage and the optionally Storage extension.

ODA_Front


ODA Rear view

Highlight of the multiple redundant connections, including InfiniBand for Oracle Clusterware, ASM and RAC communications. No single point of HW or SW failure.

ODA_Back


Storage Organization

With 16x8TB SAS HDDs a total raw space of 128TB is available on each storage self (64TB in configuration ASM double-mirrored and 42.7TB with ASM triple-mirrored). To offer better I/O performance without exploding the price, Oracle has implemented the following SSD devices: 4x400GB ASM double-mirrored, for frequently accessed data, and 4x200GB ASM triple-mirrored, for database redo logs.

As shown on the picture aside, each rotating disk has two slices, the external, and more performant partition assigned to the +DATA ASM disk group, and the internal one allocated to +RECO ASM disk group.


ODA_Disk

This storage optimization allows the ODA to achieve competitive I/O performance. In a production-like environment, using the three type of disks, as per ODA Database template odb-24 (https://docs.oracle.com/cd/E22693_01/doc.12/e55580/sizing.htm), Trivadis has measured 12k I/O per second and a throughput of 2300 MB/s with an average latency of 10ms. As per Oracle documentation, the maximum number of I/O per second of the rotating disks, with a single storage shelf is 3300; but this value increases significantly relocating the hottest data files to +FLASH disk group created on SSD devices.


ACFS becomes the default database storage of ODA

Starting from the ODA software version 12.1.0.2, any fresh installation enforces ASM Cluster File System (ACFS) as lonely type of database storage support, restricting the supported database versions to 11.2.0.4 and greater. In case of ODA upgrade from previous release, all pre-existing databases are not automatically migrated to ACFS, but Oracle provides a tool called acfs_mig.pl for executing this mandatory step on all Non-CDB databases of version >= 11.2.0.4.

Oracle has decided to promote ACFS as default database storage on ODA environment for the following reasons:

  • ACFS provides almost equivalent performance than Oracle ASM disk groups.
  • Additional functionalities on industry standard POSIX file system.
  • Database snapshot copy of PDBs, and NON-CDB of version 11.2.0.4 or greater.
  • Advanced functionality for general-purpose files such as replication, tagging, encryption, security, and auditing.

Database created on ACFS follows the same Oracle Managed Files (OMF) standard used by ASM.

As in the past, the database provisioning requires the utilization of the command line interface oakcli and the selection of a database template, which defines several characteristics including the amount of space to allocate on each file system. Container and Non-Container databases can coexist on the same Oracle Database Appliance.

The ACFS file systems are created during the database provisioning process on top of the ASM disk groups +DATA, +RECO, +REDO, and optionally +FLASH. The file systems have two possible setups, depending on the database type Container or Non-Container.

  • Container database: for each CDB the ODA database-provisioning job creates dedicated ACFS file systems with the following characteristics:
Disk Characteristics ASM Disk group ACFS Mount Point
SAS Disk external partition +DATA /u02/app/oracle/oradata/datc<db_unique_name>
SAS Disk internal partition +RECO /u01/app/oracle/fast_recovery_area/rcoc<db_unique_name>
SSD Triple-mirrored +REDO /u01/app/oracle/oradata/rdoc<db_unique_name>
SSD Double-mirrored +FLASH (*) /u02/app/oracle/oradata/flashdata


  • Non-Container database: in case of Non-CDB the ODA database-provisioning job creates or resizes the following shared ACFS file systems:
Disk Characteristics ASM Disk group ACFS Mount Point
SAS Disk external partition +DATA /u02/app/oracle/oradata/datastore
SAS Disk internal partition +RECO /u01/app/oracle/fast_recovery_area/datastore
SSD Triple-mirrored +REDO /u01/app/oracle/oradata/datastore
SSD Double-mirrored +FLASH (*) /u02/app/oracle/oradata/flashdata

(*) Optionally used by the databases as Smart Flash Cache (extension of the SGA buffer cache), or allocated to store the hottest data files leveraging the I/O performance of the SSD disks.


Oracle Database Appliance Bare Metal

The bare metal configuration has been available since version one of the appliance, and nowadays it remains the default option proposed by Oracle, which pre-install the OS Linux on any new system. Very simple and intuitive to install thanks to the pre-built bundle software, which automates most of the steps. At the end of the installation, the architecture is very similar to any other two node RAC setup based on commodity hardware; but even from an operation point of view there are great advantages, because the Oracle Appliance Manager framework simplifies and accelerates the execution of almost any system and database administrator task.

Here below is depicted the ODA architecture when the bare metal configuration is in use:

ODA_Bare_Metal


Oracle Database Appliance Virtualized

When the ODA is deployed with the virtualization, both servers run Oracle VM Server, also called Dom0. Each Dom0 hosts in a local dedicated repository the ODA Base (or Dom Base), a privileged virtual machine where it is installed the Appliance Manager, Grid Infrastructure and RDBMS binaries. The ODA Base takes advantage of the Xen PCI Pass-through technology to provide direct access to the ODA shared disks presented and managed by ASM. This configuration reduces the VM flexibility; in fact, no VM migration is allowed for the two ODA Base, but it guarantees almost no I/O penalty in term of performance. With the Dom Base setup, the basic installation is completed and it is possible to start provisioning databases using Oracle Appliance Manager.

At the same time, the administrator can create new-shared repositories hosted on ACFS and NFS exported to the hypervisor for hosting the application virtual machines. Those application virtual machines are also identified with the name of Domain U.  The Domain U and the templates can be stored on a local or shared Oracle VM Server repository, but to enable the functionality to migrate between the two Oracle VM Servers a shared repository on the ACFS file system should be used.

Even when the virtualization is in use, Oracle Appliance Manager is the only framework for system and database administration tasks like repository creation, import of template, deployment of virtual machine, network configuration, database provisioning and so on, relieving the administrator from all complexity.

The implementation of the Solution-in-a-box guarantees the maximum Return on Investment of the ODA; in fact, while restricting the virtual CPUs to license on the Dom Base it allows relocating spare resources to the application virtual machines as showed on the picture below.

ODA_Virtualized


ODA compared to Exadata Machine and Commodity Hardware

As described on the previous sections, Oracle Database Appliance offers unique features such as pay-as-you-grow, solution-in-a-box and so on, which can heavily influence the decision for a new database architecture. The aim of the table below is to list the main architecture characteristics to evaluate while defining a new database infrastructure, comparing the result between Oracle Database Appliance, Exadata Machine and a Commodity Architecture based on Intel Linux engineered to run RAC databases.

Table_Architectures

As shown by the different scores of the three architectures, each solution comes with points of strength and weakness; about the Oracle Database Appliance, it is evident that due to its characteristics, the smallest Oracle Engineered System remains a great option for small, medium database environments.


Conclusion

I hope this article keep the initial promise to explain the technical reasons of the Oracle Database Appliance success, and it has highlighted the great work done by Oracle, engineering this solution on the edge of the technology keeping the price under control.

One last summary of what in my opinion are the major benefits offered by the ODA:

  • Time-to-market: Thanks to automated processes and pre-build software images, the deployment phase is extremely rapid.
  • Simplicity: The use of standard software components, combined to the appliance orchestrator Oracle Appliance Manager makes the ODA very simple to operate.
  • Standardization & Automation: The Appliance Manager encapsulates and automatizes all repeatable and error-prone tasks like provisioning, decommissioning, patching and so on.
  • Vendor certified platform: Oracle validates and certifies the compatibility among all HW & SW components.
  • Evolution: Over the time, the ODA benefits of specific bug fixing and software evolution (introduced by Oracle though the quarterly patch sets); keeping the system on the edge for longer time when compared to a commodity architecture.

Troubleshooting not mounting ACFS File System

The ACSF /cloufs was created and registered on the CRS, following node reboot the file system was no longer mounting!


I logged on ASMCMD and checked the status of the ASM Volume:

[grid@rednodech07 ~]$ asmcmd
ASMCMD> volinfo -a
Diskgroup Name: FRA

 Volume Name: VOL_CLOUDFS
 Volume Device: ERROR
 State: DISABLED
 Size (MB): 20480
 Resize Unit (MB): 32
 Redundancy: MIRROR
 Stripe Columns: 4
 Stripe Width (K): 128
 Usage: ACFS
 Mountpath: /cloudfs

The output of the command above shows that the volume VOL_CLOUDFS is DISABLED. I tried manually  to restart it, but I got the following error:

ASMCMD> volenable -a
ORA-15032: not all alterations performed
ORA-15477: cannot communicate with the volume driver (DBD ERROR: OCIStmtExecute)
ASMCMD>


Then I checked if the ACFS kernel module where loaded into the Linux kernel:

  • oracleacfs (oracleacfs.ko): manages all ACFS filesystem operations.
  •  oracleavdm (oracleavdm.ko): AVDM module enabling direct interface with the filesystem
  • oracleoks (oracleoks.ko): provides memory management, lock and cluster synchronization
[root@rednodech07 ~]# /sbin/lsmod | grep oracle


Because the kernel modules were not loaded, I tried to manally load with the command

/bin/acfsload start

But it didn’t work, so I stopped the Grid Instrastruceure on the local node and I have reinstalled the ACFS drivers:

[root@rednodech07 asm]# /u01/GRID/11.2.0.4/bin/crsctl stop crs
CRS-2791: Starting shutdown of Oracle High Availability Services-managed resources on 'rednodech07'
CRS-2673: Attempting to stop 'ora.crsd' on 'rednodech07'
CRS-2790: Starting shutdown of Cluster Ready Services-managed resources on 'rednodech07'
CRS-2673: Attempting to stop 'ora.LISTENER.lsnr' on 'rednodech07'
CRS-2673: Attempting to stop 'ora.LISTENER_SCAN1.lsnr' on 'rednodech07'
CRS-2673: Attempting to stop 'ora.cvu' on 'rednodech07'
CRS-2673: Attempting to stop 'ora.oc4j' on 'rednodech07'
CRS-2673: Attempting to stop 'ora.LISTENER_SCAN2.lsnr' on 'rednodech07'
CRS-2673: Attempting to stop 'ora.LISTENER_SCAN3.lsnr' on 'rednodech07'
CRS-2673: Attempting to stop 'ora.GRID.dg' on 'rednodech07'
CRS-2673: Attempting to stop 'ora.tvdtst.db' on 'rednodech07'
CRS-2677: Stop of 'ora.cvu' on 'rednodech07' succeeded
CRS-2677: Stop of 'ora.LISTENER.lsnr' on 'rednodech07' succeeded
CRS-2673: Attempting to stop 'ora.rednodech07.vip' on 'rednodech07'
CRS-2677: Stop of 'ora.LISTENER_SCAN1.lsnr' on 'rednodech07' succeeded
CRS-2673: Attempting to stop 'ora.scan1.vip' on 'rednodech07'
CRS-2677: Stop of 'ora.LISTENER_SCAN2.lsnr' on 'rednodech07' succeeded
CRS-2673: Attempting to stop 'ora.scan2.vip' on 'rednodech07'
CRS-2677: Stop of 'ora.LISTENER_SCAN3.lsnr' on 'rednodech07' succeeded
CRS-2673: Attempting to stop 'ora.scan3.vip' on 'rednodech07'
CRS-2677: Stop of 'ora.tvdtst.db' on 'rednodech07' succeeded
CRS-2673: Attempting to stop 'ora.DATA.dg' on 'rednodech07'
CRS-2673: Attempting to stop 'ora.FRA.dg' on 'rednodech07'
CRS-2677: Stop of 'ora.DATA.dg' on 'rednodech07' succeeded
CRS-2677: Stop of 'ora.FRA.dg' on 'rednodech07' succeeded
CRS-2677: Stop of 'ora.rednodech07.vip' on 'rednodech07' succeeded
CRS-2677: Stop of 'ora.scan1.vip' on 'rednodech07' succeeded
CRS-2677: Stop of 'ora.scan2.vip' on 'rednodech07' succeeded
CRS-2677: Stop of 'ora.oc4j' on 'rednodech07' succeeded
CRS-2677: Stop of 'ora.scan3.vip' on 'rednodech07' succeeded
CRS-2677: Stop of 'ora.GRID.dg' on 'rednodech07' succeeded
CRS-2673: Attempting to stop 'ora.asm' on 'rednodech07'
CRS-2677: Stop of 'ora.asm' on 'rednodech07' succeeded
CRS-2673: Attempting to stop 'ora.ons' on 'rednodech07'
CRS-2677: Stop of 'ora.ons' on 'rednodech07' succeeded
CRS-2673: Attempting to stop 'ora.net1.network' on 'rednodech07'
CRS-2677: Stop of 'ora.net1.network' on 'rednodech07' succeeded
CRS-2792: Shutdown of Cluster Ready Services-managed resources on 'rednodech07' has completed
CRS-2677: Stop of 'ora.crsd' on 'rednodech07' succeeded
CRS-2673: Attempting to stop 'ora.crf' on 'rednodech07'
CRS-2673: Attempting to stop 'ora.ctssd' on 'rednodech07'
CRS-2673: Attempting to stop 'ora.evmd' on 'rednodech07'
CRS-2673: Attempting to stop 'ora.asm' on 'rednodech07'
CRS-2673: Attempting to stop 'ora.mdnsd' on 'rednodech07'
CRS-2677: Stop of 'ora.crf' on 'rednodech07' succeeded
CRS-2677: Stop of 'ora.evmd' on 'rednodech07' succeeded
CRS-2677: Stop of 'ora.ctssd' on 'rednodech07' succeeded
CRS-2677: Stop of 'ora.mdnsd' on 'rednodech07' succeeded
CRS-2677: Stop of 'ora.asm' on 'rednodech07' succeeded
CRS-2673: Attempting to stop 'ora.cluster_interconnect.haip' on 'rednodech07'
CRS-2677: Stop of 'ora.cluster_interconnect.haip' on 'rednodech07' succeeded
CRS-2673: Attempting to stop 'ora.cssd' on 'rednodech07'
CRS-2677: Stop of 'ora.cssd' on 'rednodech07' succeeded
CRS-2673: Attempting to stop 'ora.gipcd' on 'rednodech07'
CRS-2677: Stop of 'ora.gipcd' on 'rednodech07' succeeded
CRS-2673: Attempting to stop 'ora.gpnpd' on 'rednodech07'
CRS-2677: Stop of 'ora.gpnpd' on 'rednodech07' succeeded
CRS-2793: Shutdown of Oracle High Availability Services-managed resources on 'rednodech07' has completed
CRS-4133: Oracle High Availability Services has been stopped.
[root@rednodech07 asm]#


[root@rednodech07 ~]# /u01/GRID/11.2.0.4/bin/acfsroot install
ACFS-9300: ADVM/ACFS distribution files found.
ACFS-9312: Existing ADVM/ACFS installation detected.
ACFS-9314: Removing previous ADVM/ACFS installation.
ACFS-9315: Previous ADVM/ACFS components successfully removed.
ACFS-9307: Installing requested ADVM/ACFS software.
ACFS-9308: Loading installed ADVM/ACFS drivers.
ACFS-9321: Creating udev for ADVM/ACFS.
ACFS-9323: Creating module dependencies - this may take some time.
ACFS-9154: Loading 'oracleoks.ko' driver.
ACFS-9154: Loading 'oracleadvm.ko' driver.
ACFS-9154: Loading 'oracleacfs.ko' driver.
ACFS-9327: Verifying ADVM/ACFS devices.
ACFS-9156: Detecting control device '/dev/asm/.asm_ctl_spec'.
ACFS-9156: Detecting control device '/dev/ofsctl'.
ACFS-9309: ADVM/ACFS installation correctness verified.
[root@rednodech07 ~]#


At this point I have restarted the Grid Infrastructure, the ACFS kernel modules got loaded  and the ASM Volume State become ENABLED.

[root@rednodech07 ~]# /u01/GRID/11.2.0.4/bin/crsctl start crs
CRS-4123: Oracle High Availability Services has been started.


[root@rednodech07 ~]# /sbin/lsmod | grep oracle
oracleacfs 1994567 0
oracleadvm 243254 0
oracleoks 460313 2 oracleacfs,oracleadvm

[grid@rednodech07 ~]$ asmcmd
ASMCMD> volinfo -a
Diskgroup Name: FRA

 Volume Name: VOL_CLOUDFS
 Volume Device: /dev/asm/vol_cloudfs-390
 State: ENABLED
 Size (MB): 20480
 Resize Unit (MB): 32
 Redundancy: MIRROR
 Stripe Columns: 4
 Stripe Width (K): 128
 Usage: ACFS
 Mountpath: /cloudfs

ASMCMD>

It remained to restart the ACFS File system with the following command:

[root@rednodech07 /]# /bin/mount -t acfs /dev/asm/vol_cloudfs-390 /cloudfs

[oracle@rednodech07 duplicate_tcswu]$ mount
/dev/mapper/vg_rednodech07-lv_root on / type ext4 (rw)
proc on /proc type proc (rw)
sysfs on /sys type sysfs (rw)
devpts on /dev/pts type devpts (rw,gid=5,mode=620)
tmpfs on /dev/shm type tmpfs (rw)
/dev/sdbc1 on /boot type ext4 (rw)
/dev/mapper/vg_rednodech07-lv_home on /home type ext4 (rw)
/dev/mapper/vg_rednodech07-lv_tmp on /tmp type ext4 (rw)
/dev/mapper/vg_rednodech07-lv_u01 on /u01 type ext4 (rw)
/dev/mapper/vg_rednodech07-lv_var on /var type ext4 (rw)
none on /proc/sys/fs/binfmt_misc type binfmt_misc (rw)
/dev/asm/vol_cloudfs-390 on /cloudfs type acfs (rw)


How to Create and Clone PDBs

################################################
## How to create a PDB Database from Seed DB  ##
################################################

CREATE PLUGGABLE DATABASE pdb01
  ADMIN USER pdb_adm IDENTIFIED BY <password> ROLES=(DBA)
  PATH_PREFIX = '/u01/'
  STORAGE (MAXSIZE 20G MAX_SHARED_TEMP_SIZE 2048M)
  FILE_NAME_CONVERT = ('+DATA01','+DATA02')
  DEFAULT TABLESPACE users DATAFILE '+DATA02' SIZE 10G AUTOEXTEND ON MAXSIZE 20G
  TEMPFILE REUSE;

ALTER PLUGGABLE DATABASE pdb01 OPEN;  


##################################################
## How to clone a PDB Database running on ASM   ##
##################################################

ALTER PLUGGABLE DATABASE pdb01 CLOSE;  
ALTER PLUGGABLE DATABASE pdb01 OPEN READ ONLY;

CREATE PLUGGABLE DATABASE pdb02 FROM pdb01;

ALTER PLUGGABLE DATABASE pdb01 OPEN READ WRITE;
ALTER PLUGGABLE DATABASE pdb02 OPEN READ WRITE;


##################################################
## How to clone a PDB Database using ACFS Snapshot Copy
##################################################
 
ALTER PLUGGABLE DATABASE pdb03 CLOSE;
ALTER PLUGGABLE DATABASE pdb03 OPEN READ ONLY;
 
 
CREATE PLUGGABLE DATABASE pdb04 FROM pdb03
FILE_NAME_CONVERT = ('/u03/oradata/CDB2/pdb03/','/u03/oradata/CDB2/pdb04/')
SNAPSHOT COPY;

ALTER PLUGGABLE DATABASE pdb03 CLOSE;
ALTER PLUGGABLE DATABASE pdb03 OPEN READ WRITE;
ALTER PLUGGABLE DATABASE pdb04 OPEN READ WRITE;
Featured

ASM 12c

A powerful framework for storage management


1 INTRODUCTION

Oracle Automatic Storage Management (ASM) is a well-known, largely used multi-platform volume manager and file system, designed for single-instance and clustered environment. Developed for managing Oracle database files with optimal performance and native data protection, simplifying the storage management; nowadays ASM includes several functionalities for general-purpose files too.
This article focuses on the architecture and characteristics of the version 12c, where great changes and enhancements of pre-existing capabilities have been introduced by Oracle.
Dedicated sections explaining how Oracle has leveraged ASM within the Oracle Engineered Systems complete the paper.


1.1 ASM 12c Instance Architecture Diagram

Below are highlighted the functionalities and the main background components associated to an ASM instance. It is important to notice how starting from Oracle 12c a database can run within ASM Disk Groups or on top of ASM Cluster file systems (ACFS).


ASM_db


Overview ASM options available in Oracle 12c.

ACFS


1.2       ASM 12c Multi-Nodes Architecture Diagram

In a Multi-node cluster environment, ASM 12c is now available in two configurations:

  • 11gR2 like: with one ASM instance on each Grid Infrastructure node.
  • Flex ASM: a new concept, which leverages the architecture availability and performance of the cluster; removing the 1:1 hard dependency between cluster node and local ASM instance. With Flex ASM only few nodes of the cluster run an ASM instance, (the default cardinality is 3) and the database instances communicate with ASM in two possible way: locally or over the ASM Network. In case of failure of one ASM instance, the databases automatically and transparently reconnect to another surviving instance on the cluster. This major architectural change required the introduction of two new cluster resources, ASM-Listener for supporting remote client connections and ADVM-Proxy, which permits the access to the ACFS layer. In case of wide cluster installation, Flex ASM enhances the performance and the scalability of the Grid Infrastructure, reducing the amount of network traffic generated between ASM instances.


Below two graphical representations of the same Oracle cluster; on the first drawing ASM is configured with pre-12c setup, on the second one Flex ASM is in use.

ASM architecture 11gR2 like

01_NO_FlexASM_Drawing


Flex ASM architecture

01_FlexASM_Drawing


2  ASM 12c NEW FEATURES

The table below summarizes the list of new functionalities introduced on ASM 12c R1

Feature Definition
Filter Driver Filter Driver (Oracle ASMFD) is a kernel module that resides in the I/O

path of the Oracle ASM disks used to validate write I/O requests to Oracle ASM disks, eliminates accidental overwrites of Oracle ASM disks that would cause corruption. For example, the Oracle ASM Filter Driver filters out all non-Oracle I/Os which could cause accidental overwrites.

General ASM Enhancements –       Oracle ASM now replicates physically addressed metadata, such as the disk header and allocation tables, within each disk, offering a better protection against bad block disk sectors and external corruptions.

–       Increased storage limits: ASM can manage up to 511 disk groups and a maximum disk size of 32 PB.

–       New REPLACE clause on the ALTER DISKGROUP statement.

Disk Scrubbing Disk scrubbing checks logical data corruptions and repairs the corruptions automatically in normal and high redundancy disks groups. This process automatically starts during rebalance operations or the administrator can trigger it.
Disk Resync Enhancements It enables fast recovery from instance failure and faster resyncs performance. Multiple disks can be brought online simultaneously. Checkpoint functionality enables to resume from the point where the process was interrupted.
Even Read For Disk Groups If ASM mirroring is in use, each I/O request submitted to the system can be satisfied by more than one disk. With this feature, each request to read is sent to the least loaded of the possible source disks.
ASM Rebalance Enhancements The rebalance operation has been improved in term of scalability, performance, and reliability; supporting concurrent operations on multiple disk groups in a single instance.  In this version, it has been enhanced also the support for thin provisioning, user-data validation, and error handling.
ASM Password File in a Disk Group ASM Password file is now stored within the ASM disk group.
Access Control Enhancements on Windows It is now possible to use access control to separate roles in Windows environments. With Oracle Database services running as users rather than Local System, the Oracle ASM access control feature is enabled to support role separation on Windows.
Rolling Migration Framework for ASM One-off Patches This feature enhances the rolling migration framework to apply oneoff patches released for ASM in a rolling manner, without affecting the overall availability of the cluster or the database


Updated Key Management Framework This feature updates Oracle key management commands to unify the key management application programming interface (API) layer. The updated key management framework makes interacting with keys in the wallet easier and adds new key metadata that describes how the keys are being used.


2.1 ASM 12c Client Cluster

One more ASM functionality explored but still in phase of development and therefore not really documented by Oracle, is ASM Client Cluster

Designed to host applications requiring cluster functionalities (monitoring, restart and failover capabilities), without the need to provision local shared storage.

The ASM Client Cluster installation is available as configuration option of the Grid Infrastructure binaries, starting from version 12.1.0.2.1 with Oct. 2014 GI PSU.

The use of ASM Client Cluster imposes the following pre-requisites and limitations:

  • The existence of an ASM Server Cluster version 12.1.0.2.1 with Oct. 2014 GI PSU, configured with the GNS server with or without zone delegation.
  • The ASM Server Cluster becomes aware of the ASM Client Cluster by importing an ad hoc XML configuration containing all details.
  • The ASM Client Cluster uses the OCR, Voting Files and Password File of the ASM Server Cluster.
  • ASM Client Cluster communicates with the ASM Server Cluster over the ASM Network.
  • ASM Server Cluster provides remote shared storage to ASM Client Cluster.


As already mentioned, at the time of writing this feature is still under development and without official documentation available, the only possible comment is that the ASM Client Cluster looks similar to another option introduced by Oracle 12c and called Flex Cluster. In fact, Flex Cluster has the concept of HUB and LEAF nodes; the first used to run database workload with direct access to the ASM disks and the second used to host applications in HA configuration but without direct access to the ASM disks.


3  ACFS NEW FEATURES

In Oracle 12c the Automatic Storage Management Cluster File System supports more and more types of files, offering advanced functionalities like snapshot, replication, encryption, ACL and tagging.  It is also important to highlight that this cluster file system comply with the POSIX standards of Linux/UNIX and with the Windows standards.

Access to ACFS from outside the Grid Infrastructure cluster is granted by NFS protocol; the NFS export can be registered as clusterware resource becoming available from any of the cluster nodes (HANFS).

Here is an exhaustive list of files supported by ACFS: executables, trace files, logs, application reports, BFILEs, configuration files, video, audio, text, images, engineering drawings, general-purpose and Oracle database files.

The major change, introduced in this version of ACFS, is definitely the capability and support to host Oracle database files; granting access to a set of functionalities that in the past were restricted to customer files only. Among them, the most important is the snapshot image, which has been fully integrated with the database Multitenant architecture, allowing cloning entire Pluggable databases in few seconds, independently from the size and in space efficient way using copy-on-write technology.

The snapshots are created and immediately available in the “<FS_mount_point>.ASFS/snaps” directory, and can be generated and later converted from read-only to read/write and vice versa. In addition, ACFS supports nested snapshots.


Example of ACFS snapshot copy:

-- Create a read/write Snapshot copy
[grid@oel6srv02 bin]$ acfsutil snap create -w cloudfs_snap /cloudfs

-- Display Snapshot Info
[grid@oel6srv02 ~]$ acfsutil snap info cloudfs_snap /cloudfs
snapshot name:               cloudfs_snap
RO snapshot or RW snapshot:  RW
parent name:                 /cloudfs
snapshot creation time:      Wed May 27 16:54:53 2015

-- Display specific file info 
[grid@oel6srv02 ~]$ acfsutil info file /cloudfs/scripts/utl_env/NEW_SESSION.SQL
/cloudfs/scripts/utl_env/NEW_SESSION.SQL
flags:        File
inode:        42
owner:        oracle
group:        oinstall
size:         684
allocated:    4096
hardlinks:    1
device index: 1
major, minor: 251,91137
access time:  Wed May 27 10:34:18 2013
modify time:  Wed May 27 10:34:18 2013
change time:  Wed May 27 10:34:18 2013
extents:
-offset ----length | -dev --------offset
0       4096 |    1     1496457216
extent count: 1

--Convert the snapshot from Read/Write to Read-only
acfsutil snap convert -r cloudfs_snap /cloudfs

 --Drop the snapshot 
[grid@oel6srv02 ~]$ acfsutil snap delete cloudfs_snap /cloudfs

Example of Pluggable database cloned using ACFS snapshot copy List of requirements that must be met to use ACFS SNAPSHOT COPY clause:

      • All pluggable database files of the source PDB must be stored on ACFS.


      • The source PDB cannot be in a remote CDB.


      • The source PDB must be in read-only mode.


      • Dropping the parent PDB with the including datafiles clause, does not automatically remove the snapshot dependencies, manual intervention is required.


SQL> CREATE PLUGGABLE DATABASE pt02 FROM ppq01
2  FILE_NAME_CONVERT = ('/u02/oradata/CDB4/PPQ01/',
3                       '/u02/oradata/CDB4/PT02/')
4  SNAPSHOT COPY;
Pluggable database created.
Elapsed: 00:00:13.70

The PDB snapshot copy imposes few restrictions among which the source database opened in read-only. This requirement prevents the implementation on most of the production environments where the database must remain available in read/write 24h/7. For this reason, ACFS for database files is particularly recommended on test and development where flexibility, speed and space efficiency of the clones are key factors for achieving high productive environment.

Graphical representation of how efficiently create and maintain a Test & Development database environment:

DB_Snapshot


4 ASM 12c and ORACLE ENGINEERED SYSTEMS

Oracle has developed few ASM features to leverage the characteristics of the Engineered Systems. Analyzing the architecture of the Exadata Storage, we see how the unique capabilities of ASM make possible to stripe and mirror data across independent set of disks grouped in different Storage Cells.

The sections below describe the implementation of ASM on the Oracle Database Appliance (ODA) and Exadata systems.


4.1 ASM 12c on Oracle Database Appliance

Oracle Database Appliance is a simple, reliable and affordable system engineered for running database workloads. One of the key characteristics present since the first version is the pay-as-you-grow model; it permits to activate a crescendo number of CPU-cores when needed, optimizing the licensing cost. With the new version of the ODA software bundle, Oracle has introduced the configuration Solution-in-a-box; which includes the virtualization layer for hosting Oracle databases and application components on the same appliance, but on separate virtual machines. The next sections highlight how the two configurations are architected and the role played by ASM:

  • ODA Bare metal: available since version one of the appliance, this is still the default configuration proposed by Oracle. Beyond the automated installation process, it is like any other two-node cluster, with all ASM and ACFS features available.


ODA_Bare_Metal


  • ODA Virtualized: on both ODA servers runs the Oracle VM Server software, also called Dom0. Each Dom0 hosts the ODA Base (or Dom Base), a privileged virtual machine where it is installed the Appliance Manager, Grid Infrastructure and RDBMS binaries. The ODA Base takes advantage of the Xen PCI Pass-through technology to provide direct access to the ODA shared disks presented and managed by ASM. This configuration reduces the VM flexibility; in fact, no VM migration is allowed, but it guarantees almost no I/O penalty in term of performance. After the Dom Base creation, it is possible to add Virtual Machine where running application components. Those optional application virtual machines are also identified with the name of Domain U.

By default, all VMs and templates are stored on a local Oracle VM Server repository, but in order to be able to migrate application virtual machines between the two Oracle VM Servers a shared repository on the ACFS file system should be created.

The implementation of the Solution-in-a-box guarantees the maximum Return on Investment of the ODA, because while licensing only the virtual CPUs allocated to Dom Base, the remaining resources are assigned to the application components as showed on the picture below.

ODA_Virtualized


4.2 ACFS Becomes the default database storage of ODA

Starting from Version 12.1.0.2, a fresh installation of the Oracle Database Appliance adopts ACFS as primary cluster file system to store database files and general-purpose data. Three file systems are created in the ASM disk groups (DATA, RECO, and REDO) and the new databases are stored in these three ACFS file systems instead of in the ASM disk groups.

In case of ODA upgrade from previous release to 12.1.0.2, all pre-existing databases are not automatically migrated to ACFS; but can coexist with the new databases created on ACFS.

At any time, the databases can be migrated from ASM to ACFS as post upgrade step.

Oracle has decided to promote ACFS as default database storage on ODA environment for the following reasons:


  • ACFS provides almost equivalent performance than Oracle ASM disk groups.
  • Additional functionalities on industry standard POSIX file system.
  • Database snapshot copy of PDBs, and NON-CDB version 11.2.0.4 of greater.
  • Advanced functionality for general-purpose files such as replication, tagging, encryption, security, and auditing.

Database created on ACFS follows the same Oracle Managed Files (OMF) standard used by ASM.


4.3 ASM 12c on Exadata Machine

Oracle Exadata Database machine is now at the fifth hardware generation; the latest software update has embraced the possibility to run virtual environments, but differently from the ODA or other Engineered System like Oracle Virtual Appliance, the VMs are not intended to host application components. ASM plays a key role on the success of the Exadata, because it orchestrates all Storage Cells in a way that appear as a single entity, while in reality, they do not know and they do not talk to each other.

The Exadata, available in a wide range of hardware configurations from 1/8 to multi-racks, offers a great flexibility on the storage setup too. The sections below illustrate what is possible to achieve in term of storage configuration when the Exadata is exploited bare metal and virtualized:

  • Exadata Bare Metal: despite the default storage configuration, which foresees three disk groups striped across all Storage Cells, guaranteeing the best I/O performance; as post-installation step, it is possible to deploy a different configuration. Before changing the storage setup, it is vital to understand and evaluate all associated consequences. In fact, even though in specific cases can be a meaningful decision, any storage configuration different from the default one, has as result a shift from optimal performance to flexibility and workload isolation.

Shown below a graphical representation of the default Exadata storage setup, compared to a custom configuration, where the Storage Cells have been divided in multiple groups, segmenting the I/O workloads and avoiding disruption between environments.

Exa_BareMetal_Disks_Default

Exa_BareMetal_Disks_Segmented.png

  • Exadata Virtualized: the installation of the Exadata with the virtualization option foresees a first step of meticulous capacity planning, defining the resources to allocate to the virtual machines (CPU and memory) and the size of each ASM disk group (DBFS, Data, Reco) of the clusters. This last step is particularly important, because unlike the VM resources, the characteristics of the ASM disk groups cannot be changed.

The new version of the Exadata Deployment Assistant, which generates the configuration file to submit to the Exadata installation process, now in conjunction with the use of Oracle Virtual Machines, permits to enter the information related to multiple Grid Infrastructure clusters.

The hardware-based I/O virtualization (so called Xen SR-IOV Virtualization), implemented on the Oracle VMs running on the Exadata Database servers, guarantees almost native I/O and Networking performance over InfiniBand; with lower CPU consumption when compared to a Xen Software I/O virtualization. Unfortunately, this performance advantage comes at the detriment of other virtualization features like Load Balancing, Live Migration and VM Save/Restore operations.

If the Exadata combined with the virtualization open new horizon in term of database consolidation and licensing optimization, do not leave any option to the storage configuration. In fact, the only possible user definition is the amount of space to allocate to each disk group; with this information, the installation procedure defines the size of the Grid Disks on all available Storage Cells.

Following a graphical representation of the Exadata Storage Cells, partitioned for holding three virtualized clusters. For each cluster, ASM access is automatically restricted to the associated Grid Disks.

Exa_BareMetal_Disk_Virtual


4.4 ACFS on Linux Exadata Database Machine

Starting from version 12.1.0.2, the Exadata Database Machine running Oracle Linux, supports ACFS for database file and general-purpose, with no functional restriction.

This makes ACFS an attractive storage alternative for holding: external tables, data loads, scripts and general-purpose files.

In addition, Oracle ACFS on Exadata Database Machines supports database files for the following database versions:

  • Oracle Database 10g Rel. 2 (10.2.0.4 and 10.2.0.5)
  • Oracle Database 11g (11.2.0.4 and higher)
  • Oracle Database 12c (12.1.0.1 and higher)

Since Exadata Storage Cell does not support database version 10g, ACFS becomes an important storage option for customers wishing to host older databases on their Exadata system.

However, those new configuration options and flexibility come with one major performance restriction. When ACFS for database files is in use, the Exadata is still not supporting the Smart Scan operations and is not able to push database operations directly to the storage. Hence, for a best performance result, it is recommended to store database files on the Exadata Storage using ASM disk groups.

As per any other system, when implementing ACFS on Exadata Database Machine, snapshots and tagging are supported for database and general-purpose files, while replication, security, encryption, audit and high availability NFS functionalities are only supported with general-purpose files.


 5 Conclusion

Oracle Automatic Storage Management 12c is a single integrated solution, designed to manage database files and general-purpose data under different hardware and software configurations. The adoption of ASM and ACFS not only eliminates the need for third party volume managers and file systems, but also simplifies the storage management offering the best I/O performance, enforcing Oracle best practices. In addition, ASM 12c with the Flex ASM setup removes previous important architecture limitations:

  • Availability: the hard dependency between the local ASM and database instance, was a single point of failure. In fact, without Flex ASM, the failure of the ASM instance causes the crash of all local database instances.
  • Performance: Flex ASM reduces the network traffic generated among the ASM instances, leveraging the architecture scalability; and it is easier and faster to keep the ASM metadata synchronized across large clusters. Finally yet importantly, only few nodes of the cluster have to support the burden of an ASM instance, leaving additional resources to application processing.


Oracle ASM offers a large set of configurations and options; it is now our duty to understand case-by-case, when it is relevant to use one setup or another, with the aim to maximize performance, availability and flexibility of the infrastructure.


ASM 11gR2 Create ACFS Cluster FS

#####################################################
##           Step by step how to create Oracle ACFS Cluster Filesystem       ##
#####################################################

[grid@lnxcld02 trace]$ asmcmd


  Type "help [command]" to get help on a specific ASMCMD command.

        commands:
        --------

        md_backup, md_restore

        lsattr, setattr

        cd, cp, du, find, help, ls, lsct, lsdg, lsof, mkalias
        mkdir, pwd, rm, rmalias

        chdg, chkdg, dropdg, iostat, lsdsk, lsod, mkdg, mount
        offline, online, rebal, remap, umount

        dsget, dsset, lsop, shutdown, spbackup, spcopy, spget
        spmove, spset, startup

        chtmpl, lstmpl, mktmpl, rmtmpl

        chgrp, chmod, chown, groups, grpmod, lsgrp, lspwusr, lsusr
        mkgrp, mkusr, orapwusr, passwd, rmgrp, rmusr

        volcreate, voldelete, voldisable, volenable, volinfo
        volresize, volset, volstat


ASMCMD>     
ASMCMD> volcreate -G FRA1 -s 5G Vol_ACFS01
ASMCMD> volinfo -a
Diskgroup Name: FRA1

         Volume Name: VOL_ACFS01
         Volume Device: /dev/asm/vol_acfs01-199
         State: ENABLED
         Size (MB): 5120
         Resize Unit (MB): 32
         Redundancy: UNPROT
         Stripe Columns: 4
         Stripe Width (K): 128
         Usage:
         Mountpath:

ASMCMD> volenable -a
ASMCMD>
ASMCMD> exit


[grid@lnxcld02 trace]$ acfsdriverstate version
ACFS-9325:     Driver OS kernel version = 2.6.18-8.el5(i386).
ACFS-9326:     Driver Oracle version = 110803.1.
[grid@lnxcld02 trace]$ acfsdriverstate loaded
ACFS-9203: true


SQL> SELECT volume_name, volume_device FROM V$ASM_VOLUME;

VOLUME_NAME                    VOLUME_DEVICE
------------------------------ ----------------------------------------
VOL_ACFS01                     /dev/asm/vol_acfs01-199

1 row selected.

---------------------------------------------------------------------------------

[root@lnxcld02 adump]# ls -la /dev/asm/vol_acfs01-199
brwxrwx--- 1 root asmadmin 252, 101889 Nov  1 20:03 /dev/asm/vol_acfs01-199

[root@lnxcld02 adump]# mkdir /cloud_FS
[root@lnxcld01 adump]# mkdir /cloud_FS


[root@lnxcld02 adump]# mkfs -t acfs /dev/asm/vol_acfs01-199
mkfs.acfs: version                   = 11.2.0.3.0
mkfs.acfs: on-disk version           = 39.0
mkfs.acfs: volume                    = /dev/asm/vol_acfs01-199
mkfs.acfs: volume size               = 5368709120
mkfs.acfs: Format complete.


[root@lnxcld02 adump]# acfsutil registry -a -f /dev/asm/vol_acfs01-199 /cloud_FS
acfsutil registry: mount point /cloud_FS successfully added to Oracle Registry


[root@lnxcld02 adump]# df -h
Filesystem            Size  Used Avail Use% Mounted on
/dev/hda1              11G  3.6G  6.0G  38% /
/dev/hdb1              12G  7.2G  3.9G  66% /home
tmpfs                 1.5G  634M  867M  43% /dev/shm
Oracle_Software       293G  180G  114G  62% /media/sf_Oracle_Software
/dev/hdc               40G   18G    22  45% /u01
/dev/asm/vol_acfs01-199
                      5.0G   75M  5.0G   2% /cloud_FS


SQL> select * from v$asm_volume;

GROUP_NUMBER VOLUME_NAME                    COMPOUND_INDEX    SIZE_MB VOLUME_NUMBER REDUND STRIPE_COLUMNS STRIPE_WIDTH_K STATE            FILE_NUMBER
------------ ------------------------------ -------------- ---------- ------------- ------ -------------- -------------- ---------------- -----------
INCARNATION DRL_FILE_NUMBER RESIZE_UNIT_MB USAGE                          VOLUME_DEVICE                            MOUNTPATH
----------- --------------- -------------- ------------------------------ ---------------------------------------- --------------------
           2 VOL_ACFS01                           33554433       5120             1 UNPROT              4            128 ENABLED                  270   
766094623               0             32    ACFS                           /dev/asm/vol_acfs01-199                  /cloud_FS


1 row selected.


Installation Oracle Grid Infrastrucure 12c

####################################

LINUX Setup click here

####################################

Setup OS

– Disable the Firewall

[root@oel6srv01 ~]# service iptables save
[root@oel6srv01 ~]# service iptables stop
[root@oel6srv01 ~]# chkconfig iptables off
[root@oel6srv01 ~]# service iptables status
-- If you are using IPv6 firewall, enter:
 [root@oel6srv01 ~]# service ip6tables save
 [root@oel6srv01 ~]# service ip6tables stop
 [root@oel6srv01 ~]# chkconfig ip6tables off
 [root@oel6srv01 ~]# service ip6tables status


– Disable the SELinux

[root@oel6srv01 ~]# vi /etc/sysconfig/selinux


– DISABLED kdump

[root@oel6srv01 ~]# chkconfig kdump on
[root@oel6srv01 ~]# chkconfig --list |grep kdump
kdump           0:off   1:off   2:off   3:off   4:off   5:off   6:off


– Network Setup

Public Cluster interphases, VIPs and SCAN

Subnet 10.0.0.x
Netmask 255.255.255.0

Private Cluster interphases

Subnet  192.168.0.x
Netmask 255.255.255.0


– Kernel add or amend the following lines  to the “/etc/sysctl.conf” file.

# vi /etc/sysctl.conf
fs.aio-max-nr = 1048576
 fs.file-max = 6815744
 kernel.shmall = 2097152
 kernel.shmmax = 1062637568
 kernel.shmmni = 4096
 # semaphores: semmsl, semmns, semopm, semmni
 kernel.sem = 250 32000 100 128
 net.ipv4.ip_local_port_range = 9000 65500
 net.core.rmem_default=262144
 net.core.rmem_max=4194304
 net.core.wmem_default=262144
 net.core.wmem_max=1048586
--Activate the current Kernel parameters:
/sbin/sysctl -p

– Add the following lines to /etc/security/limits.conf

# vi  /etc/security/limits.conf
## Go to the end
 grid     soft     nproc      2047
 grid     hard     nproc     16384
 grid     soft     nofile     1024
 grid     hard     nofile    65536
 oracle   soft     nproc      2047
 oracle   hard     nproc     16384
 oracle   soft     nofile     1024
 oracle   hard     nofile    65536

– Add the following line to /etc/pam.d/login

# vi /etc/pam.d/login
session     required    pam_limits.so


– Disable secure linux

–making sure the SELINUX flag is set as follows.

# vi /etc/selinux/config
SELINUX=disabled


– NTP Setup

–If you are using NTP, you must add the “-x” option into the following line in the “/etc/sysconfig/ntpd” file.

# vi /etc/sysconfig/ntpd
OPTIONS="-x -u ntp:ntp -p /var/run/ntpd.pid"
# service ntpd restart
 -- OR STOP NTP SERVER the Grid will start CSSD in Active mode instead of Observe:
 # service ntpd stop
 # chkconfig ntpd off
---------------------------------------------
 - Mandatory Packages for Oracle Linux 6  and Red Hat Enterprise Linux 6
 ---------------------------------------------
 binutils-2.20.51.0.2-5.11.el6 (x86_64)
 compat-libcap1-1.10-1 (x86_64)
 compat-libstdc++-33-3.2.3-69.el6 (x86_64)
 compat-libstdc++-33-3.2.3-69.el6.i686
 gcc-4.4.4-13.el6 (x86_64)
 gcc-c++-4.4.4-13.el6 (x86_64)
 glibc-2.12-1.7.el6 (i686)
 glibc-2.12-1.7.el6 (x86_64)
 glibc-devel-2.12-1.7.el6 (x86_64)
 glibc-devel-2.12-1.7.el6.i686
 ksh
 libgcc-4.4.4-13.el6 (i686)
 libgcc-4.4.4-13.el6 (x86_64)
 libstdc++-4.4.4-13.el6 (x86_64)
 libstdc++-4.4.4-13.el6.i686
 libstdc++-devel-4.4.4-13.el6 (x86_64)
 libstdc++-devel-4.4.4-13.el6.i686
 libaio-0.3.107-10.el6 (x86_64)
 libaio-0.3.107-10.el6.i686
 libaio-devel-0.3.107-10.el6 (x86_64)
 libaio-devel-0.3.107-10.el6.i686
 make-3.81-19.el6
 sysstat-9.0.4-11.el6 (x86_64)

–Install the cvuqdisk RPM. Without cvuqdisk, Cluster Verification Utility cannot discover shared disks,
–and it raises the following error message “Package cvuqdisk not installed” when Cluster Verification Utility is executed.

–A copy of the cvuqdisk  package is present on the 1st Grid Infrastructure ZIP file.

— Log in as root.

  1. Use the following command to find if you have an existing version of the cvuqdisk package:
# rpm -qi cvuqdisk

2.  If you have an existing version, then enter the following command to deinstall the existing version:

rpm -e cvuqdisk

  1. Set the environment variable CVUQDISK_GRP to point to the group that will own cvuqdisk, typically oinstall. For example:
# CVUQDISK_GRP=oinstall; export CVUQDISK_GRP
4. Install the cvuqdisk package:
rpm -iv package
# rpm -iv cvuqdisk-1.0.9-1.rpm
--OR
you install oracle-rdbms-server-12cR1-preinstall


– OPTIONAL RPMs

--Minimum ODBC Drivers for Oracle and Red Hat Linux 6 on x86-64
 unixODBC-2.2.14-11.el6 (64-bit) or later
 unixODBC-devel-2.2.14-11.el6 (64-bit) or later

– UNIX Groups

/usr/sbin/groupadd -g 1000 oinstall
/usr/sbin/groupadd -g 1001 asmadmin
/usr/sbin/groupadd -g 1002 dba
/usr/sbin/groupadd -g 1003 asmdba
/usr/sbin/groupadd -g 1004 asmoper

–New optional roles which grant access to specific features like Data Guard, RMAN and Security have been added in 12c, but not implemented in this example.


– UNIX Users

useradd -u 1100 -g oinstall -G asmadmin,asmdba,asmoper grid
useradd -u 1101 -g oinstall -G asmdba,dba oracle


– Set SSH timeout wait to unlimited

# vi /etc/ssh/sshd_config
LoginGraceTime 0


– Create the u01 file system

[root@oel6srv01 ~]# fdisk /dev/sdb
The number of cylinders for this disk is set to 2871.
 There is nothing wrong with that, but this is larger than 1024,
 and could in certain setups cause problems with:
 1) software that runs at boot time (e.g., old versions of LILO)
 2) booting and partitioning software from other OSs
 (e.g., DOS FDISK, OS/2 FDISK)
Command (m for help): n
 Command action
 e   extended
 p   primary partition (1-4)
 p
Partition number (1-4): 1
 First cylinder (1-2871, default 1):
 Using default value 1
 Last cylinder or +size or +sizeM or +sizeK (1-2871, default 2871):
 Using default value 2871
Command (m for help): w
 The partition table has been altered!
Calling ioctl() to re-read partition table.
WARNING: Re-reading the partition table failed with error 16: Device or resource busy.
 The kernel still uses the old table.
 The new table will be used at the next reboot.
 Syncing disks.
 [root@oel6srv01 ~]#
 [root@oel6srv01 ~]# fdisk -l
Disk /dev/sda: 21.4 GB, 21474836480 bytes
 255 heads, 63 sectors/track, 2610 cylinders
 Units = cylinders of 16065 * 512 = 8225280 bytes
Device Boot      Start         End      Blocks   Id  System
 /dev/sda1   *           1          13      104391   83  Linux
 /dev/sda2              14        2610    20860402+  8e  Linux LVM
Disk /dev/sdb: 23.6 GB, 23622320128 bytes
 255 heads, 63 sectors/track, 2871 cylinders
 Units = cylinders of 16065 * 512 = 8225280 bytes
Device Boot      Start         End      Blocks   Id  System
 /dev/sdb1               1        2871    23061276   83  Linux
[root@oel6srv01 ~]# mkfs.ext4 /dev/sdb1
 mke4fs 1.41.12 (17-May-2010)
 Filesystem label=
 OS type: Linux
 Block size=4096 (log=2)
 Fragment size=4096 (log=2)
 Stride=0 blocks, Stripe width=0 blocks
 1441792 inodes, 5765319 blocks
 288265 blocks (5.00%) reserved for the super user
 First data block=0
 Maximum filesystem blocks=4294967296
 176 block groups
 32768 blocks per group, 32768 fragments per group
 8192 inodes per group
 Superblock backups stored on blocks:
 32768, 98304, 163840, 229376, 294912, 819200, 884736, 1605632, 2654208,
 4096000
Writing inode tables: done
 Creating journal (32768 blocks): done
 Writing superblocks and filesystem accounting information: done
This filesystem will be automatically checked every 37 mounts or
 180 days, whichever comes first.  Use tune4fs -c or -i to override.
 [root@oel6srv01 ~]#
[root@oel6srv01 /]# mkdir u01
 [root@oel6srv01 /]# cat /etc/fstab
..
..
/dev/sdb1               /u01                    ext4    defaults        0 0
[root@oel6srv01 /]# mount /u01
 [root@oel6srv01 /]# df -h
Filesystem            Size  Used Avail Use% Mounted on
/dev/mapper/VolGroup00-LogVol00
 15G  3.2G   12G  22% /
 /dev/sda1              99M   24M   71M  25% /boot
 tmpfs                 1.3G     0  1.3G   0% /dev/shm
 /dev/sdb1              22G  172M   21G   1% /u01

– Creation of GI and RDBMS directories

mkdir -p /u01/GRID/12.1.0.1
 mkdir -p /u01/app/product/12.1.0.1
#Oracle Base
 chown -R oracle:oinstall /u01/app
 chmod -R 775 /u01/app
#Oracle RDBMS Home
 chown -R oracle:oinstall /u01/app/product/12.1.0.1
 chmod -R 775 /u01/app/product/12.1.0.1
#Grid Home
 chown -R grid:oinstall /u01/GRID
 chmod -R 775 /u01/GRID/12.1.0.1

– Add this entries to the generic User Profile

# vi /etc/profile
if [ $USER = "oracle" ] || [ $USER = "grid" ]; then
 if [ $SHELL = "/bin/ksh" ]; then
 ulimit -p 16384
 ulimit -n 65536
 else
 ulimit -u 16384 -n 65536
 fi
 umask 022
 fi
 if [ $USER = "root" ]; then
 umask 022
 fi

— Configure the shared storage for ASM

##########################################################
##  Installation Oracle Grid Infrastructure
##########################################################

--Run 12c Cluvfy with the following options to verify that all prerequisites are met:
 ./runcluvfy.sh stage -post hwos -n oel6srv01,oel6srv02,oel6srv03,oel6srv04 -verbose

# Start the Grid Installation…..

[grid@oel6srv01 grid]$ ./runInstaller
 Starting Oracle Universal Installer...
Checking Temp space: must be greater than 120 MB.   Actual 39776 MB    Passed
 Checking swap space: must be greater than 150 MB.   Actual 4031 MB    Passed
 Checking monitor: must be configured to display at least 256 colors.    Actual 16777216    Passed
 Preparing to launch Oracle Universal Installer from /tmp/OraInstall2013-06-25_08-23-26PM. Please wait ..


##############################################################
##  Grid Infrastructure crsctl output
##############################################################

[grid@oel6srv01 ~]$ crsctl stat res -t
 --------------------------------------------------------------------------------
 Name           Target  State        Server                   State details
 --------------------------------------------------------------------------------
 Local Resources
 --------------------------------------------------------------------------------
 ora.ASMNET2LSNR_ASM.lsnr
 ONLINE  ONLINE       oel6srv01                STABLE
 ONLINE  ONLINE       oel6srv02                STABLE
 ONLINE  ONLINE       oel6srv03                STABLE
 ONLINE  ONLINE       oel6srv04                STABLE
 ora.DATA1.VOL_CLOUD01.advm
 ONLINE  ONLINE       oel6srv01                Volume device /dev/a
 sm/vol_cloud01-178 i
 s online,STABLE
 ONLINE  ONLINE       oel6srv02                Volume device /dev/a
 sm/vol_cloud01-178 i
 s online,STABLE
 ONLINE  ONLINE       oel6srv03                Volume device /dev/a
 sm/vol_cloud01-178 i
 s online,STABLE
 ONLINE  ONLINE       oel6srv04                Volume device /dev/a
 sm/vol_cloud01-178 i
 s online,STABLE
 ora.DATA1.dg
 OFFLINE OFFLINE      oel6srv01               STABLE
 OFFLINE OFFLINE      oel6srv02               STABLE
 ONLINE  ONLINE       oel6srv03                STABLE
 ONLINE  ONLINE       oel6srv04                STABLE
 ora.FRA1.dg
 OFFLINE OFFLINE      oel6srv01               STABLE
 OFFLINE OFFLINE      oel6srv02               STABLE
 ONLINE  ONLINE       oel6srv03                STABLE
 ONLINE  ONLINE       oel6srv04                STABLE
 ora.LISTENER.lsnr
 ONLINE  ONLINE       oel6srv01                STABLE
 ONLINE  ONLINE       oel6srv02                STABLE
 ONLINE  ONLINE       oel6srv03                STABLE
 ONLINE  ONLINE       oel6srv04                STABLE
 ora.OCRVOTING.dg
 OFFLINE OFFLINE      oel6srv01               STABLE
 OFFLINE OFFLINE      oel6srv02               STABLE
 ONLINE  ONLINE       oel6srv03                STABLE
 ONLINE  ONLINE       oel6srv04                STABLE
 ora.data1.vol_cloud01.acfs
 ONLINE  ONLINE       oel6srv01                mounted on /cloudfs,
 STABLE
 ONLINE  ONLINE       oel6srv02                mounted on /cloudfs,
 STABLE
 ONLINE  ONLINE       oel6srv03                mounted on /cloudfs,
 STABLE
 ONLINE  ONLINE       oel6srv04                mounted on /cloudfs,
 STABLE
 ora.net1.network
 ONLINE  ONLINE       oel6srv01                STABLE
 ONLINE  ONLINE       oel6srv02                STABLE
 ONLINE  ONLINE       oel6srv03                STABLE
 ONLINE  ONLINE       oel6srv04                STABLE
 ora.ons
 ONLINE  ONLINE       oel6srv01                STABLE
 ONLINE  ONLINE       oel6srv02                STABLE
 ONLINE  ONLINE       oel6srv03                STABLE
 ONLINE  ONLINE       oel6srv04                STABLE
 ora.proxy_advm
 ONLINE  ONLINE       oel6srv01                STABLE
 ONLINE  ONLINE       oel6srv02                STABLE
 ONLINE  ONLINE       oel6srv03                STABLE
 ONLINE  ONLINE       oel6srv04                STABLE
 --------------------------------------------------------------------------------
 Cluster Resources
 --------------------------------------------------------------------------------
 ora.LISTENER_SCAN1.lsnr
 1        ONLINE  ONLINE       oel6srv04                STABLE
 ora.MGMTLSNR
 1        ONLINE  ONLINE       oel6srv04                169.254.25.188 192.1
 68.0.114 192.168.0.1
 24,STABLE
 ora.asm
 1        ONLINE  ONLINE       oel6srv04                STABLE
 3        ONLINE  ONLINE       oel6srv03                STABLE
 ora.cvu
 1        ONLINE  ONLINE       oel6srv04                STABLE
 ora.mgmtdb
 1        ONLINE  ONLINE       oel6srv04                Open,STABLE
 ora.oc4j
 1        ONLINE  ONLINE       oel6srv01                STABLE
 ora.oel6srv01.vip
 1        ONLINE  ONLINE       oel6srv01                STABLE
 ora.oel6srv02.vip
 1        ONLINE  ONLINE       oel6srv02                STABLE
 ora.oel6srv03.vip
 1        ONLINE  ONLINE       oel6srv03                STABLE
 ora.oel6srv04.vip
 1        ONLINE  ONLINE       oel6srv04                STABLE
 ora.scan1.vip
 1        ONLINE  ONLINE       oel6srv04                STABLE
 --------------------------------------------------------------------------------

ASM Commands

################################################################
# Adding/Removing/Managing ASM instances
################################################################

--Use the following syntax to add configuration information about an existing ASM instance:
 srvctl add asm -n node_name -i +asm_instance_name -o oracle_home

--Use the following syntax to remove an ASM instance:
 srvctl remove asm -n node_name [-i +asm_instance_name]

--Use the following syntax to enable an ASM instance:
 srvctl enable asm -n node_name [-i ] +asm_instance_name

--Use the following syntax to disable an ASM instance:
 srvctl disable asm -n node_name [-i +asm_instance_name]

--Use the following syntax to start an ASM instance:
 srvctl start asm -n node_name [-i +asm_instance_name] [-o start_options]

--Use the following syntax to stop an ASM instance:
 srvctl stop asm -n node_name [-i +asm_instance_name] [-o stop_options]

--Use the following syntax to show the configuration of an ASM instance:
 srvctl config asm -n node_name

--Use the following syntax to obtain the status of an ASM instance:
 srvctl status asm -n node_name

P.S.:

For all of the SRVCTL commands in this section for which an option is not required, if the instance name “-i” is not specified the command applies  to all ASM instances.


###################################
# Managing DiskGroup inside ASM:
###################################

–Note that adding or dropping disks will initiate a rebalance of the data on the disks.
–The status of these processes can be shown by selecting from v$asm_operation.

--Quering ASM Disk Groups
 col name format a25
 col DATABASE_COMPATIBILITY format a10
 col COMPATIBILITY format a10
 select * from v$asm_diskgroup;
 --or
 select name, state, type, total_mb, free_mb from v$asm_diskgroup;
--Quering ASM Disks
 col PATH format a55
 col name format a25
 select name, path, group_number, TOTAL_MB, FREE_MB, READS, WRITES, READ_TIME,
 WRITE_TIME from v$asm_disk order by 3,1;
 --or
 col PATH format a50
 col HEADER_STATUS  format a12
 col name format a25
 --select INCARNATION,
 select name, path, MOUNT_STATUS,HEADER_STATUS, MODE_STATUS, STATE, group_number,
 OS_MB, TOTAL_MB, FREE_MB, READS, WRITES, READ_TIME, WRITE_TIME, BYTES_READ,
 BYTES_WRITTEN, REPAIR_TIMER, MOUNT_DATE, CREATE_DATE from v$asm_disk;


################################################################
# Tuning and Analysis
################################################################

–Performance Statistics

–N.B Time in Hundred seconds!

 col READ_TIME format 9999999999.99
 col WRITE_TIME format 9999999999.99
 col BYTES_READ format 99999999999999.99
 col BYTES_WRITTEN  format 99999999999999.99
 select name, STATE, group_number, TOTAL_MB, FREE_MB,READS, WRITES, READ_TIME,
 WRITE_TIME, BYTES_READ, BYTES_WRITTEN, REPAIR_TIMER,MOUNT_DATE
 from v$asm_disk order by group_number, name;


--Check the Num of Extents in use per Disk inside one Disk Group.
 select max(substr(name,1,30)) group_name, count(PXN_KFFXP) extents_per_disk,
 DISK_KFFXP, GROUP_KFFXP from x$kffxp, v$ASM_DISKGROUP gr
 where GROUP_KFFXP=&group_nr and GROUP_KFFXP=GROUP_NUMBER
 group by GROUP_KFFXP, DISK_KFFXP order by GROUP_KFFXP, DISK_KFFXP;

--Find The File distribution Between Disks
 SELECT * FROM v$asm_alias  WHERE  name='PWX_DATA.272.669293645';

SELECT GROUP_KFFXP Group#,DISK_KFFXP Disk#,AU_KFFXP AU#,XNUM_KFFXP Extent#
 FROM   X$KFFXP WHERE  number_kffxp=(SELECT file_number FROM v$asm_alias
 WHERE name='PWX_DATA.272.669293645');

--or

SELECT GROUP_KFFXP Group#,DISK_KFFXP Disk#,AU_KFFXP AU#,XNUM_KFFXP Extent#
 FROM X$KFFXP WHERE  number_kffxp=&DataFile_Number;

--or
 select d.name, XV.GROUP_KFFXP Group#, XV.DISK_KFFXP Disk#,
 XV.NUMBER_KFFXP File_Number, XV.AU_KFFXP AU#, XV.XNUM_KFFXP Extent#,
 XV.ADDR, XV.INDX, XV.INST_ID, XV.COMPOUND_KFFXP, XV.INCARN_KFFXP,
 XV.PXN_KFFXP, XV.XNUM_KFFXP,XV.LXN_KFFXP, XV.FLAGS_KFFXP,
 XV.CHK_KFFXP, XV.SIZE_KFFXP from v$asm_disk d, X$KFFXP XV
 where d.GROUP_NUMBER=XV.GROUP_KFFXP and d.DISK_NUMBER=XV.DISK_KFFXP
 and number_kffxp=&File_NUM order by 2,3,4;

--List the hierarchical tree of files stored in the diskgroup
 SELECT concat('+'||gname, sys_connect_by_path(aname, '/')) full_alias_path FROM
 (SELECT g.name gname, a.parent_index pindex, a.name aname,
 a.reference_index rindex FROM v$asm_alias a, v$asm_diskgroup g
 WHERE a.group_number = g.group_number)
 START WITH (mod(pindex, power(2, 24))) = 0
 CONNECT BY PRIOR rindex = pindex;


###################################
#Create and Modify Disk Group
###################################

create diskgroup FRA1 external redundancy disk '/dev/vx/rdsk/oraASMdg/fra1'
 ATTRIBUTE 'compatible.rdbms' = '11.1', 'compatible.asm' = '11.1';

alter diskgroup FRA1  check all;

--on +ASM2 :
 alter diskgroup FRA1 mount;

--Add a second disk:
 alter diskgroup FRA1 add disk '/dev/vx/rdsk/oraASMdg/fra2';

--Add several disks with a wildcard:
 alter diskgroup FRA1 add disk '/dev/vx/rdsk/oraASMdg/fra*';

--Remove a disk from a diskgroup:
 alter diskgroup FRA1 drop disk 'FRA1_0002';

--Drop the entire DiskGroup
 drop diskgroup DATA1 including contents;

--How to DROP the entire DiskGroup when it is in NOMOUNT Status
 --Generate the dd command which will reset the header of all the
 --disks belong the GROUP_NUMBER=0!!!!
 select 'dd if=/dev/zero of=''' ||PATH||''' bs=8192 count=100' from v$asm_disk
 where GROUP_NUMBER=0;

select * from v$asm_operation;

————————————————————————–

alter diskgroup FRA1 drop disk 'FRA1_0002';
 alter diskgroup FRA1 add disk '/dev/vx/rdsk/fra1dg/fra3';

alter diskgroup FRA1 drop disk 'FRA1_0003';
 alter diskgroup FRA1 add disk '/dev/vx/rdsk/fra1dg/fra4';


When a new diskgroup is created, it is only mounted on the local instance,
and only the instance-specific entry for the asm_diskgroups parameter is updated.
By manually mounting the diskgroup on other instances, the asm_diskgroups parameter on those instances are updated.

--on +ASM1 :
 create diskgroup FRA1 external redundancy disk '/dev/vx/rdsk/fradg/fra1'
 ATTRIBUTE 'compatible.rdbms' = '11.1', 'compatible.asm' = '11.1';

--on +ASM2 :
 alter diskgroup FRA1 mount;

--It works even for on going balances!!!
 alter diskgroup DATA1 rebalance power 10;


################################################################
# New ASM Command Line Utility (ASMCMD) Commands and Options
################################################################

ASMCMD Command Reference:

Command Description
 --------------------
 - cd Command Changes the current directory to the specified directory.
 - cp Command Enables you to copy files between ASM disk groups on a local instance and remote instances.
 - du Command Displays the total disk space occupied by ASM files in the specified
 - ASM directory and all of its subdirectories, recursively.
 - exit Command Exits ASMCMD.
 - find Command Lists the paths of all occurrences of the specified name (with wildcards) under the specified directory.
 - help Command Displays the syntax and description of ASMCMD commands.
 - ls Command Lists the contents of an ASM directory, the attributes of the specified
 - file, or the names and attributes of all disk groups.
 - lsct Command Lists information about current ASM clients.
 - lsdg Command Lists all disk groups and their attributes.
 - lsdsk Command Lists disks visible to ASM.
 - md_backup Command Creates a backup of all of the mounted disk groups.
 - md_restore Command Restores disk groups from a backup.
 - mkalias Command Creates an alias for system-generated filenames.
 - mkdir Command Creates ASM directories.
 - pwd Command Displays the path of the current ASM directory.
 - remap Command Repairs a range of physical blocks on a disk.
 - rm Command Deletes the specified ASM files or directories.
 - rmalias Command Deletes the specified alias, retaining the file that the alias points to.

--------
 -- kfed tool From Unix Prompt for reading ASM disk header.
 kfed read /dev/vx/rdsk/fra1dg/fra1


################################################################
# CREATE and Manage Tablespaces and Datafiles on ASM
################################################################

CREATE TABLESPACE my_ts DATAFILE '+disk_group_1' SIZE 100M AUTOEXTEND ON;

ALTER TABLESPACE sysaux ADD DATAFILE '+disk_group_1' SIZE 100M;

ALTER DATABASE DATAFILE '+DATA1/dbname/datafile/audit.259.668957419' RESIZE 150M;
-------------------------
 create diskgroup DATA1 external redundancy disk '/dev/vx/rdsk/oraASMdg/fra1'
 ATTRIBUTE 'compatible.rdbms' = '11.1', 'compatible.asm' = '11.1';

select 'alter diskgroup DATA1 add disk ''' || PATH || ''';' from v$asm_disk
 where GROUP_NUMBER=0 and rownum<=&Num_Disks_to_add;

select 'alter diskgroup FRA1 add disk ''' || PATH || ''';' from v$asm_disk
 where GROUP_NUMBER=0 and rownum<=&Num_Disks_to_add;

--Remove ASM header
 select 'dd if=/dev/zero of=''' ||PATH||''' bs=8192 count=100' from v$asm_disk
 where GROUP_NUMBER=0;