Introduction to Oracle Dedicated Region Cloud@Customer (DRCC)

Over the past few years, the public cloud adoption has become mainstream and the enterprises take advantage of the cloud in term of cost reduction, agility, flexibility, automation and self-service activities.

But it exists a large portion of critical workloads that due to regulatory and performance-related contraints, cannot currently be moved to the public cloud. To solve those restrictions, Oracle has engineered a unique solution named Oracle Dedicated Region Cloud@Customer (DRCC).

Designed as alternative to the OCI public cloud, it offers the same services at the same conditions available on the OCI public regions, inside the customer’s data center.

The main use cases for the DRCC adoption are associated to the following constraints:

  1. Data Sovereignty
  2. Security and Control
  3. Network Latency

Data Sovereignty

Data sovereignty generally refers to government efforts to prevent their citizens’ data from falling into the wrong hands via measures that restrict how businesses can transfer personal information beyond their country’s borders. Those measures can be in the form of regulations—think General Data Protection Regulation (GDPR) in the European Union, which regulates data privacy in the European Union and the European Economic Area as well as the transfer of personal data from those regions, or the California Consumer Privacy Act (CCPA), which gives citizens the right to know what personal information companies collect about them and how it is used and shared.

source: https://www.oracle.com/security/saas-security/data-sovereignty/

Security and Control

Restricting the physical access to the data center to special granted employees, and keeping the data behind the company’s firewall.

Network Latency

Specific applications (like trading or Voice over IP) are very sensitive to the increase of the network latency, therefore cannot be easily relocated to the public cloud.


DRCC Overview

As previously mentioned, the DRCC implementation offers the same services at the same conditions available on the OCI public region, for a full list of OCI services and associated SLA please check this link.

The main differences between the DRCC and the OCI region are:

  • It is built inside the customer’s premises
  • Data never leaves the customer’s premises
  • The infrastructure is remotely managed by Oracle
  • All resources are dedicated to one tenant

High level DRCC architecture

List of currently available major DRCC services


DRCC Benefits

Oracle Dedicated Region Cloud@Customer brings all public cloud capabilities on-premises, so the enterprises can reduce infrastructure and operational costs, upgrade legacy applications on modern cloud platform, and meet the most demanding regulatory, data residency and latency requirements:

  • Bring all existing OCI services (at the time of this blog post around 80) including the Autonomous Database, eliminating any technical debt.
  • Leading cloud performance
  • Security-first architecture that reduces the risk and attack surfaces
  • Keep full control of all data to meet the most demanding data privacy and latency requirements.
  • Pay only for the services consumed and during the utilization period.
  • Deploy seamlessly between on-premises and public cloud, using the exact same tools, APIs, and SLA available in OCI and DRCC.
  • Single-vendor cloud accountability and management for all cloud platform, database, and infrastructure


Conclusion

Oracle DRCC unique characteristics offers cloud-scale security, resiliency and superior performance, allowing to meet the most stringents requirements in terms of data residency and latency.

DRCC expands the public OCI offers, enabling customers to build and operate modern applications inside their data center at the same price offered in Oracle’s public cloud.

More details about DRCC are available at the follwing Oracle corporate link.


Exadata as Code

It is very exciting for me to share this post, because what I’m going to describe here is not the final, but the current and intermediate result achieved by the Trivadis team on the development and implementation of what I call “Exadata as Code” project.

In the Cloud and automation era, this is the Trivadis answer to increase efficiency, time-to-market and quality on the most challenging Exadata projects. Trivadis has been working hard to achieve this level of automation, covering most of the recurrent activities on the platform, and this is not all, as any CI/CD development, it is getting every day better, enriched by new features and fixes, which simplify the lifecycle management of such platforms.

Few months ago, I posted a blog entitled Bulk Exadata Patching, where it is shown how to improve the Exadata patching automation, but despite the improvements, it was still having a number of manual interactions. Now we have reached a much better level of automation, with one-click action to perform cumbersome tasks like: Infrastructure and Database Provisioning/Decommissioning, Patching, and many other operational tasks.

How Exadata as Code works

The concept is quite simple, all developments are made available in the form of Ansible playbooks and incapsulated inside Jenkins; this brings the following advantages:

  • User friendly interface
  • Orchestration Pipelines
  • Enhanced Security, recording auditing information and logging job executions
  • Job Scheduling

Exadata Administration Workflow

Scalable solution with which efficiently manage Exadata platforms

Oracle Database Administration Workflow

Secure high quality database operation with an effective DBA Team

Wrap-up

One takeaway from this experience, automation is the only option to stay competitive and deliver high quality service.


Special thanks go to all Trivadis’ colleagues working everyday so passionately on the project #BetterTogether.


Bulk Exadata Patching

After more than 11 year from the launch Oracle Exadata Machine has become popular on many companies across industries, making administrators, developers and final users almost unanimously satisfied about performance and availability.

But also, on Exadata there are cumbersome maintenance activities like patching.

Most of my Exadata customers have acquired 2 non-full RACKs, which makes the patching effort quite reasonable; but recently I started working on a project with multiple full RACKs, with tens of Storage Servers, Compute Nodes and hundreds of Virtual Machines…

A very challenging environment, especially when it came to patching…

Patching all the systems using the standard patchmgr utiliy was not acceptable, therefore I had to replace my standard patching procedure with a new one offering automation and scalability.

At this subject Oracle provides few handy options:

Patching Exadata Infrastructure

  • Storage Server Patching via http/https server: starting with Oracle Exadata System Software release 18.1.0.0.0, it is possible to patch the Storage Servers using an external http server hosting the new software image. The activitiy can be scheduled up to one week before the installation, allowing on each Cell the Management Server (MS) to start downloading and run pre-checks in advance. MS interrupts the software upgrade and generates an alert if the Cell does not comply with all pre-requisites.
  • Unbreakable Linux Network: ULN offers software patches, updates, and fixes for Oracle Linux and Oracle VM. The implementation of a local YUM repository leverages the patch automation of the bare metal OS or dom0/domU.
  • InfiniBand Switch: standard rolling upgrade patching procedure using patchmgr.

Patching Grid Infrastructure & RDBMS

  • GI & RDBMS: those components are patched using the standard Oracle tools common to all platforms, but the entire process has been parallalized using OS tools like dcli commands.

Overview Bulk Exadata Patching


Main Patching Commands

Storage Server – Scheduling Automated Storage Server Update via HTTP/HTTPS

On the Storage Cell set the local Apache location hosting the cell software

[root@efucndb01-a ~]# dcli -l root -g ~/cells cellcli -e 'alter softwareUpdate store=\"http://uln-yum.emilianofusaglia.net/cellsw\"'
efucncel01-a: Software Update successfully altered.
efucncel02-a: Software Update successfully altered.
efucncel03-a: Software Update successfully altered.
efucncel04-a: Software Update successfully altered.
efucncel05-a: Software Update successfully altered.
efucncel06-a: Software Update successfully altered.
efucncel07-a: Software Update successfully altered.
efucncel08-a: Software Update successfully altered.
efucncel09-a: Software Update successfully altered.
efucncel10-a: Software Update successfully altered.
efucncel11-a: Software Update successfully altered.
efucncel12-a: Software Update successfully altered.
efucncel13-a: Software Update successfully altered.
efucncel14-a: Software Update successfully altered.
[root@efucndb01-a ~]#

Schedule the update

[root@efucndb01-a ~]# dcli -l root -g ~/cells cellcli -e 'alter softwareUpdate time=\"03:20 AM WEDNESDAY\"'
efucncel01-a: Software update is scheduled to begin at: 2020-02-05T03:20:00+01:00.
efucncel02-a: Software update is scheduled to begin at: 2020-02-05T03:20:00+01:00.
efucncel03-a: Software update is scheduled to begin at: 2020-02-05T03:20:00+01:00.
efucncel04-a: Software update is scheduled to begin at: 2020-02-05T03:20:00+01:00.
efucncel05-a: Software update is scheduled to begin at: 2020-02-05T03:20:00+01:00.
efucncel06-a: Software update is scheduled to begin at: 2020-02-05T03:20:00+01:00.
efucncel07-a: Software update is scheduled to begin at: 2020-02-05T03:20:00+01:00.
efucncel08-a: Software update is scheduled to begin at: 2020-02-05T03:20:00+01:00.
efucncel09-a: Software update is scheduled to begin at: 2020-02-05T03:20:00+01:00.
efucncel10-a: Software update is scheduled to begin at: 2020-02-05T03:20:00+01:00.
efucncel11-a: Software update is scheduled to begin at: 2020-02-05T03:20:00+01:00.
efucncel12-a: Software update is scheduled to begin at: 2020-02-05T03:20:00+01:00.
efucncel13-a: Software update is scheduled to begin at: 2020-02-05T03:20:00+01:00.
efucncel14-a: Software update is scheduled to begin at: 2020-02-05T03:20:00+01:00.
[root@efucndb01-a ~]#

Verify the scheduled upgrade

[root@efucndb01-a ~]# dcli -l root -g ~/cells cellcli -e 'list softwareupdate detail'
efucncel01-a: name: 19.3.4.0.0.200130
efucncel01-a: status: PreReq OK. Ready to update at: 2020-02-05T03:20:00+01:00
efucncel01-a: store: http://uln-yum.emilianofusaglia.net/cellsw
efucncel01-a: time: 2020-02-05T03:20:00+01:00
efucncel02-a: name: 19.3.4.0.0.200130
efucncel02-a: status: PreReq OK. Ready to update at: 2020-02-05T03:20:00+01:00
efucncel02-a: store: http://uln-yum.emilianofusaglia.net/cellsw
efucncel02-a: time: 2020-02-05T03:20:00+01:00
efucncel03-a: name: 19.3.4.0.0.200130
efucncel03-a: status: PreReq OK. Ready to update at: 2020-02-05T03:20:00+01:00
efucncel03-a: store: http://uln-yum.emilianofusaglia.net/cellsw
efucncel03-a: time: 2020-02-05T03:20:00+01:00
efucncel04-a: name: 19.3.4.0.0.200130
efucncel04-a: status: PreReq OK. Ready to update at: 2020-02-05T03:20:00+01:00
efucncel04-a: store: http://uln-yum.emilianofusaglia.net/cellsw
efucncel04-a: time: 2020-02-05T03:20:00+01:00
efucncel05-a: name: 19.3.4.0.0.200130
efucncel05-a: status: PreReq OK. Ready to update at: 2020-02-05T03:20:00+01:00
efucncel05-a: store: http://uln-yum.emilianofusaglia.net/cellsw
efucncel05-a: time: 2020-02-05T03:20:00+01:00
efucncel06-a: name: 19.3.4.0.0.200130
efucncel06-a: status: PreReq OK. Ready to update at: 2020-02-05T03:20:00+01:00
efucncel06-a: store: http://uln-yum.emilianofusaglia.net/cellsw
efucncel06-a: time: 2020-02-05T03:20:00+01:00
efucncel07-a: name: 19.3.4.0.0.200130
efucncel07-a: status: PreReq OK. Ready to update at: 2020-02-05T03:20:00+01:00
efucncel07-a: store: http://uln-yum.emilianofusaglia.net/cellsw
efucncel07-a: time: 2020-02-05T03:20:00+01:00
efucncel08-a: name: 19.3.4.0.0.200130
efucncel08-a: status: PreReq OK. Ready to update at: 2020-02-05T03:20:00+01:00
efucncel08-a: store: http://uln-yum.emilianofusaglia.net/cellsw
efucncel08-a: time: 2020-02-05T03:20:00+01:00
efucncel09-a: name: 19.3.4.0.0.200130
efucncel09-a: status: PreReq OK. Ready to update at: 2020-02-05T03:20:00+01:00
efucncel09-a: store: http://uln-yum.emilianofusaglia.net/cellsw
efucncel09-a: time: 2020-02-05T03:20:00+01:00
efucncel10-a: name: 19.3.4.0.0.200130
efucncel10-a: status: PreReq OK. Ready to update at: 2020-02-05T03:20:00+01:00
efucncel10-a: store: http://uln-yum.emilianofusaglia.net/cellsw
efucncel10-a: time: 2020-02-05T03:20:00+01:00
efucncel11-a: name: 19.3.4.0.0.200130
efucncel11-a: status: PreReq OK. Ready to update at: 2020-02-05T03:20:00+01:00
efucncel11-a: store: http://uln-yum.emilianofusaglia.net/cellsw
efucncel11-a: time: 2020-02-05T03:20:00+01:00
efucncel12-a: name: 19.3.4.0.0.200130
efucncel12-a: status: PreReq OK. Ready to update at: 2020-02-05T03:20:00+01:00
efucncel12-a: store: http://uln-yum.emilianofusaglia.net/cellsw
efucncel12-a: time: 2020-02-05T03:20:00+01:00
efucncel13-a: name: 19.3.4.0.0.200130
efucncel13-a: status: PreReq OK. Ready to update at: 2020-02-05T03:20:00+01:00
efucncel13-a: store: http://uln-yum.emilianofusaglia.net/cellsw
efucncel13-a: time: 2020-02-05T03:20:00+01:00
efucncel14-a: name: 19.3.4.0.0.200130
efucncel14-a: status: PreReq OK. Ready to update at: 2020-02-05T03:20:00+01:00
efucncel14-a: store: http://uln-yum.emilianofusaglia.net/cellsw
efucncel14-a: time: 2020-02-05T03:20:00+01:00
[root@efucndb01-a ~]#

Unbreakable Linux Network

dom0 checks

[root@efuconsole dbserver_patch_19.200120]# ./patchmgr -dbnodes ~/dom0 -precheck -yum_repo http://uln-yum.emilianofusaglia.net/yum/EngineeredSystems/exadata/dbserver/dom0/19.3.4.0.0/base/x86_64 -target_version 19.3.4.0.0.200130

NOTE patchmgr release: 19.200120 (always check MOS 1553103.1 for the latest release of dbserver.patch.zip)
NOTE
WARNING Do not interrupt the patchmgr session.
WARNING Do not resize the screen. It may disturb the screen layout.
WARNING Do not reboot database nodes during update or rollback.
WARNING Do not open logfiles in write mode and do not try to alter them.

2020-02-06 14:06:17 +0100 :Working: Verify SSH equivalence for the root user to node(s)
2020-02-06 14:06:19 +0100 :SUCCESS: Verify SSH equivalence for the root user to node(s)
2020-02-06 14:06:22 +0100 :Working: Initiate precheck on 8 node(s)
2020-02-06 14:07:36 +0100 :Working: Check free space on node(s)
2020-02-06 14:07:42 +0100 :SUCCESS: Check free space on node(s)
2020-02-06 14:08:07 +0100 :Working: dbnodeupdate.sh running a precheck on node(s).
2020-02-06 14:09:43 +0100 :SUCCESS: Initiate precheck on node(s).
2020-02-06 14:09:45 +0100 :SUCCESS: Completed run of command: ./patchmgr -dbnodes /root/dom0 -precheck -yum_repo http://uln-yum.emilianofusaglia.net/yum/EngineeredSystems/exadata/dbserver/dom0/19.3.4.0.0/base/x86_64 -target_version 19.3.4.0.0.200130
2020-02-06 14:09:45 +0100 :INFO : Precheck attempted on nodes in file /root/dom0: [efucndb01-a efucndb02-a efucndb03-a efucndb04-a efucndb05-a efucndb06-a efucndb07-a efucndb08-a]
2020-02-06 14:09:45 +0100 :INFO : Current image version on dbnode(s) is:
2020-02-06 14:09:45 +0100 :INFO : efucndb01-a: 19.2.6.0.0.190911.1
2020-02-06 14:09:45 +0100 :INFO : efucndb02-a: 19.2.6.0.0.190911.1
2020-02-06 14:09:45 +0100 :INFO : efucndb03-a: 19.2.6.0.0.190911.1
2020-02-06 14:09:45 +0100 :INFO : efucndb04-a: 19.2.6.0.0.190911.1
2020-02-06 14:09:45 +0100 :INFO : efucndb05-a: 19.2.6.0.0.190911.1
2020-02-06 14:09:45 +0100 :INFO : efucndb06-a: 19.2.6.0.0.190911.1
2020-02-06 14:09:45 +0100 :INFO : efucndb07-a: 19.2.6.0.0.190911.1
2020-02-06 14:09:45 +0100 :INFO : efucndb08-a: 19.2.6.0.0.190911.1
2020-02-06 14:09:45 +0100 :INFO : For details, check the following files in /EXAVMIMAGES/Patch/patchmgr_DBSERVER/dbserver_patch_19.200120:
2020-02-06 14:09:45 +0100 :INFO : - _dbnodeupdate.log
2020-02-06 14:09:45 +0100 :INFO : - patchmgr.log
2020-02-06 14:09:45 +0100 :INFO : - patchmgr.trc
2020-02-06 14:09:45 +0100 :INFO : Exit status:0
2020-02-06 14:09:45 +0100 :INFO : Exiting.
[root@efucndb01-a dbserver_patch_19.200120]#

dom0 upgrade

[root@efuconsole dbserver_patch_19.200120]# ./patchmgr -dbnodes ~/dom0 -upgrade -yum_repo http://uln-yum.emilianofusaglia.net/yum/EngineeredSystems/exadata/dbserver/dom0/19.3.4.0.0/base/x86_64 -target_version 19.3.4.0.0.200130

NOTE patchmgr release: 19.200120 (always check MOS 1553103.1 for the latest release of dbserver.patch.zip)
NOTE
NOTE Database nodes will reboot during the update process.
NOTE
WARNING Do not interrupt the patchmgr session.
WARNING Do not resize the screen. It may disturb the screen layout.
WARNING Do not reboot database nodes during update or rollback.
WARNING Do not open logfiles in write mode and do not try to alter them.

2020-02-06 14:29:11 +0100 :Working: Verify SSH equivalence for the root user to node(s)
2020-02-06 14:29:13 +0100 :SUCCESS: Verify SSH equivalence for the root user to node(s)
2020-02-06 14:29:15 +0100 :Working: Initiate prepare steps on node(s).
2020-02-06 14:29:17 +0100 :Working: Check free space on node(s)
2020-02-06 14:29:23 +0100 :SUCCESS: Check free space on node(s)
2020-02-06 14:29:59 +0100 :SUCCESS: Initiate prepare steps on node(s).
2020-02-06 14:29:59 +0100 :Working: Initiate update on 8 node(s).
2020-02-06 14:29:59 +0100 :Working: dbnodeupdate.sh running a backup on 8 node(s).
2020-02-06 14:36:16 +0100 :SUCCESS: dbnodeupdate.sh running a backup on 8 node(s).
2020-02-06 14:36:16 +0100 :Working: Initiate update on node(s)
2020-02-06 14:36:16 +0100 :Working: Get information about any required OS upgrades from node(s).
2020-02-06 14:36:28 +0100 :SUCCESS: Get information about any required OS upgrades from node(s).
2020-02-06 14:36:28 +0100 :Working: dbnodeupdate.sh running an update step on all nodes.
2020-02-06 14:56:38 +0100 :INFO : efucndb01-a is ready to reboot.
2020-02-06 14:56:38 +0100 :INFO : efucndb02-a is ready to reboot.
2020-02-06 14:56:38 +0100 :INFO : efucndb03-a is ready to reboot.
2020-02-06 14:56:38 +0100 :INFO : efucndb04-a is ready to reboot.
2020-02-06 14:56:38 +0100 :INFO : efucndb05-a is ready to reboot.
2020-02-06 14:56:38 +0100 :INFO : efucndb06-a is ready to reboot.
2020-02-06 14:56:38 +0100 :INFO : efucndb07-a is ready to reboot.
2020-02-06 14:56:38 +0100 :INFO : efucndb08-a is ready to reboot.
2020-02-06 14:56:39 +0100 :SUCCESS: dbnodeupdate.sh running an update step on all nodes.
2020-02-06 14:56:51 +0100 :Working: Initiate reboot on node(s)
2020-02-06 14:56:55 +0100 :SUCCESS: Initiate reboot on node(s)
2020-02-06 14:56:55 +0100 :Working: Waiting to ensure node(s) is down before reboot.
2020-02-06 14:58:20 +0100 :SUCCESS: Waiting to ensure node(s) is down before reboot.
2020-02-06 14:58:20 +0100 :Working: Waiting to ensure node(s) is up after reboot.
2020-02-06 15:04:23 +0100 :SUCCESS: Waiting to ensure node(s) is up after reboot.
2020-02-06 15:04:23 +0100 :Working: Waiting to connect to node(s) with SSH. During Linux upgrades this can take some time.
2020-02-06 15:27:46 +0100 :SUCCESS: Waiting to connect to node(s) with SSH. During Linux upgrades this can take some time.
2020-02-06 15:27:46 +0100 :Working: Wait for node(s) is ready for the completion step of update.
2020-02-06 15:31:29 +0100 :SUCCESS: Wait for node(s) is ready for the completion step of update.
2020-02-06 15:31:30 +0100 :Working: Initiate completion step from dbnodeupdate.sh on node(s)
2020-02-06 15:48:10 +0100 :SUCCESS: Initiate completion step from dbnodeupdate.sh on efucndb01-a
2020-02-06 15:48:14 +0100 :SUCCESS: Initiate completion step from dbnodeupdate.sh on efucndb02-a
2020-02-06 15:48:19 +0100 :SUCCESS: Initiate completion step from dbnodeupdate.sh on efucndb03-a
2020-02-06 15:48:30 +0100 :SUCCESS: Initiate completion step from dbnodeupdate.sh on efucndb04-a
2020-02-06 15:48:35 +0100 :SUCCESS: Initiate completion step from dbnodeupdate.sh on efucndb05-a
2020-02-06 15:48:46 +0100 :SUCCESS: Initiate completion step from dbnodeupdate.sh on efucndb06-a
2020-02-06 15:48:50 +0100 :SUCCESS: Initiate completion step from dbnodeupdate.sh on efucndb07-a
2020-02-06 15:49:02 +0100 :SUCCESS: Initiate completion step from dbnodeupdate.sh on efucndb08-a
2020-02-06 15:49:18 +0100 :SUCCESS: Initiate update on node(s).
2020-02-06 15:49:18 +0100 :SUCCESS: Initiate update on 0 node(s).
[INFO ] Collected dbnodeupdate diag in file: Diag_patchmgr_dbnode_upgrade_060220142909.tbz
-rw-r--r-- 1 root root 6381043 Feb 6 15:49 Diag_patchmgr_dbnode_upgrade_060220142909.tbz
2020-02-06 15:49:22 +0100 :SUCCESS: Completed run of command: ./patchmgr -dbnodes /root/dom0 -upgrade -yum_repo http://uln-yum.emilianofusaglia.net/yum/EngineeredSystems/exadata/dbserver/dom0/19.3.4.0.0/base/x86_64 -target_version 19.3.4.0.0.200130
2020-02-06 15:49:22 +0100 :INFO : Upgrade attempted on nodes in file /root/dom0: [efucndb01-a efucndb02-a efucndb03-a efucndb04-a efucndb05-a efucndb06-a efucndb07-a efucndb08-a]
2020-02-06 15:49:22 +0100 :INFO : Current image version on dbnode(s) is:
2020-02-06 15:49:22 +0100 :INFO : efucndb01-a: 19.3.4.0.0.200130
2020-02-06 15:49:22 +0100 :INFO : efucndb02-a: 19.3.4.0.0.200130
2020-02-06 15:49:22 +0100 :INFO : efucndb03-a: 19.3.4.0.0.200130
2020-02-06 15:49:22 +0100 :INFO : efucndb04-a: 19.3.4.0.0.200130
2020-02-06 15:49:22 +0100 :INFO : efucndb05-a: 19.3.4.0.0.200130
2020-02-06 15:49:22 +0100 :INFO : efucndb06-a: 19.3.4.0.0.200130
2020-02-06 15:49:22 +0100 :INFO : efucndb07-a: 19.3.4.0.0.200130
2020-02-06 15:49:22 +0100 :INFO : efucndb08-a: 19.3.4.0.0.200130
2020-02-06 15:49:22 +0100 :INFO : For details, check the following files in /EXAVMIMAGES/Patch/patchmgr_DBSERVER/dbserver_patch_19.200120:
2020-02-06 15:49:22 +0100 :INFO : - _dbnodeupdate.log
2020-02-06 15:49:22 +0100 :INFO : - patchmgr.log
2020-02-06 15:49:22 +0100 :INFO : - patchmgr.trc
2020-02-06 15:49:22 +0100 :INFO : Exit status:0
2020-02-06 15:49:22 +0100 :INFO : Exiting.

InfiniBand Switch

IB switch checks

[root@efucndb01-a patch_switch_19.3.4.0.0.200130]# ./patchmgr -ibswitches ~/ibs -upgrade -ibswitch_precheck
2020-02-10 07:57:44 +0100 :Working: Verify SSH equivalence for the root user to node(s)
2020-02-10 07:57:46 +0100 :SUCCESS: Verify SSH equivalence for the root user to node(s)
2020-02-10 07:57:47 +0100 1 of 1 :Working: Initiate pre-upgrade validation check on InfiniBand switch(es).
----- InfiniBand switch update process started 2020-02-10 07:57:48 +0100 -----
[NOTE ] Log file at /EXAVMIMAGES/Patch/IBs_19.3.4.0.0/patch_switch_19.3.4.0.0.200130/upgradeIBSwitch.log
[INFO ] List of InfiniBand switches for upgrade: ( efucnsw-iba01-a efucnsw-ibb01-a )
[SUCCESS ] Verifying Network connectivity to efucnsw-iba01-a
[SUCCESS ] Verifying Network connectivity to efucnsw-ibb01-a
[SUCCESS ] Validating verify-topology output
[INFO ] Master Subnet Manager is set to "efucnsw-iba01-a" in all Switches
[INFO ] ---------- Starting with InfiniBand Switch efucnsw-iba01-a
[WARNING ] Infiniband switch meets minimal version requirements, but downgrade is only available to 2.2.13-2 with the current package.
To downgrade to other versions:
Manually download the InfiniBand switch firmware package to the patch directory
Set export variable "EXADATA_IMAGE_IBSWITCH_DOWNGRADE_VERSION" to the appropriate version
Run patchmgr command to initiate downgrade.
[SUCCESS ] Verify SSH access to the patchmgr host efucndb01-a.emilianofusaglia.net from the InfiniBand Switch efucnsw-iba01-a.
[INFO ] Starting pre-update validation on efucnsw-iba01-a
[SUCCESS ] Verifying that /tmp has 150M in efucnsw-iba01-a, found 492M
[SUCCESS ] Verifying that / has 20M in efucnsw-iba01-a, found 28M
[SUCCESS ] NTP daemon is running on efucnsw-iba01-a.
[INFO ] Manually validate the following entries Date:(YYYY-aM-DD) 2020-02-10 Time:(HH:MM:SS) 07:58:05
[INFO ] Validating the current firmware on the InfiniBand Switch
[SUCCESS ] Firmware verification on InfiniBand switch efucnsw-iba01-a
[SUCCESS ] Verifying that the patchmgr host efucndb01-a.emilianofusaglia.net is recognized on the InfiniBand Switch efucnsw-iba01-a through getHostByName
[SUCCESS ] Execute plugin check for Patch Check Prereq on efucnsw-iba01-a
[INFO ] Finished pre-update validation on efucnsw-iba01-a
[SUCCESS ] Pre-update validation on efucnsw-iba01-a
[SUCCESS ] Prereq check on efucnsw-iba01-a
[INFO ] ---------- Starting with InfiniBand Switch efucnsw-ibb01-a
[WARNING ] Infiniband switch meets minimal version requirements, but downgrade is only available to 2.2.13-2 with the current package.
To downgrade to other versions:
Manually download the InfiniBand switch firmware package to the patch directory
Set export variable "EXADATA_IMAGE_IBSWITCH_DOWNGRADE_VERSION" to the appropriate version
Run patchmgr command to initiate downgrade.
[SUCCESS ] Verify SSH access to the patchmgr host efucndb01-a.emilianofusaglia.net from the InfiniBand Switch efucnsw-ibb01-a.
[INFO ] Starting pre-update validation on efucnsw-ibb01-a
[SUCCESS ] Verifying that /tmp has 150M in efucnsw-ibb01-a, found 492M
[SUCCESS ] Verifying that / has 20M in efucnsw-ibb01-a, found 28M
[SUCCESS ] NTP daemon is running on efucnsw-ibb01-a.
[INFO ] Manually validate the following entries Date:(YYYY-aM-DD) 2020-02-10 Time:(HH:MM:SS) 07:58:25
[INFO ] Validating the current firmware on the InfiniBand Switch
[SUCCESS ] Firmware verification on InfiniBand switch efucnsw-ibb01-a
[SUCCESS ] Verifying that the patchmgr host efucndb01-a.emilianofusaglia.net is recognized on the InfiniBand Switch efucnsw-ibb01-a through getHostByName
[SUCCESS ] Execute plugin check for Patch Check Prereq on efucnsw-ibb01-a
[INFO ] Finished pre-update validation on efucnsw-ibb01-a
[SUCCESS ] Pre-update validation on efucnsw-ibb01-a
[SUCCESS ] Prereq check on efucnsw-ibb01-a
[SUCCESS ] Overall status
----- InfiniBand switch update process ended 2020-02-10 07:58:42 +0100 -----
2020-02-10 07:58:42 +0100 1 of 1 :SUCCESS: Initiate pre-upgrade validation check on InfiniBand switch(es).
2020-02-10 07:58:42 +0100 :SUCCESS: Completed run of command: ./patchmgr -ibswitches /root/ibs -upgrade -ibswitch_precheck
2020-02-10 07:58:42 +0100 :INFO : upgrade attempted on nodes in file /root/ibs: [efucnsw-iba01-a efucnsw-ibb01-a]
2020-02-10 07:58:42 +0100 :INFO : For details, check the following files in /EXAVMIMAGES/Patch/IBs_19.3.4.0.0/patch_switch_19.3.4.0.0.200130:
2020-02-10 07:58:42 +0100 :INFO : - upgradeIBSwitch.log
2020-02-10 07:58:42 +0100 :INFO : - upgradeIBSwitch.trc
2020-02-10 07:58:42 +0100 :INFO : - patchmgr.stdout
2020-02-10 07:58:42 +0100 :INFO : - patchmgr.stderr
2020-02-10 07:58:42 +0100 :INFO : - patchmgr.log
2020-02-10 07:58:42 +0100 :INFO : - patchmgr.trc
2020-02-10 07:58:42 +0100 :INFO : Exit status:0
2020-02-10 07:58:42 +0100 :INFO : Exiting.
[root@efucndb01-a patch_switch_19.3.4.0.0.200130]#

IB switch upgrade

[root@efucndb01-a patch_switch_19.3.4.0.0.200130]# ./patchmgr -ibswitches ~/ibs -upgrade
2020-02-10 07:59:22 +0100 :Working: Verify SSH equivalence for the root user to node(s)
2020-02-10 07:59:24 +0100 :SUCCESS: Verify SSH equivalence for the root user to node(s)
2020-02-10 07:59:25 +0100 1 of 1 :Working: Initiate upgrade of InfiniBand switches to 2.2.14-1. Expect up to 40 minutes for each switch
----- InfiniBand switch update process started 2020-02-10 07:59:25 +0100 -----
[NOTE ] Log file at /EXAVMIMAGES/Patch/IBs_19.3.4.0.0/patch_switch_19.3.4.0.0.200130/upgradeIBSwitch.log
[INFO ] List of InfiniBand switches for upgrade: ( efucnsw-iba01-a efucnsw-ibb01-a )
[SUCCESS ] Verifying Network connectivity to efucnsw-iba01-a
[SUCCESS ] Verifying Network connectivity to efucnsw-ibb01-a
[SUCCESS ] Validating verify-topology output
[INFO ] Proceeding with upgrade of InfiniBand switches to version 2.2.14_1
[INFO ] Master Subnet Manager is set to "efucnsw-iba01-a" in all Switches
[INFO ] ---------- Starting with InfiniBand Switch efucnsw-iba01-a
[WARNING ] Infiniband switch meets minimal version requirements, but downgrade is only available to 2.2.13-2 with the current package.
To downgrade to other versions:
Manually download the InfiniBand switch firmware package to the patch directory
Set export variable "EXADATA_IMAGE_IBSWITCH_DOWNGRADE_VERSION" to the appropriate version
Run patchmgr command to initiate downgrade.
[SUCCESS ] Verify SSH access to the patchmgr host efucndb01-a.emilianofusaglia.net from the InfiniBand Switch efucnsw-iba01-a.
[INFO ] Starting pre-update validation on efucnsw-iba01-a
[SUCCESS ] Verifying that /tmp has 150M in efucnsw-iba01-a, found 492M
[SUCCESS ] Verifying that / has 20M in efucnsw-iba01-a, found 26M
[SUCCESS ] Service opensmd is running on InfiniBand Switch efucnsw-iba01-a
[SUCCESS ] NTP daemon is running on efucnsw-iba01-a.
[INFO ] Manually validate the following entries Date:(YYYY-aM-DD) 2020-02-10 Time:(HH:MM:SS) 07:59:41
[INFO ] Validating the current firmware on the InfiniBand Switch
[SUCCESS ] Firmware verification on InfiniBand switch efucnsw-iba01-a
[SUCCESS ] Verifying that the patchmgr host efucndb01-a.emilianofusaglia.net is recognized on the InfiniBand Switch efucnsw-iba01-a through getHostByName
[SUCCESS ] Execute plugin check for Patch Check Prereq on efucnsw-iba01-a
[INFO ] Finished pre-update validation on efucnsw-iba01-a
[SUCCESS ] Pre-update validation on efucnsw-iba01-a
[INFO ] Package will be downloaded at firmware update time via scp
[SUCCESS ] Execute plugin check for Patching on efucnsw-iba01-a
[INFO ] Starting upgrade on efucnsw-iba01-a to 2.2.14_1. Please give upto 15 mins for the process to complete. DO NOT INTERRUPT or HIT CTRL+C during the upgrade
[INFO ] Rebooting efucnsw-iba01-a to complete the firmware update. Wait for 15 minutes before continuing. DO NOT MANUALLY REBOOT THE INFINIBAND SWITCH
Connection to efucndb01-a closed by remote host.
Connection to efucndb01-a closed.
2020-02-10 08:27:49 +0100 :Working: Verify SSH equivalence for the root user to node(s)
2020-02-10 08:27:51 +0100 :SUCCESS: Verify SSH equivalence for the root user to node(s)
2020-02-10 08:27:52 +0100 1 of 1 :Working: Initiate upgrade of InfiniBand switches to 2.2.14-1. Expect up to 40 minutes for each switch
----- InfiniBand switch update process started 2020-02-10 08:27:52 +0100 -----
[NOTE ] Log file at /EXAVMIMAGES/Patch/IBs_19.3.4.0.0/patch_switch_19.3.4.0.0.200130/upgradeIBSwitch.log
[INFO ] List of InfiniBand switches for upgrade: ( efucnsw-iba01-a efucnsw-ibb01-a )
[SUCCESS ] Verifying Network connectivity to efucnsw-iba01-a
[SUCCESS ] Verifying Network connectivity to efucnsw-ibb01-a
[INFO ] InfiniBand switch efucnsw-iba01-a is already at target version.
[SUCCESS ] Validating verify-topology output
[INFO ] Proceeding with upgrade of InfiniBand switches to version 2.2.14_1
[INFO ] Master Subnet Manager is set to "efucnsw-ibb01-a" in all Switches
[INFO ] ---------- Starting with InfiniBand Switch efucnsw-ibb01-a
[WARNING ] Infiniband switch meets minimal version requirements, but downgrade is only available to 2.2.13-2 with the current package.
To downgrade to other versions:
Manually download the InfiniBand switch firmware package to the patch directory
Set export variable "EXADATA_IMAGE_IBSWITCH_DOWNGRADE_VERSION" to the appropriate version
Run patchmgr command to initiate downgrade.
[SUCCESS ] Verify SSH access to the patchmgr host efucndb01-a.emilianofusaglia.net from the InfiniBand Switch efucnsw-ibb01-a.
[INFO ] Starting pre-update validation on efucnsw-ibb01-a
[SUCCESS ] Verifying that /tmp has 150M in efucnsw-ibb01-a, found 492M
[SUCCESS ] Verifying that / has 20M in efucnsw-ibb01-a, found 26M
[SUCCESS ] Service opensmd is running on InfiniBand Switch efucnsw-ibb01-a
[SUCCESS ] NTP daemon is running on efucnsw-ibb01-a.
[INFO ] Manually validate the following entries Date:(YYYY-aM-DD) 2020-02-10 Time:(HH:MM:SS) 08:28:07
[INFO ] Validating the current firmware on the InfiniBand Switch
[SUCCESS ] Firmware verification on InfiniBand switch efucnsw-ibb01-a
[SUCCESS ] Verifying that the patchmgr host efucndb01-a.emilianofusaglia.net is recognized on the InfiniBand Switch efucnsw-ibb01-a through getHostByName
[SUCCESS ] Execute plugin check for Patch Check Prereq on efucnsw-ibb01-a
[INFO ] Finished pre-update validation on efucnsw-ibb01-a
[SUCCESS ] Pre-update validation on efucnsw-ibb01-a
[INFO ] Package will be downloaded at firmware update time via scp
[SUCCESS ] Execute plugin check for Patching on efucnsw-ibb01-a
[INFO ] Starting upgrade on efucnsw-ibb01-a to 2.2.14_1. Please give upto 15 mins for the process to complete. DO NOT INTERRUPT or HIT CTRL+C during the upgrade
[INFO ] Rebooting efucnsw-ibb01-a to complete the firmware update. Wait for 15 minutes before continuing. DO NOT MANUALLY REBOOT THE INFINIBAND SWITCH
Connection to efucndb01-a closed by remote host.
Connection to efucndb01-a closed.

Exadata and IORM by Examples


The Exadata Machine is frequently used to consolidate the database infrastructure, and such kind of environments must guarantee performance stability and governance. On Exadata the IO Resource Manager extends the capabilities available also on the other platforms to allocate, cap and prioritize the resources among databases and categories.

Available since the the first version of the Storage Cell software, IORM has been recently enhanced to cope with the new Multitenant and Cloud requirements.  The IORM Plan can optimize the workload with one of the following objectives: basic, auto, low_latency,  balanced or high_throughput.


I/O Resource Manager Overview

IORM allows to execute I/O Requests based on their priority, this is achieved handling separated queues which manage High and Low priority requests as shown on the image below.


IORM_Overview


Default IORM status

Automatically enabled it cannot be completely disabled. The default mode, protects critical operations like  flash cache and flash log  I/Os

CellCLI> list iormplan detail
name: tvdceladm06_IORMPLAN
catPlan:
dbPlan:
objective: basic
status: active

CellCLI>


Per Database IORM definition

This configuration is suitable on environments with a small number of databases, where the I/O resources are individually defined for each database.

alter iormplan objective=auto

ALTER IORMPLAN -
dbplan=((name=ERP01, level=1, allocation=75, limit=95, role=primary), -
(name=ERP01, level=1, allocation=5, limit=25, role=standby),          -
(name=TREP, level=1, allocation=2, limit=5, flashCacheSize=1G),       -
(name=EPA01, level=2, allocation=40, limit=80),                       -
(name=DHJ01, level=3, allocation=50, flashCacheSize=20G),             -
(name=other, level=3, allocation=30)) 

The above plan regulates: the database level, allocation (%), soft and hard limits (%), the amount of flash cache and the role (primary or standby).


DBaaS and IORM

This configuration is suitable for Cloud like environments, where a large number of databases are consolidated on the same infrastructure. The database services are standardized in few categories (for example Gold, Silver and Bronze) and the I/O resource plan regulates the same service categories.

CellCLI> ALTER IORMPLAN
dbplan=((name=gold, share=20,limit=100, type=profile), 
        (name=silver, share=10, limit=60, type=profile),
        (name=bronze, share=5, limit=20, type=profile))
The datase parameter db_performance_profile allows to associate the corresponding IORM service category to the instance:
SQL> alter system set db_performance_profile=silver scope=spfile;

My OOW18 Summary


For those who are interested here my major takeaways from the OOW18


As we all know, since few years the HOTTEST topic advertized at the OOW is “Cloud Computing”, but this time Oracle Cloud was no longer alone!

In fact the focus was divided between the new Oracle OCI Cloud, also named by Larry as Second Generation of Cloud and the Autonomous Database.


OCI Second Gen of Cloud

Here a summary of the major advantages compared to the previous version:

– Security, guaranteed by robots which scan the network for any malicious attack.  

– The cutting edge virtual network, which brings up to 50GB speed and extreme flexibility.

– Bare Metal Infrastructure based on Exadata Machines.

– Aggressive pricing, compared to the competitors.


Autonomous Database.

The Autonomous Database option is now available for OLTP and DWH databases and includes new capabilities like automatic index creation and column stored table conversion. In version 19 it will manage online memory increase and additional tuning options.

As announces during Larry’s keynote, the  Autonomous database will be also available with the Cloud @ Customer option (on Exadata only), ant it will no longer require human labor (DBA and Sys Admin intervention), because Self Provisioning, Self Driving, Self Tuning and Self Repairing.

For non-technical people it looks magic, but it is few steps from what we already use in a standard Oracle 12c Database. In fact Autonomous Database leverages a bunch of database advisors and tuning options, now orchestrated by an Artificial Intelligence and Machine Learning software, in order to provide data-driven predictions and decisions.

Over the next few years, Autonomous Database will be enriched with several new options, improving the quality of live of many DBAs, which will be relieved of the majority of the tedious and recurring tasks, leaving the most added value tasks under their own responsibility.

Last but not least, the Autonomous Database runs in a very high end configurations (Oracle guarantees 99,995% of availability), which is quite expensive to acquire due to the list of mandatory requirements: Exadata, RAC, Active DG, Multitenant, Tuning Pack, Diagnostic Pack etc..


Exadata Machine

Several interesting features are coming next year with the introduction of the INTEL Optane DC Persistent Memory for even faster OLTP.

This new type of memory will be installed on the Storage Cell and used as accelerator in front of Flash memory.

The database node will  access to the Persistent Memory via RDMA with a gain up to 20 x faster access latency.

Oracle is developing the more and more Remote Direct Memory Access (RDMA) instructions for Cache Fusion and Storage Cell operations in order to offload the database nodes and increase the overall performance.

Stay tuned on Exadata Machine because the next generation will also include BIG architectural change…


Oracle Virtual Machine (OVM)

One curiosity directly collected at Linux Virtualization booth is that even though the next generation of hypervisor will be based on KVM, Oracle will keep calling it OVM and of course the current OVM product based on XEN (OVS, OVM) will still be in use by many companies.

How possibly the customers can get confused ?!?


With this I finished, although there would be much more to write.


Exadata Storage Snapshots

This post describes how to implement Oracle Database Snapshot Technology on Exadata Machine.

Because Exadata Storage Cell Smart Features, Storage Indexes, IORM and Network Resource Manager work at level of ASM Volume Manager only, (and they don’t work on top of ACFS Cluster File System), the implementation of the snapshot technology is different compared to any other non-Exadata environment.

At this purpuse Oracle has developed a new type of ASM Disk Group called SPARSE Disk Group. It uses ASM SPARSE Grid Disk based on Thin Provisioning to save the database snapshot copies and the associated metadata, and it supports non-CDB and PDB snapshot copy.

The implementation requires the following minimal software versions :

  • Exadata Storage Software version 12.1.2.1.0.
  • Oracle Database version 12.1.0.2 with bundle patch 5.
One major restriction applies to Exadata Storage Sanpshot compared to ACFS;
the source database must be a shared copy open on read only and called Test Master. The Test Master Database can not be modified or deleted as long the latest child snapshot is in use.
This restriction exists because Exadata Snapshot technology uses “allocate on first write”, and not “copy on write” (like for ACFS), and the snapshot is per-database-datafile.
When a child snapshot issue a write, the write goes to a private copy of that block inside the snapshot, preserving the original block value which can be accessed by other child snapshots of the same Test Master.

How to Implement Exadata Storage Snapshots in a PDB Environment

Check the celldisks for available free space to allocate to a new SPARSE Disk Group

[root@strgceladm01 ~]# cellcli -e list celldisk attributes name,freespace
 CD_00_strgceladm01 853.34375G
 CD_01_strgceladm01 853.34375G
 CD_02_strgceladm01 853.34375G
 CD_03_strgceladm01 853.34375G
 CD_04_strgceladm01 853.34375G
 CD_05_strgceladm01 853.34375G
 CD_06_strgceladm01 853.34375G
 CD_07_strgceladm01 853.34375G
 CD_08_strgceladm01 853.34375G
 CD_09_strgceladm01 853.34375G
 CD_10_strgceladm01 853.34375G
 CD_11_strgceladm01 853.34375G
 FD_00_strgceladm01 0
 FD_01_strgceladm01 0
 FD_02_strgceladm01 0
 FD_03_strgceladm01 0
[root@strgceladm01 ~]#


[root@strgceladm02 ~]# cellcli -e list celldisk attributes name,freespace
 CD_00_strgceladm02 853.34375G
 CD_01_strgceladm02 853.34375G
 CD_02_strgceladm02 853.34375G
 CD_03_strgceladm02 853.34375G
 CD_04_strgceladm02 853.34375G
 CD_05_strgceladm02 853.34375G
 CD_06_strgceladm02 853.34375G
 CD_07_strgceladm02 853.34375G
 CD_08_strgceladm02 853.34375G
 CD_09_strgceladm02 853.34375G
 CD_10_strgceladm02 853.34375G
 CD_11_strgceladm02 853.34375G
 FD_00_strgceladm02 0
 FD_01_strgceladm02 0
 FD_02_strgceladm02 0
 FD_03_strgceladm02 0
[root@strgceladm02 ~]#


[root@strgceladm03 ~]# cellcli -e list celldisk attributes name,freespace
 CD_00_strgceladm03 853.34375G
 CD_01_strgceladm03 853.34375G
 CD_02_strgceladm03 853.34375G
 CD_03_strgceladm03 853.34375G
 CD_04_strgceladm03 853.34375G
 CD_05_strgceladm03 853.34375G
 CD_06_strgceladm03 853.34375G
 CD_07_strgceladm03 853.34375G
 CD_08_strgceladm03 853.34375G
 CD_09_strgceladm03 853.34375G
 CD_10_strgceladm03 853.34375G
 CD_11_strgceladm03 853.34375G
 FD_00_strgceladm03 0
 FD_01_strgceladm03 0
 FD_02_strgceladm03 0
 FD_03_strgceladm03 0
[root@strgceladm03 ~]#

For each Storage Cell Create a SPARSE Grid Disks as described below

[root@strgceladm01 ~]# cellcli -e CREATE GRIDDISK ALL PREFIX=SPARSE, sparse=true, SIZE=853.34375G
Cell disks were skipped because they had no freespace for grid disks: FD_00_strgceladm01, FD_01_strgceladm01, FD_02_strgceladm01, FD_03_strgceladm01.
GridDisk SPARSE_CD_00_strgceladm01 successfully created
GridDisk SPARSE_CD_01_strgceladm01 successfully created
GridDisk SPARSE_CD_02_strgceladm01 successfully created
GridDisk SPARSE_CD_03_strgceladm01 successfully created
GridDisk SPARSE_CD_04_strgceladm01 successfully created
GridDisk SPARSE_CD_05_strgceladm01 successfully created
GridDisk SPARSE_CD_06_strgceladm01 successfully created
GridDisk SPARSE_CD_07_strgceladm01 successfully created
GridDisk SPARSE_CD_08_strgceladm01 successfully created
GridDisk SPARSE_CD_09_strgceladm01 successfully created
GridDisk SPARSE_CD_10_strgceladm01 successfully created
GridDisk SPARSE_CD_11_strgceladm01 successfully created
[root@strgceladm01 ~]#

For each Storage Cell List all Grid Disks

[root@strgceladm01 ~]# cellcli -e list griddisk attributes name,size
 DATAC1_CD_00_strgceladm01 6.294586181640625T
 DATAC1_CD_01_strgceladm01 6.294586181640625T
 DATAC1_CD_02_strgceladm01 6.294586181640625T
 DATAC1_CD_03_strgceladm01 6.294586181640625T
 DATAC1_CD_04_strgceladm01 6.294586181640625T
 DATAC1_CD_05_strgceladm01 6.294586181640625T
 DATAC1_CD_06_strgceladm01 6.294586181640625T
 DATAC1_CD_07_strgceladm01 6.294586181640625T
 DATAC1_CD_08_strgceladm01 6.294586181640625T
 DATAC1_CD_09_strgceladm01 6.294586181640625T
 DATAC1_CD_10_strgceladm01 6.294586181640625T
 DATAC1_CD_11_strgceladm01 6.294586181640625T
 FGRID_FD_00_strgceladm01 2.0717315673828125T
 FGRID_FD_01_strgceladm01 2.0717315673828125T
 FGRID_FD_02_strgceladm01 2.0717315673828125T
 FGRID_FD_03_strgceladm01 2.0717315673828125T
 RECOC1_CD_00_strgceladm01 1.78143310546875T
 RECOC1_CD_01_strgceladm01 1.78143310546875T
 RECOC1_CD_02_strgceladm01 1.78143310546875T
 RECOC1_CD_03_strgceladm01 1.78143310546875T
 RECOC1_CD_04_strgceladm01 1.78143310546875T
 RECOC1_CD_05_strgceladm01 1.78143310546875T
 RECOC1_CD_06_strgceladm01 1.78143310546875T
 RECOC1_CD_07_strgceladm01 1.78143310546875T
 RECOC1_CD_08_strgceladm01 1.78143310546875T
 RECOC1_CD_09_strgceladm01 1.78143310546875T
 RECOC1_CD_10_strgceladm01 1.78143310546875T
 RECOC1_CD_11_strgceladm01 1.78143310546875T
 SPARSE_CD_00_strgceladm01 853.34375G
 SPARSE_CD_01_strgceladm01 853.34375G
 SPARSE_CD_02_strgceladm01 853.34375G
 SPARSE_CD_03_strgceladm01 853.34375G
 SPARSE_CD_04_strgceladm01 853.34375G
 SPARSE_CD_05_strgceladm01 853.34375G
 SPARSE_CD_06_strgceladm01 853.34375G
 SPARSE_CD_07_strgceladm01 853.34375G
 SPARSE_CD_08_strgceladm01 853.34375G
 SPARSE_CD_09_strgceladm01 853.34375G
 SPARSE_CD_10_strgceladm01 853.34375G
 SPARSE_CD_11_strgceladm01 853.34375G
[root@strgceladm01 ~]#

From ASM Instance Create a SPARSE Disk Group

SQL> CREATE DISKGROUP SPARSEC1 EXTERNAL REDUNDANCY DISK 'o/*/SPARSE_CD_*'
ATTRIBUTE
'compatible.asm' = '12.2.0.1',
'compatible.rdbms' = '12.2.0.1',
'cell.smart_scan_capable'='TRUE',
'cell.sparse_dg' = 'allsparse',
'AU_SIZE' = '4M';

Diskgroup created.

Set the following ASM attributes on the Disk Group hosting the Test Master Database

ALTER DISKGROUP DATAC1 SET ATTRIBUTE 'access_control.enabled' = 'true';

Grant access to the OS RDBMS user used to access to the Disk Group

ALTER DISKGROUP DATAC1 ADD USER 'oracle';

From an ASM Instance Set ownership permissions for every file that belongs solely to the PDB being snapped cloned as per example below

alter diskgroup DATAC1 set ownership owner='oracle' for file '+DATAC1/CDBT/<xxxxxxxxxxxxxxxxxxx>/DATAFILE/system.xxx.xxxxxxx';
alter diskgroup DATAC1 set ownership owner='oracle' for file '+DATAC1/CDBT/<xxxxxxxxxxxxxxxxxxx>/DATAFILE/sysaux.xxx.xxxxxxx';
alter diskgroup DATAC1 set ownership owner='oracle' for file '+DATAC1/CDBT/<xxxxxxxxxxxxxxxxxxx>/DATAFILE/users.xxx.xxxxxxx';
...
..

Restart the Master Test PDB in Read Only

alter pluggable database PDBTESTMASTER close immediate instances=all;
alter pluggable database PDBTESTMASTER open read only;

Create the first PDB Snapshot Copy on Exadata SPARSE Disk Group

Create pluggable database PDBDEV01 from PDBTESTMASTER tempfile reuse create_file_dest='+SPARSEC1' snapshot copy;

Feedback of the Exadata Storage Snapshots

The ability to create storage efficient database copies in a few seconds, independently from the size of the Test Master is very useful for today IT departments; but such extreme velocity and flexibility is not entirely free. In fact performance tests on a I/O bound workload have highlighted important performance degradation. This reminds us that as defined by Oracle Corporation, the Snapshot Technology, included on Exadata Machine remains a non-production option.

Feedback of Modern Consolidated Database Environment


Since the launch of Oracle 12c R1 Beta Program (August 2012) at Trivadis, we have been intensively testing, engineering and implementing Multitenant architectures for our customers.

Today, we can provide our feedbacks and those of our customers!

The overall feedback related to Oracle Multitenant is very positive, customers have been able to increase flexibility and automation, improving the efficiency of the software development life cycles.

Even the Single-tenant configuration (free of charge) brings few advantages compared to the non-CDB architecture. Therefore, from a technology point of view I recommend adopting the Container Database (CDB) architecture for all Oracle databases.


Examples of Multitenant architectures implemented

Having defined Oracle Multitenant a technological revolution on the space of relational databases, when combined with others 12c features it becomes a game changer for flexibility, automation and velocity.

Here are listed few examples of successful architectures implemented with our customers, using Oracle Container Database (CDB):


  • Database consolidation without performance and stability compromise here.


  • Multitenant and DevOps here.


  • Operating Database Disaster Recovery in Multitenant environment here.


Oracle Multitenant supports database DevOps standards

As a consultant I constantly speak with my customers, and among a big number of them I noticed that the speed and flexibility of all database provisioning activities generate huge concern.

Hence I decide to describe on this post few Oracle Multitenant options to resolve those problems.

If production is the most critical environment to maintain, it is definetly not the one generating the greatest efforts in term of provisioning. The applications are more and more complex, and require continuous delivery;  to satify those needs the infrastructure has few provisioning challengers to overcome.

Now with the Oracle version 12.2 and the Mutitenet option, the DBaaS model becomes simpler than ever.


Clone PDB

The Clone PDB operation has been enhanced from Cold to Hot Clone. This improvement requires the usage of  PDB Local Undo. The Hot Clone is now the default method and can be devided in three major steps:

  1. PDB source datafile copy, because the PDB remains open in read/write at this stage the cloned datafiles are physically inconsistent (fuzzy data files).
  2. The Redo Log entries generated on the source PDB during the copy are applied to the targed PDB. This step makes the source and target PDBs two exact physical copies.
  3. Because the Redo Log entries coming from the source PDB contain committed and uncommitted transactions, to make the target PDB transactionally consistent, the undo entries of all uncommitted transations must be applied.


The command below shows how to clone a PDB open in read/write:

Create Pluggable Database ERP_Hot_Clone from ERP;


Refreshable PDB

Refreshable PDB leverages the Hot Clone PDB capability, creating an initial copy of the source PDB refreshed over the time at scheduled interval or on-demand.

To better understand the possible use cases, the graphical example below covers the development’s request to have every morning a copy of production data.


Refreshabe_PDB_all.png


How to create a Refreshable PDB

Syntax to create an automatic refreshable PDB:

Create Pluggable Database CRM_Test from CRM_Prod@db_link refresh mode every 720; -- (12H)


Syntax to create a manual PDB refresh:

Create Pluggable Database CRM_Test from CRM_Prod@db_link refresh mode manual;


After the clone the refreshable PDB should then be opened in read-only:

Alter Pluggable Database CRM_Test read only;


How to invoke a manual PDB refresh:

Alter Pluggable Database CRM_Test refresh;


Creation of the snapshot databases:

Create Pluggable Database CRM_TEST_Snap01 FROM CRM_Test
FILE_NAME_CONVERT = ('/u03/oradata/CDB122/CRM_Test/','/u03/oradata/CDB122/CRM_Test_Snap01/')
SNAPSHOT COPY;


Oracle DB stored on ASM vs ACFS

Nowadays a new Oracle database environment with Grid Infrastructure has three main storage options:

  1. Third party clustered file system
  2. ASM Disk Groups
  3. ACFS File System

While the first option was not in scope, this blog compares the result of the tests between ASM and ACFS, highlighting when to use one or the other to store 12c NON-CDB or CDB Databases.

The tests conducted on different environments using Oracle version 12.1.0.2 July PSU have shown controversial results compared to what Oracle  is promoting for the Oracle Database Appliance (ODA) in the following paper: “Frequently Asked Questions Storing Database Files in ACFS on Oracle Database Appliance


Outcome of the tests

ASM remains the preferred option to achieve the best I/O performance, while ACFS introduces interesting features like DB snapshot to quickly and space efficiently provision new databases.

The performance gap between the two solutions is not negligible as reported below by the  AWR – TOP Timed Events sections of two PDBs, sharing the same infrastructure, executing the same workload but respectively using ASM and ACFS storage:

  • PDBASM: Pluggable Database stored on  ASM Disk Group
  • PDBACFS:Pluggable Database stored on ACFS File System


PDBASM AWR – TOP Timed Events and Other Stats

topevents_asm

fg_asm


PDBACFS AWR – TOP Timed Events and Other Stats

TopEvents_ACFS.png

fg_acfs


Due to the different characteristics and results when ASM or ACFS is in use, it is not possible to give a generic recommendation. But case by case the choise should be driven by business needs like maximum performance versus fast and efficient database clone.


New to Oracle Multitenant?

Multitenant is the biggest architectural change of Oracle 12c and the enabler of many new database options in the years to come. Therefore I have decided to write over the time, few blog posts with basic examples of what should be done and not in a multitenant database environment.


Rule #1   – What should not be done

If you are a CDB DBA, always pay attention to which container you are connected to and remember that application data should be stored on Application PDB only!

Unfortunately this golden rule is not-enforced by the RDBMS, but it is left in our responsibility as shown on the example below:

oracle@lxoel7n01:~/ [CDB_TEST] sqlplus / as sysdba

SQL*Plus: Release 12.1.0.2.0 Production on Wed Sep 21 18:28:23 2016

Copyright (c) 1982, 2014, Oracle. All rights reserved.


Connected to:
Oracle Database 12c Enterprise Edition Release 12.1.0.2.0 - 64bit Production
With the Partitioning, Automatic Storage Management, OLAP, Advanced Analytics
and Real Application Testing options

CDB$ROOT SQL>
CDB$ROOT SQL> show user
USER is "SYS"
CDB$ROOT SQL> show con_name

CON_NAME
------------------------------
CDB$ROOT


Once connected to the ROOT container let see if I can mistakenly create an application table:

CDB$ROOT SQL> CREATE TABLE EMP_1
(emp_id NUMBER,
emp_name VARCHAR2(25),
start_date DATE,
emp_status VARCHAR2(10) DEFAULT 'ACTIVE',
resume CLOB); 2 3 4 5 6

Table created.

CDB$ROOT SQL> desc emp_1
 Name                                Null?    Type
 ----------------------------------- -------- ----------------------------
 EMP_ID                                        NUMBER
 EMP_NAME                                      VARCHAR2(25)
 START_DATE                                    DATE
 EMP_STATUS                                    VARCHAR2(10)
 RESUME                                        CLOB


CDB$ROOT SQL> insert into emp_1 values (1, 'Emiliano', sysdate, 'active', ' ');

1 row created.

CDB$ROOT SQL> commit;

Commit complete.


CDB$ROOT SQL> select * from emp_1;

EMP_ID     EMP_NAME                  START_DAT EMP_STATUS RESUME
---------- ------------------------- --------- ---------- ----------------
 1          Emiliano                  21-SEP-16 active

CDB$ROOT SQL> show con_name

CON_NAME
------------------------------
CDB$ROOT

The answer is “YES” and the consequences can be devastating…


Rule #2   – Overview of Local and Common Entities

Non-schema entities can be created as local or common.  Local entities exist only in one PDB similar to a non-CDB architecture, while Common entities exist in every current and future container.

List of possible Local / Common entities in a Multitenant database:

  • Users
  • Roles
  • Profiles
  • Audit Policies

All Local entities are created from the local PDB and all Common entities are created from the CDB$ROOT container.

Common-user-defined Users, Roles and Profiles require a standard database prefix, defined by the spfile parameter COMMON_USER_PREFIX:

SQL> show parameter common_user_prefix

NAME                              TYPE        VALUE
--------------------------------- ----------- -----------------
common_user_prefix                string      C##


Example of Common User creation:

SQL> CREATE USER C##CDB_DBA1 IDENTIFIED BY PWD CONTAINER=ALL;

User created.


SQL> SELECT con_id, username, user_id, common

  2  FROM cdb_users where username='C##CDB_DBA1'  ORDER BY con_id;

    CON_ID USERNAME                USER_ID COMMON
---------- -------------------- ---------- ------
         1 C##CDB_DBA1               102    YES
         2 C##CDB_DBA1               101    YES
         3 C##CDB_DBA1               107    YES
         4 C##CDB_DBA1               105    YES
         5 C##CDB_DBA1               109    YES
         ...


Example of Local user creation:

SQL> show con_name

CON_NAME
------------------------------
MYPDB

SQL> CREATE USER application IDENTIFIED BY pwd CONTAINER=CURRENT;

User created.

If we try to create a Local User from the CDB$ROOT container the following error occurs: ORA-65049: creation of local user or role is not allowed in CDB$ROOT

SQL> show con_name

CON_NAME
------------------------------
CDB$ROOT

SQL> CREATE USER application IDENTIFIED BY pwd   CONTAINER=CURRENT;

CREATE USER application IDENTIFIED BY pwd   CONTAINER=CURRENT

                                      *

ERROR at line 1:
ORA-65049: creation of local user or role is not allowed in CDB$ROOT


Rule #3  – Application should connect through user-defined database services only

We have been avoiding to create user-defined database services for many years, sometimes even for RAC databases. But in Multitenet or Singletenant architecture the importance of user-defined database service is even greater. For each CDB and PDB Oracle is still automatically creating a default service, but as in the past the default services should never be exposed to the applications.


To create user-defined database service in stand-alone environment use the package DBMS_SERVICE while connected to the corresponding PDB:

BEGIN
 DBMS_SERVICE.CREATE_SERVICE(
     SERVICE_NAME     => 'mypdb_app.emilianofusaglia.net',
     NETWORK_NAME     => 'mypdb_app.emilianofusaglia.net',
     FAILOVER_METHOD  =>
     ...
      );
 DBMS_SERVICE.START_SERVICE('mypdp_app.emilianofusaglia.net ');
END;
/

The database services will not start automatically after opening a PDB!  Create a database trigger for this purpose.


To create user-defined database service in clustered environment use the srvctl utility from the corresponding RDBMS ORACLE_HOME:

oracle@oel7n01:~/ [EFU1] srvctl add service -db EFU \
> -pdb MYPDB -service mypdb_app.emilianofusaglia.net \
> -failovertype SELECT -failovermethod BASIC \
> -failoverdelay 2 -failoverretry 90


List all CDB database services order by Container ID:

SQL> SELECT con_id, name, pdb FROM v$services ORDER BY con_id;

    CON_ID NAME                                     PDB
---------- --------------------------------------- -----------------

         1 EFUXDB                                   CDB$ROOT   <-- CDB Default Service 
         1 SYS$BACKGROUND                           CDB$ROOT   <-- CDB Default Service 
         1 SYS$USERS                                CDB$ROOT   <-- CDB Default Service 
         1 EFU.emilianofusaglia.net                 CDB$ROOT   <-- CDB Default Service 
         1 EFU_ADMIN.emilianofusaglia.net           CDB$ROOT   <-- CDB User-defined Service  
         3 mypdb.emilianofusaglia.net               MYPDB      <-- PDB Default Service 
         3 mypdb_app.emilianofusaglia.net           MYPDB      <-- PDB User-defined Service  

7 rows selected.


EZCONNECT to a PDB using the user-defined service:

sqlplus <username>/<password>@<host_name>:<local-listener-port>/<service-name>
sqlplus application/pwd@oel7c-scan:1522/mypdb_app.emilianofusaglia.net


Rule #4  –  Backup/Recovery strategy in Multitenant

As database administrator one of the first responsibility to fulfil is the “Backup/Recovery” strategy. The migration to multitenant database, due to the high level of consolidation density requires to review existing procedures. Few infrastructure operations, like creating a Data Guard or executing a backup, have been shifted from per-database to per-container consolidating the number of tasks.

RMAN in 12c covers all CDB, PDB backup/restore combinations, even though the best practice suggests to run the daily backup at CDB level, and in case of restore needed, the granularity goes down to the single block of one PDB.  Below are reported few basic backup/restore operations in Multitenant environment.


Backup a full CDB:

RMAN> connect target /;
RMAN> backup database plus archivelog;


Backup a list of PDBs:

RMAN> connect target /;
RMAN> backup pluggable database mypdb, hrpdb plus archivelog;


Backup one PDB directly connecting to it:

RMAN> connect target sys/manager@mypdb.emilianofusaglia.net;
RMAN> backup incremental level 0 database;


Backup a PDB tablespace:

RMAN> connect target /;
RMAN> backup tablespace mypdb:system;


Generate RMAN report:

RMAN> report need backup pluggable database mypdb;


Complete PDB Restore

RMAN> connect target /;
RMAN> alter pluggable database mypdb close;
RMAN> restore pluggable database mypdb;
RMAN> recover pluggable database mypdb;
RMAN> alter pluggable database mypdb open;


Rule #5  –  Before moving to Multitenant

Oracle Multitenant has introduced many architectural changes that force the DBA to evolve how databases are administered. My last golden rule suggests to thoroughly study the multitenant/singletenant architecture before starting any implementation.

During my experiences implementing multitenant/singletenant architectures, I found great dependencies with the following database areas:

  • Provisioning/Decommissioning
  • Patching and Upgrade
  • Backup/recovery
  • Capacity Planning and Management
  • Tuning
  • Separation of duties between CDB and PDB


How to Create and Clone PDBs

################################################
## How to create a PDB Database from Seed DB  ##
################################################

CREATE PLUGGABLE DATABASE pdb01
  ADMIN USER pdb_adm IDENTIFIED BY <password> ROLES=(DBA)
  PATH_PREFIX = '/u01/'
  STORAGE (MAXSIZE 20G MAX_SHARED_TEMP_SIZE 2048M)
  FILE_NAME_CONVERT = ('+DATA01','+DATA02')
  DEFAULT TABLESPACE users DATAFILE '+DATA02' SIZE 10G AUTOEXTEND ON MAXSIZE 20G
  TEMPFILE REUSE;

ALTER PLUGGABLE DATABASE pdb01 OPEN;  


##################################################
## How to clone a PDB Database running on ASM   ##
##################################################

ALTER PLUGGABLE DATABASE pdb01 CLOSE;  
ALTER PLUGGABLE DATABASE pdb01 OPEN READ ONLY;

CREATE PLUGGABLE DATABASE pdb02 FROM pdb01;

ALTER PLUGGABLE DATABASE pdb01 OPEN READ WRITE;
ALTER PLUGGABLE DATABASE pdb02 OPEN READ WRITE;


##################################################
## How to clone a PDB Database using ACFS Snapshot Copy
##################################################
 
ALTER PLUGGABLE DATABASE pdb03 CLOSE;
ALTER PLUGGABLE DATABASE pdb03 OPEN READ ONLY;
 
 
CREATE PLUGGABLE DATABASE pdb04 FROM pdb03
FILE_NAME_CONVERT = ('/u03/oradata/CDB2/pdb03/','/u03/oradata/CDB2/pdb04/')
SNAPSHOT COPY;

ALTER PLUGGABLE DATABASE pdb03 CLOSE;
ALTER PLUGGABLE DATABASE pdb03 OPEN READ WRITE;
ALTER PLUGGABLE DATABASE pdb04 OPEN READ WRITE;
Featured

ASM 12c

A powerful framework for storage management


1 INTRODUCTION

Oracle Automatic Storage Management (ASM) is a well-known, largely used multi-platform volume manager and file system, designed for single-instance and clustered environment. Developed for managing Oracle database files with optimal performance and native data protection, simplifying the storage management; nowadays ASM includes several functionalities for general-purpose files too.
This article focuses on the architecture and characteristics of the version 12c, where great changes and enhancements of pre-existing capabilities have been introduced by Oracle.
Dedicated sections explaining how Oracle has leveraged ASM within the Oracle Engineered Systems complete the paper.


1.1 ASM 12c Instance Architecture Diagram

Below are highlighted the functionalities and the main background components associated to an ASM instance. It is important to notice how starting from Oracle 12c a database can run within ASM Disk Groups or on top of ASM Cluster file systems (ACFS).


ASM_db


Overview ASM options available in Oracle 12c.

ACFS


1.2       ASM 12c Multi-Nodes Architecture Diagram

In a Multi-node cluster environment, ASM 12c is now available in two configurations:

  • 11gR2 like: with one ASM instance on each Grid Infrastructure node.
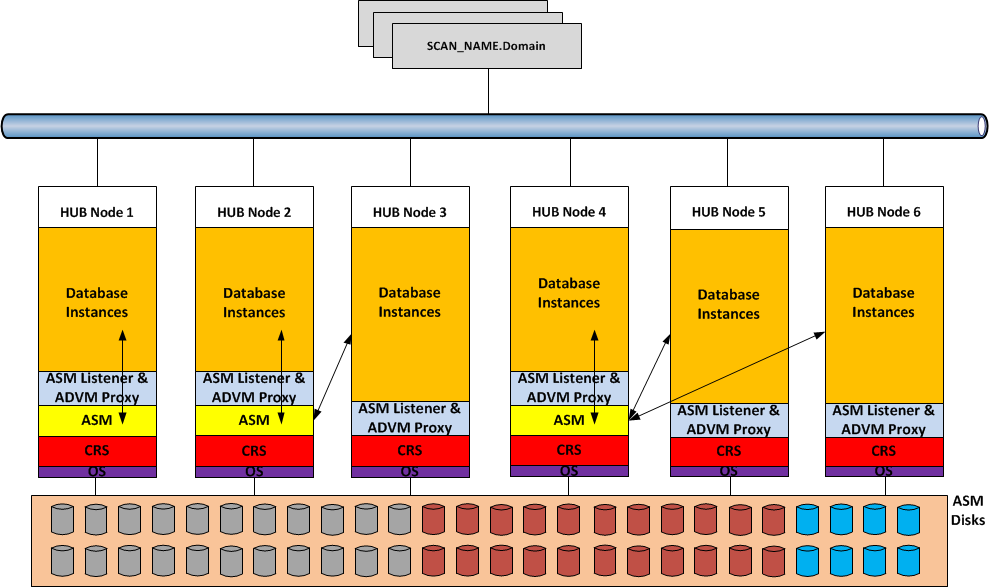
  • Flex ASM: a new concept, which leverages the architecture availability and performance of the cluster; removing the 1:1 hard dependency between cluster node and local ASM instance. With Flex ASM only few nodes of the cluster run an ASM instance, (the default cardinality is 3) and the database instances communicate with ASM in two possible way: locally or over the ASM Network. In case of failure of one ASM instance, the databases automatically and transparently reconnect to another surviving instance on the cluster. This major architectural change required the introduction of two new cluster resources, ASM-Listener for supporting remote client connections and ADVM-Proxy, which permits the access to the ACFS layer. In case of wide cluster installation, Flex ASM enhances the performance and the scalability of the Grid Infrastructure, reducing the amount of network traffic generated between ASM instances.


Below two graphical representations of the same Oracle cluster; on the first drawing ASM is configured with pre-12c setup, on the second one Flex ASM is in use.

ASM architecture 11gR2 like

01_NO_FlexASM_Drawing


Flex ASM architecture

01_FlexASM_Drawing


2  ASM 12c NEW FEATURES

The table below summarizes the list of new functionalities introduced on ASM 12c R1

Feature Definition
Filter Driver Filter Driver (Oracle ASMFD) is a kernel module that resides in the I/O

path of the Oracle ASM disks used to validate write I/O requests to Oracle ASM disks, eliminates accidental overwrites of Oracle ASM disks that would cause corruption. For example, the Oracle ASM Filter Driver filters out all non-Oracle I/Os which could cause accidental overwrites.

General ASM Enhancements –       Oracle ASM now replicates physically addressed metadata, such as the disk header and allocation tables, within each disk, offering a better protection against bad block disk sectors and external corruptions.

–       Increased storage limits: ASM can manage up to 511 disk groups and a maximum disk size of 32 PB.

–       New REPLACE clause on the ALTER DISKGROUP statement.

Disk Scrubbing Disk scrubbing checks logical data corruptions and repairs the corruptions automatically in normal and high redundancy disks groups. This process automatically starts during rebalance operations or the administrator can trigger it.
Disk Resync Enhancements It enables fast recovery from instance failure and faster resyncs performance. Multiple disks can be brought online simultaneously. Checkpoint functionality enables to resume from the point where the process was interrupted.
Even Read For Disk Groups If ASM mirroring is in use, each I/O request submitted to the system can be satisfied by more than one disk. With this feature, each request to read is sent to the least loaded of the possible source disks.
ASM Rebalance Enhancements The rebalance operation has been improved in term of scalability, performance, and reliability; supporting concurrent operations on multiple disk groups in a single instance.  In this version, it has been enhanced also the support for thin provisioning, user-data validation, and error handling.
ASM Password File in a Disk Group ASM Password file is now stored within the ASM disk group.
Access Control Enhancements on Windows It is now possible to use access control to separate roles in Windows environments. With Oracle Database services running as users rather than Local System, the Oracle ASM access control feature is enabled to support role separation on Windows.
Rolling Migration Framework for ASM One-off Patches This feature enhances the rolling migration framework to apply oneoff patches released for ASM in a rolling manner, without affecting the overall availability of the cluster or the database


Updated Key Management Framework This feature updates Oracle key management commands to unify the key management application programming interface (API) layer. The updated key management framework makes interacting with keys in the wallet easier and adds new key metadata that describes how the keys are being used.


2.1 ASM 12c Client Cluster

One more ASM functionality explored but still in phase of development and therefore not really documented by Oracle, is ASM Client Cluster

Designed to host applications requiring cluster functionalities (monitoring, restart and failover capabilities), without the need to provision local shared storage.

The ASM Client Cluster installation is available as configuration option of the Grid Infrastructure binaries, starting from version 12.1.0.2.1 with Oct. 2014 GI PSU.

The use of ASM Client Cluster imposes the following pre-requisites and limitations:

  • The existence of an ASM Server Cluster version 12.1.0.2.1 with Oct. 2014 GI PSU, configured with the GNS server with or without zone delegation.
  • The ASM Server Cluster becomes aware of the ASM Client Cluster by importing an ad hoc XML configuration containing all details.
  • The ASM Client Cluster uses the OCR, Voting Files and Password File of the ASM Server Cluster.
  • ASM Client Cluster communicates with the ASM Server Cluster over the ASM Network.
  • ASM Server Cluster provides remote shared storage to ASM Client Cluster.


As already mentioned, at the time of writing this feature is still under development and without official documentation available, the only possible comment is that the ASM Client Cluster looks similar to another option introduced by Oracle 12c and called Flex Cluster. In fact, Flex Cluster has the concept of HUB and LEAF nodes; the first used to run database workload with direct access to the ASM disks and the second used to host applications in HA configuration but without direct access to the ASM disks.


3  ACFS NEW FEATURES

In Oracle 12c the Automatic Storage Management Cluster File System supports more and more types of files, offering advanced functionalities like snapshot, replication, encryption, ACL and tagging.  It is also important to highlight that this cluster file system comply with the POSIX standards of Linux/UNIX and with the Windows standards.

Access to ACFS from outside the Grid Infrastructure cluster is granted by NFS protocol; the NFS export can be registered as clusterware resource becoming available from any of the cluster nodes (HANFS).

Here is an exhaustive list of files supported by ACFS: executables, trace files, logs, application reports, BFILEs, configuration files, video, audio, text, images, engineering drawings, general-purpose and Oracle database files.

The major change, introduced in this version of ACFS, is definitely the capability and support to host Oracle database files; granting access to a set of functionalities that in the past were restricted to customer files only. Among them, the most important is the snapshot image, which has been fully integrated with the database Multitenant architecture, allowing cloning entire Pluggable databases in few seconds, independently from the size and in space efficient way using copy-on-write technology.

The snapshots are created and immediately available in the “<FS_mount_point>.ASFS/snaps” directory, and can be generated and later converted from read-only to read/write and vice versa. In addition, ACFS supports nested snapshots.


Example of ACFS snapshot copy:

-- Create a read/write Snapshot copy
[grid@oel6srv02 bin]$ acfsutil snap create -w cloudfs_snap /cloudfs

-- Display Snapshot Info
[grid@oel6srv02 ~]$ acfsutil snap info cloudfs_snap /cloudfs
snapshot name:               cloudfs_snap
RO snapshot or RW snapshot:  RW
parent name:                 /cloudfs
snapshot creation time:      Wed May 27 16:54:53 2015

-- Display specific file info 
[grid@oel6srv02 ~]$ acfsutil info file /cloudfs/scripts/utl_env/NEW_SESSION.SQL
/cloudfs/scripts/utl_env/NEW_SESSION.SQL
flags:        File
inode:        42
owner:        oracle
group:        oinstall
size:         684
allocated:    4096
hardlinks:    1
device index: 1
major, minor: 251,91137
access time:  Wed May 27 10:34:18 2013
modify time:  Wed May 27 10:34:18 2013
change time:  Wed May 27 10:34:18 2013
extents:
-offset ----length | -dev --------offset
0       4096 |    1     1496457216
extent count: 1

--Convert the snapshot from Read/Write to Read-only
acfsutil snap convert -r cloudfs_snap /cloudfs

 --Drop the snapshot 
[grid@oel6srv02 ~]$ acfsutil snap delete cloudfs_snap /cloudfs

Example of Pluggable database cloned using ACFS snapshot copy List of requirements that must be met to use ACFS SNAPSHOT COPY clause:

      • All pluggable database files of the source PDB must be stored on ACFS.


      • The source PDB cannot be in a remote CDB.


      • The source PDB must be in read-only mode.


      • Dropping the parent PDB with the including datafiles clause, does not automatically remove the snapshot dependencies, manual intervention is required.


SQL> CREATE PLUGGABLE DATABASE pt02 FROM ppq01
2  FILE_NAME_CONVERT = ('/u02/oradata/CDB4/PPQ01/',
3                       '/u02/oradata/CDB4/PT02/')
4  SNAPSHOT COPY;
Pluggable database created.
Elapsed: 00:00:13.70

The PDB snapshot copy imposes few restrictions among which the source database opened in read-only. This requirement prevents the implementation on most of the production environments where the database must remain available in read/write 24h/7. For this reason, ACFS for database files is particularly recommended on test and development where flexibility, speed and space efficiency of the clones are key factors for achieving high productive environment.

Graphical representation of how efficiently create and maintain a Test & Development database environment:

DB_Snapshot


4 ASM 12c and ORACLE ENGINEERED SYSTEMS

Oracle has developed few ASM features to leverage the characteristics of the Engineered Systems. Analyzing the architecture of the Exadata Storage, we see how the unique capabilities of ASM make possible to stripe and mirror data across independent set of disks grouped in different Storage Cells.

The sections below describe the implementation of ASM on the Oracle Database Appliance (ODA) and Exadata systems.


4.1 ASM 12c on Oracle Database Appliance

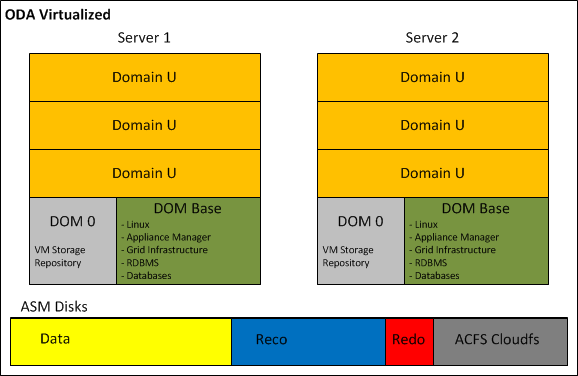
Oracle Database Appliance is a simple, reliable and affordable system engineered for running database workloads. One of the key characteristics present since the first version is the pay-as-you-grow model; it permits to activate a crescendo number of CPU-cores when needed, optimizing the licensing cost. With the new version of the ODA software bundle, Oracle has introduced the configuration Solution-in-a-box; which includes the virtualization layer for hosting Oracle databases and application components on the same appliance, but on separate virtual machines. The next sections highlight how the two configurations are architected and the role played by ASM:

  • ODA Bare metal: available since version one of the appliance, this is still the default configuration proposed by Oracle. Beyond the automated installation process, it is like any other two-node cluster, with all ASM and ACFS features available.


ODA_Bare_Metal


  • ODA Virtualized: on both ODA servers runs the Oracle VM Server software, also called Dom0. Each Dom0 hosts the ODA Base (or Dom Base), a privileged virtual machine where it is installed the Appliance Manager, Grid Infrastructure and RDBMS binaries. The ODA Base takes advantage of the Xen PCI Pass-through technology to provide direct access to the ODA shared disks presented and managed by ASM. This configuration reduces the VM flexibility; in fact, no VM migration is allowed, but it guarantees almost no I/O penalty in term of performance. After the Dom Base creation, it is possible to add Virtual Machine where running application components. Those optional application virtual machines are also identified with the name of Domain U.

By default, all VMs and templates are stored on a local Oracle VM Server repository, but in order to be able to migrate application virtual machines between the two Oracle VM Servers a shared repository on the ACFS file system should be created.

The implementation of the Solution-in-a-box guarantees the maximum Return on Investment of the ODA, because while licensing only the virtual CPUs allocated to Dom Base, the remaining resources are assigned to the application components as showed on the picture below.

ODA_Virtualized


4.2 ACFS Becomes the default database storage of ODA

Starting from Version 12.1.0.2, a fresh installation of the Oracle Database Appliance adopts ACFS as primary cluster file system to store database files and general-purpose data. Three file systems are created in the ASM disk groups (DATA, RECO, and REDO) and the new databases are stored in these three ACFS file systems instead of in the ASM disk groups.

In case of ODA upgrade from previous release to 12.1.0.2, all pre-existing databases are not automatically migrated to ACFS; but can coexist with the new databases created on ACFS.

At any time, the databases can be migrated from ASM to ACFS as post upgrade step.

Oracle has decided to promote ACFS as default database storage on ODA environment for the following reasons:


  • ACFS provides almost equivalent performance than Oracle ASM disk groups.
  • Additional functionalities on industry standard POSIX file system.
  • Database snapshot copy of PDBs, and NON-CDB version 11.2.0.4 of greater.
  • Advanced functionality for general-purpose files such as replication, tagging, encryption, security, and auditing.

Database created on ACFS follows the same Oracle Managed Files (OMF) standard used by ASM.


4.3 ASM 12c on Exadata Machine

Oracle Exadata Database machine is now at the fifth hardware generation; the latest software update has embraced the possibility to run virtual environments, but differently from the ODA or other Engineered System like Oracle Virtual Appliance, the VMs are not intended to host application components. ASM plays a key role on the success of the Exadata, because it orchestrates all Storage Cells in a way that appear as a single entity, while in reality, they do not know and they do not talk to each other.

The Exadata, available in a wide range of hardware configurations from 1/8 to multi-racks, offers a great flexibility on the storage setup too. The sections below illustrate what is possible to achieve in term of storage configuration when the Exadata is exploited bare metal and virtualized:

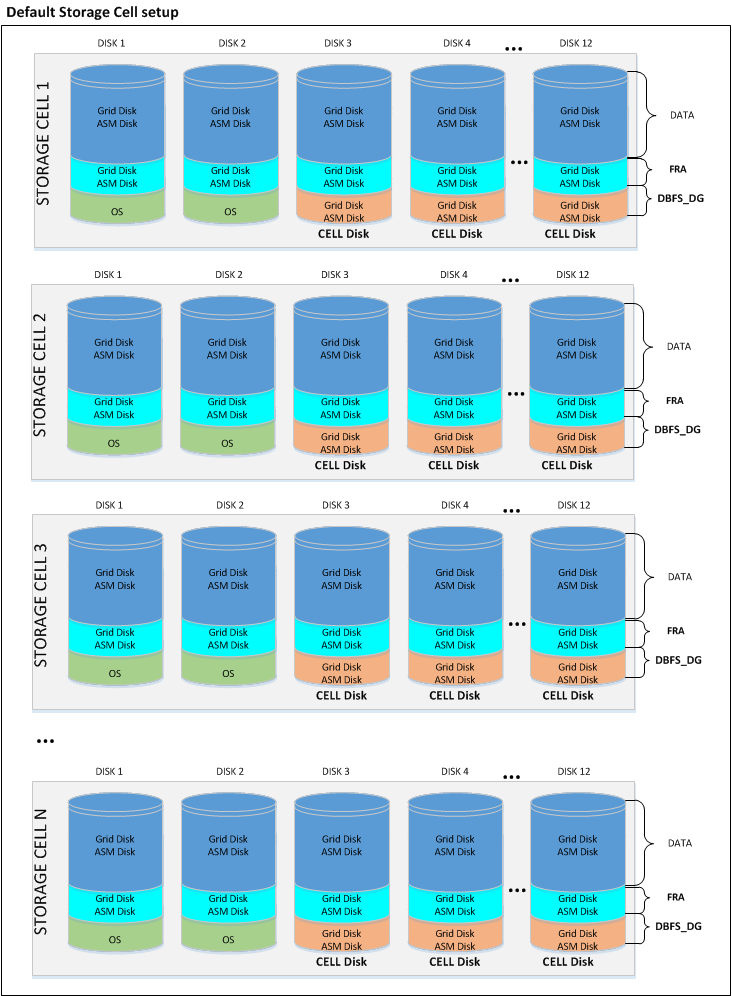
  • Exadata Bare Metal: despite the default storage configuration, which foresees three disk groups striped across all Storage Cells, guaranteeing the best I/O performance; as post-installation step, it is possible to deploy a different configuration. Before changing the storage setup, it is vital to understand and evaluate all associated consequences. In fact, even though in specific cases can be a meaningful decision, any storage configuration different from the default one, has as result a shift from optimal performance to flexibility and workload isolation.

Shown below a graphical representation of the default Exadata storage setup, compared to a custom configuration, where the Storage Cells have been divided in multiple groups, segmenting the I/O workloads and avoiding disruption between environments.

Exa_BareMetal_Disks_Default

Exa_BareMetal_Disks_Segmented.png

  • Exadata Virtualized: the installation of the Exadata with the virtualization option foresees a first step of meticulous capacity planning, defining the resources to allocate to the virtual machines (CPU and memory) and the size of each ASM disk group (DBFS, Data, Reco) of the clusters. This last step is particularly important, because unlike the VM resources, the characteristics of the ASM disk groups cannot be changed.

The new version of the Exadata Deployment Assistant, which generates the configuration file to submit to the Exadata installation process, now in conjunction with the use of Oracle Virtual Machines, permits to enter the information related to multiple Grid Infrastructure clusters.

The hardware-based I/O virtualization (so called Xen SR-IOV Virtualization), implemented on the Oracle VMs running on the Exadata Database servers, guarantees almost native I/O and Networking performance over InfiniBand; with lower CPU consumption when compared to a Xen Software I/O virtualization. Unfortunately, this performance advantage comes at the detriment of other virtualization features like Load Balancing, Live Migration and VM Save/Restore operations.

If the Exadata combined with the virtualization open new horizon in term of database consolidation and licensing optimization, do not leave any option to the storage configuration. In fact, the only possible user definition is the amount of space to allocate to each disk group; with this information, the installation procedure defines the size of the Grid Disks on all available Storage Cells.

Following a graphical representation of the Exadata Storage Cells, partitioned for holding three virtualized clusters. For each cluster, ASM access is automatically restricted to the associated Grid Disks.

Exa_BareMetal_Disk_Virtual


4.4 ACFS on Linux Exadata Database Machine

Starting from version 12.1.0.2, the Exadata Database Machine running Oracle Linux, supports ACFS for database file and general-purpose, with no functional restriction.

This makes ACFS an attractive storage alternative for holding: external tables, data loads, scripts and general-purpose files.

In addition, Oracle ACFS on Exadata Database Machines supports database files for the following database versions:

  • Oracle Database 10g Rel. 2 (10.2.0.4 and 10.2.0.5)
  • Oracle Database 11g (11.2.0.4 and higher)
  • Oracle Database 12c (12.1.0.1 and higher)

Since Exadata Storage Cell does not support database version 10g, ACFS becomes an important storage option for customers wishing to host older databases on their Exadata system.

However, those new configuration options and flexibility come with one major performance restriction. When ACFS for database files is in use, the Exadata is still not supporting the Smart Scan operations and is not able to push database operations directly to the storage. Hence, for a best performance result, it is recommended to store database files on the Exadata Storage using ASM disk groups.

As per any other system, when implementing ACFS on Exadata Database Machine, snapshots and tagging are supported for database and general-purpose files, while replication, security, encryption, audit and high availability NFS functionalities are only supported with general-purpose files.


 5 Conclusion

Oracle Automatic Storage Management 12c is a single integrated solution, designed to manage database files and general-purpose data under different hardware and software configurations. The adoption of ASM and ACFS not only eliminates the need for third party volume managers and file systems, but also simplifies the storage management offering the best I/O performance, enforcing Oracle best practices. In addition, ASM 12c with the Flex ASM setup removes previous important architecture limitations:

  • Availability: the hard dependency between the local ASM and database instance, was a single point of failure. In fact, without Flex ASM, the failure of the ASM instance causes the crash of all local database instances.
  • Performance: Flex ASM reduces the network traffic generated among the ASM instances, leveraging the architecture scalability; and it is easier and faster to keep the ASM metadata synchronized across large clusters. Finally yet importantly, only few nodes of the cluster have to support the burden of an ASM instance, leaving additional resources to application processing.


Oracle ASM offers a large set of configurations and options; it is now our duty to understand case-by-case, when it is relevant to use one setup or another, with the aim to maximize performance, availability and flexibility of the infrastructure.


Oracle Cloud Computing

What is a database Cloud Computing?

This looks like the million dollar question; what we know for sure is that it is a quite recent technology and different people identify the Cloud Architecture by different key features (On-Demand, Broad Network Access, Resource Pooling, Rapid Elasticity, Measured Service). There are two main categories: Private and Public Cloud, which identifies respectively in house and outsourced Cloud installation. Focusing on Oracle Database technology the Private Cloud is a clustered infrastructure hosted on the company?s data center, therefore the IT department is responsible of the installation, maintenance and life cycle of all hardware and software components. In case of Public Cloud the company demands the management of the databases to a third party, which owns the infrastructure used to manage the databases of different customers.

Beyond the different marketing definitions of database cloud computing, Oracle provides a reach set of features to realize this kind of setup. The main component of this architecture is the Grid Infrastructure, which provides the cluster and storage foundation of Oracle Cloud Computing. On top of the Grid Infrastructure we have the RDBMS which enables RAC, RAC One Node and stand-alone database setups.

At this point, anyone can say that with the exception of the name, there is almost nothing new compared to the earlier version of Oracle Real Application Cluster (RAC). But Oracle Cloud Computing is much more than a simple multi-node RAC which hosts several databases; the introduction of features like Quality of Service Management (QoS), Server Pool, Instance Caging (extension of Resource Manager) and the enhancement of the existing ones, allow to consolidate all the environments guaranteeing to each application: the performance expected, the scalability for future needs, the availability to respect the Service Level Agreement (SLA), the best time to market, the governance of the entire platform and last but not least cost saving.

Obviously Oracle provides all the instruments to reach such great result, but it is up to the single organization to define and implement the most appropriate modus operandi in terms of OM, Life Cycle, Capacity planning and management, to obtain the result promised by this great technology.