Introduction to Oracle Dedicated Region Cloud@Customer (DRCC)

Over the past few years, the public cloud adoption has become mainstream and the enterprises take advantage of the cloud in term of cost reduction, agility, flexibility, automation and self-service activities.

But it exists a large portion of critical workloads that due to regulatory and performance-related contraints, cannot currently be moved to the public cloud. To solve those restrictions, Oracle has engineered a unique solution named Oracle Dedicated Region Cloud@Customer (DRCC).

Designed as alternative to the OCI public cloud, it offers the same services at the same conditions available on the OCI public regions, inside the customer’s data center.

The main use cases for the DRCC adoption are associated to the following constraints:

  1. Data Sovereignty
  2. Security and Control
  3. Network Latency

Data Sovereignty

Data sovereignty generally refers to government efforts to prevent their citizens’ data from falling into the wrong hands via measures that restrict how businesses can transfer personal information beyond their country’s borders. Those measures can be in the form of regulations—think General Data Protection Regulation (GDPR) in the European Union, which regulates data privacy in the European Union and the European Economic Area as well as the transfer of personal data from those regions, or the California Consumer Privacy Act (CCPA), which gives citizens the right to know what personal information companies collect about them and how it is used and shared.

source: https://www.oracle.com/security/saas-security/data-sovereignty/

Security and Control

Restricting the physical access to the data center to special granted employees, and keeping the data behind the company’s firewall.

Network Latency

Specific applications (like trading or Voice over IP) are very sensitive to the increase of the network latency, therefore cannot be easily relocated to the public cloud.


DRCC Overview

As previously mentioned, the DRCC implementation offers the same services at the same conditions available on the OCI public region, for a full list of OCI services and associated SLA please check this link.

The main differences between the DRCC and the OCI region are:

  • It is built inside the customer’s premises
  • Data never leaves the customer’s premises
  • The infrastructure is remotely managed by Oracle
  • All resources are dedicated to one tenant

High level DRCC architecture

List of currently available major DRCC services


DRCC Benefits

Oracle Dedicated Region Cloud@Customer brings all public cloud capabilities on-premises, so the enterprises can reduce infrastructure and operational costs, upgrade legacy applications on modern cloud platform, and meet the most demanding regulatory, data residency and latency requirements:

  • Bring all existing OCI services (at the time of this blog post around 80) including the Autonomous Database, eliminating any technical debt.
  • Leading cloud performance
  • Security-first architecture that reduces the risk and attack surfaces
  • Keep full control of all data to meet the most demanding data privacy and latency requirements.
  • Pay only for the services consumed and during the utilization period.
  • Deploy seamlessly between on-premises and public cloud, using the exact same tools, APIs, and SLA available in OCI and DRCC.
  • Single-vendor cloud accountability and management for all cloud platform, database, and infrastructure


Conclusion

Oracle DRCC unique characteristics offers cloud-scale security, resiliency and superior performance, allowing to meet the most stringents requirements in terms of data residency and latency.

DRCC expands the public OCI offers, enabling customers to build and operate modern applications inside their data center at the same price offered in Oracle’s public cloud.

More details about DRCC are available at the follwing Oracle corporate link.


Exadata as Code – PDB Snapshot Cloning

As follow up to the Exadata as Code post, today I’m going to focus on one of the latest features added to our automation: PDB Snapshot Cloning.

PDB snapshot cloning is one of the best development options to offers in a CI/CD project. In an Exadata environment there are special requirements to implement before start using this technology: Sparse Grid Disks and Sparse ASM Disk Group ( description and step-by-step example is available here).

On Exadata, the PDB Snapshot beneficial of all Smart features including offload capabilities, with in addition space- and time-efficient provisioning.

After this brief introduction let’s see how the PDB Snapshot Cloning has been implemented on our Exadata as Code automation.

Exadata Sparse Storage Automation

Select the Oracle Container Database (CDB) where the PDB Snapshot Cloning should be activated, and with One-click provisioning the Sparse Grid disks and Sparse ASM disk group are created.

After the initial provisioning, the automation starts monitoring the space usage, automatically resizing it (increasing/decreasing) when necessary.


Automated storage lifecycle management


PDB Snapshot Cloning Automation

Same principle applies to the different PDB actions: One-click Provisioning/Decommissioning of the PDB Test Master and PDB Snapshot.

Those features are exposed via UI or API to the application developers, making them autonomous on the management of such space efficient database environment.

PDB Snapshot lifecycle management


Exadata as Code

It is very exciting for me to share this post, because what I’m going to describe here is not the final, but the current and intermediate result achieved by the Trivadis team on the development and implementation of what I call “Exadata as Code” project.

In the Cloud and automation era, this is the Trivadis answer to increase efficiency, time-to-market and quality on the most challenging Exadata projects. Trivadis has been working hard to achieve this level of automation, covering most of the recurrent activities on the platform, and this is not all, as any CI/CD development, it is getting every day better, enriched by new features and fixes, which simplify the lifecycle management of such platforms.

Few months ago, I posted a blog entitled Bulk Exadata Patching, where it is shown how to improve the Exadata patching automation, but despite the improvements, it was still having a number of manual interactions. Now we have reached a much better level of automation, with one-click action to perform cumbersome tasks like: Infrastructure and Database Provisioning/Decommissioning, Patching, and many other operational tasks.

How Exadata as Code works

The concept is quite simple, all developments are made available in the form of Ansible playbooks and incapsulated inside Jenkins; this brings the following advantages:

  • User friendly interface
  • Orchestration Pipelines
  • Enhanced Security, recording auditing information and logging job executions
  • Job Scheduling

Exadata Administration Workflow

Scalable solution with which efficiently manage Exadata platforms

Oracle Database Administration Workflow

Secure high quality database operation with an effective DBA Team

Wrap-up

One takeaway from this experience, automation is the only option to stay competitive and deliver high quality service.


Special thanks go to all Trivadis’ colleagues working everyday so passionately on the project #BetterTogether.


Ksplice for Exadata

Here is detailed how installing online Uptrack fixes on the Exadata Linux Kernel using Oracle Kesplice.

Quick licensing information this option requires “Oracle Linux Premier Support Customers” for all details please visit this link


Exadata Online Linux Kernel Patching

Downloading the Uptrack from linux.oracle.com

If still present remove the exadata-sun.*computenode-exact RPM

yum list installed | grep 'exadata-sun.*computenode-exact'

[root@tvdexa07db01 Ksplice]# yum list installed | grep 'exadata-sun.*computenode-exact'
exadata-sun-vm-computenode-exact.noarch
[root@tvdexa07db01 Ksplice]#

[root@tvdexa07db01 Ksplice]# yum erase exadata-sun-vm-computenode-exact.noarch
Resolving Dependencies
--> Running transaction check
---> Package exadata-sun-vm-computenode-exact.noarch 0:19.3.4.0.0.200130-1 will be erased
--> Finished Dependency Resolution

Dependencies Resolved


Install the Uptrack update

[root@tvdexa07db01 Ksplice]# yum install uptrack-updates-4.14.35-1902.9.2.el7uek.x86_64-20200417-0.noarch.rpm
Examining uptrack-updates-4.14.35-1902.9.2.el7uek.x86_64-20200417-0.noarch.rpm: uptrack-updates-4.14.35-1902.9.2.el7uek.x86_64-20200417-0.noarch
Marking uptrack-updates-4.14.35-1902.9.2.el7uek.x86_64-20200417-0.noarch.rpm as an update to uptrack-updates-4.14.35-1902.9.2.el7uek.x86_64-20200128-0.noarch
Resolving Dependencies
--> Running transaction check
---> Package uptrack-updates-4.14.35-1902.9.2.el7uek.x86_64.noarch 0:20200128-0 will be updated
---> Package uptrack-updates-4.14.35-1902.9.2.el7uek.x86_64.noarch 0:20200417-0 will be an update
--> Finished Dependency Resolution

Dependencies Resolved

Upgrade 1 Package

Total size: 18 M
Is this ok [y/d/N]: y
Downloading packages:
Running transaction check
Running transaction test
Transaction test succeeded
Running transaction
Updating : uptrack-updates-4.14.35-1902.9.2.el7uek.x86_64-20200417-0.noarch 1/2
The following steps will be taken:
Install [mnnc6fcu] CVE-2019-3016: Privilege escalation in KVM guest paravirtualized TLB flushes.
Install [tvgkcphj] Improved fix to CVE-2019-3016: Privilege escalation in KVM guest paravirtualized TLB flushes.
Install [bss17slx] CVE-2019-19332: Denial-of-service in KVM cpuid emulation reporting.
Install [sl587t78] Missing Non Maskable Interrupts on AMD KVM guests.
Install [98393wix] CVE-2016-5244: Information leak in the RDS network protocol.
Install [alabfukc] CVE-2019-17666: Remote code execution in Realtek peer-to-peer Wifi.
Install [sc77umtr] CVE-2019-0155: Privilege escalation in Intel i915 graphics driver.
Install [o8kefoq8] CVE-2019-0154: Denial-of-service in Intel i915 graphics driver.
Install [cy9t2fe7] Improved fix to CVE-2019-11135: Side-channel information leak in Intel TSX on late microcode update.
Install [3h40qtja] IO hang on block multiqueue device waits.
Install [ll4csbbo] CVE-2019-20054: Denial-of-service in procfs sysctl removal.
Install [r7vboahq] Deadlock in Reliable Datagram socket connection.
Install [pojd20br] Denial-of-service in Reliable Datagram Socket send cancellation.
Install [ayrz7nql] CVE-2020-2732: Privilege escalation in Intel KVM nested emulation.
Install [e6szjj4l] CVE-2019-14901: Denial-of-service when parsing TDLS action frame in Marvell WiFi-Ex driver.
Install [9253ftyr] CVE-2019-15291: Denial-of-service in B2C2 FlexCop driver probing.
Install [h6qm8tqh] IO hang in Reliable Datagram Socket remote DMA socket closing.
Install [jmo8wvme] Denial-of-service in CIFS POSIX file locks on close.
Install [c92mbxy5] CVE-2019-15538: Denial-of-service in XFS filesystem with Quota support enabled.
Install [6z2m3403] CVE-2020-7053: Use-after-free when destroying i915 GEM context.
Install [c5t3d5fa] NULL dereference while loading userspace I/O driver.
Install [8dgt3zi6] CVE-2019-14895: Denial-of-service when receiving Country WLAN element in Marvell WiFi-Ex driver.
Install [a4scbw6j] Kernel panic in Infiniband RDMA QP send queues.
Install [9m542zj0] Denial-of-service in IPMI device registration.
Install [jq0r6r0v] Denial-of-service in Pressure Stall Information cgroup destruction.
Install [m5jqkbu3] Denial-of-service in Infiniband pool destruction.
Install [miag3lwz] CVE-2019-19338: Missing Intel TAA mitigation in KVM guests.
Install [28o9c5jg] CVE-2019-14615: Information leak in Intel i915 generation 9 devices.
Install [e9ghelsq] Race condition in crypto initialization causes denial-of-service.
Install [8kg2ltrj] Denial-of-service in XFS whiteout renames.
Install [djt21tl9] NULL pointer dereference when mounting a GFS2 filesystem.
Install [fmlfqa0h] NULL-pointer dereference when driver logs in/out of system.
Install [r0hywzwk] Soft lockup in low memory situation due to misused allocator in LPFC.
Install [o6ivsuer] Use-after-free due to race condition in LPFC NVME write handling.
Install [muzxn90m] Hard lock up when handling aborts for LPFC.
Install [297glmum] Soft lockup when multiple threads read /proc/stat simultaneously.
Install [p2wsrgbk] Denial-of-service in the batman-adv subsystem.
Install [tg92ldhm] Spurious signals during TTY reopen.
Install [e6k3gzxq] CVE-2019-18809: Memory leak when identifying state in Afatech AF9005 DVB-T USB1.1 driver.
Install [9ccfw3yo] CVE-2019-18806: Memory leak when allocating large buffers in QLogic QLA3XXX Network driver.
Install [73fkk23h] Use-after-free when using NFS with page cache.
Install [d4thcifo] NULL pointer dereference during UBIFS mount.
Install [jdwrgfic] CVE-2020-10942: Out-of-bounds memory access in the Virtual host driver.
Install [iizw2yj1] Use-after-free when constructing ERSPAN packet header.
Install [221vs9ih] Deadlock when deleting NVMe namespace fails.
Install [1outnjhr] Out-of-bounds read when transmitting packet using XFRM.

Install [i6sjtrm9] Point-to-Point Protocol IOCDETACH ioctl causes use-after-free.
Install [8grqdp2d] Flawed logic in read/write semaphore implementation causes crash.
Install [jsndggsn] System fails to generate vmcore dump after panic.
Install [p6dow9c8] CVE-2018-5953: Information leak in software IO TLB driver.
Installing [mnnc6fcu] CVE-2019-3016: Privilege escalation in KVM guest paravirtualized TLB flushes.
Installing [tvgkcphj] Improved fix to CVE-2019-3016: Privilege escalation in KVM guest paravirtualized TLB flushes.
Installing [bss17slx] CVE-2019-19332: Denial-of-service in KVM cpuid emulation reporting.
Installing [sl587t78] Missing Non Maskable Interrupts on AMD KVM guests.
Installing [98393wix] CVE-2016-5244: Information leak in the RDS network protocol.
Installing [alabfukc] CVE-2019-17666: Remote code execution in Realtek peer-to-peer Wifi.
Installing [sc77umtr] CVE-2019-0155: Privilege escalation in Intel i915 graphics driver.
Installing [o8kefoq8] CVE-2019-0154: Denial-of-service in Intel i915 graphics driver.
Installing [cy9t2fe7] Improved fix to CVE-2019-11135: Side-channel information leak in Intel TSX on late microcode update.
Installing [3h40qtja] IO hang on block multiqueue device waits.
Installing [ll4csbbo] CVE-2019-20054: Denial-of-service in procfs sysctl removal.
Installing [r7vboahq] Deadlock in Reliable Datagram socket connection.
Installing [pojd20br] Denial-of-service in Reliable Datagram Socket send cancellation.
Installing [ayrz7nql] CVE-2020-2732: Privilege escalation in Intel KVM nested emulation.
Installing [e6szjj4l] CVE-2019-14901: Denial-of-service when parsing TDLS action frame in Marvell WiFi-Ex driver.
Installing [9253ftyr] CVE-2019-15291: Denial-of-service in B2C2 FlexCop driver probing.
Installing [h6qm8tqh] IO hang in Reliable Datagram Socket remote DMA socket closing.
Installing [jmo8wvme] Denial-of-service in CIFS POSIX file locks on close.
Installing [c92mbxy5] CVE-2019-15538: Denial-of-service in XFS filesystem with Quota support enabled.
Installing [6z2m3403] CVE-2020-7053: Use-after-free when destroying i915 GEM context.
Installing [c5t3d5fa] NULL dereference while loading userspace I/O driver.
Installing [8dgt3zi6] CVE-2019-14895: Denial-of-service when receiving Country WLAN element in Marvell WiFi-Ex driver.
Installing [a4scbw6j] Kernel panic in Infiniband RDMA QP send queues.
Installing [9m542zj0] Denial-of-service in IPMI device registration.
Installing [jq0r6r0v] Denial-of-service in Pressure Stall Information cgroup destruction.
Installing [m5jqkbu3] Denial-of-service in Infiniband pool destruction.
Installing [miag3lwz] CVE-2019-19338: Missing Intel TAA mitigation in KVM guests.
Installing [28o9c5jg] CVE-2019-14615: Information leak in Intel i915 generation 9 devices.
Installing [e9ghelsq] Race condition in crypto initialization causes denial-of-service.
Installing [8kg2ltrj] Denial-of-service in XFS whiteout renames.
Installing [djt21tl9] NULL pointer dereference when mounting a GFS2 filesystem.
Installing [fmlfqa0h] NULL-pointer dereference when driver logs in/out of system.
Installing [r0hywzwk] Soft lockup in low memory situation due to misused allocator in LPFC.
Installing [o6ivsuer] Use-after-free due to race condition in LPFC NVME write handling.
Installing [muzxn90m] Hard lock up when handling aborts for LPFC.
Installing [297glmum] Soft lockup when multiple threads read /proc/stat simultaneously.
Installing [p2wsrgbk] Denial-of-service in the batman-adv subsystem.
Installing [tg92ldhm] Spurious signals during TTY reopen.
Installing [e6k3gzxq] CVE-2019-18809: Memory leak when identifying state in Afatech AF9005 DVB-T USB1.1 driver.
Installing [9ccfw3yo] CVE-2019-18806: Memory leak when allocating large buffers in QLogic QLA3XXX Network driver.
Installing [73fkk23h] Use-after-free when using NFS with page cache.
Installing [d4thcifo] NULL pointer dereference during UBIFS mount.
Installing [jdwrgfic] CVE-2020-10942: Out-of-bounds memory access in the Virtual host driver.
Installing [iizw2yj1] Use-after-free when constructing ERSPAN packet header.
Installing [221vs9ih] Deadlock when deleting NVMe namespace fails.
Installing [1outnjhr] Out-of-bounds read when transmitting packet using XFRM.
Installing [i6sjtrm9] Point-to-Point Protocol IOCDETACH ioctl causes use-after-free.
Installing [8grqdp2d] Flawed logic in read/write semaphore implementation causes crash.
Installing [jsndggsn] System fails to generate vmcore dump after panic.
Installing [p6dow9c8] CVE-2018-5953: Information leak in software IO TLB driver.
Your kernel is fully up to date.
Effective kernel version is 4.14.35-1902.301.1.el7uek
Cleanup : uptrack-updates-4.14.35-1902.9.2.el7uek.x86_64-20200128-0.noarch 2/2
Verifying : uptrack-updates-4.14.35-1902.9.2.el7uek.x86_64-20200417-0.noarch 1/2
Verifying : uptrack-updates-4.14.35-1902.9.2.el7uek.x86_64-20200128-0.noarch 2/2

Updated:
uptrack-updates-4.14.35-1902.9.2.el7uek.x86_64.noarch 0:20200417-0

Complete!
[root@tvdexa07db01 Ksplice]#


Check the Newly Installed Uptrack Version

[root@tvdexa07db01 Ksplice]# yum list installed | grep uptrack-updates
uptrack-updates-4.14.35-1902.9.2.el7uek.x86_64.noarch
20200417-0 @/uptrack-updates-4.14.35-1902.9.2.el7uek.x86_64-20200417-0.noarch


[root@tvdexa07db01 Ksplice]# uname -r
4.14.35-1902.9.2.el7uek.x86_64


[root@tvdexa07db01 Ksplice]# uptrack-uname -r
4.14.35-1902.301.1.el7uek.x86_64


[root@tvdexa07db01 Ksplice]# uptrack-show
Installed updates:
[qb92vyqf] Known exploit detection.
[inu8wb4r] Known exploit detection for CVE-2017-7308.
[cd8sbgv7] Known exploit detection for CVE-2018-14634.
[1kzvx01a] KPTI enablement for Ksplice.
[6vwn8ut1] Known exploit detection for CVE-2018-18445.
[4zccrjds] KSPLICE enablement for patching KVM Intel module.
[gzezyqb5] Memory leak in Mellanox ConnextX HCA Infiniband CX-3 virtual functions.
[bk9sc6f2] NULL pointer dereference when mounting a CIFS filesystem with invalid mount option.
[tiomcx4f] CVE-2019-15917: Use-after-free when registering Bluetooth HCI uart device.
[1oztqfiv] Memory corruption in Reliable Datagram Socket send completion.
[13vvcp2l] Oracle ASM device hang during offline.
[d1r03k7l] Network stall during RDMA failover.
[mnnc6fcu] CVE-2019-3016: Privilege escalation in KVM guest paravirtualized TLB flushes.
[tvgkcphj] Improved fix to CVE-2019-3016: Privilege escalation in KVM guest paravirtualized TLB flushes.
[bss17slx] CVE-2019-19332: Denial-of-service in KVM cpuid emulation reporting.
[sl587t78] Missing Non Maskable Interrupts on AMD KVM guests.
[98393wix] CVE-2016-5244: Information leak in the RDS network protocol.
[alabfukc] CVE-2019-17666: Remote code execution in Realtek peer-to-peer Wifi.
[sc77umtr] CVE-2019-0155: Privilege escalation in Intel i915 graphics driver.
[o8kefoq8] CVE-2019-0154: Denial-of-service in Intel i915 graphics driver.
[cy9t2fe7] Improved fix to CVE-2019-11135: Side-channel information leak in Intel TSX on late microcode update.
[3h40qtja] IO hang on block multiqueue device waits.
[ll4csbbo] CVE-2019-20054: Denial-of-service in procfs sysctl removal.
[r7vboahq] Deadlock in Reliable Datagram socket connection.
[pojd20br] Denial-of-service in Reliable Datagram Socket send cancellation.
[ayrz7nql] CVE-2020-2732: Privilege escalation in Intel KVM nested emulation.
[e6szjj4l] CVE-2019-14901: Denial-of-service when parsing TDLS action frame in Marvell WiFi-Ex driver.
[9253ftyr] CVE-2019-15291: Denial-of-service in B2C2 FlexCop driver probing.
[h6qm8tqh] IO hang in Reliable Datagram Socket remote DMA socket closing.
[jmo8wvme] Denial-of-service in CIFS POSIX file locks on close.
[c92mbxy5] CVE-2019-15538: Denial-of-service in XFS filesystem with Quota support enabled.
[6z2m3403] CVE-2020-7053: Use-after-free when destroying i915 GEM context.
[c5t3d5fa] NULL dereference while loading userspace I/O driver.
[8dgt3zi6] CVE-2019-14895: Denial-of-service when receiving Country WLAN element in Marvell WiFi-Ex driver.
[a4scbw6j] Kernel panic in Infiniband RDMA QP send queues.
[9m542zj0] Denial-of-service in IPMI device registration.
[jq0r6r0v] Denial-of-service in Pressure Stall Information cgroup destruction.
[m5jqkbu3] Denial-of-service in Infiniband pool destruction.
[miag3lwz] CVE-2019-19338: Missing Intel TAA mitigation in KVM guests.
[28o9c5jg] CVE-2019-14615: Information leak in Intel i915 generation 9 devices.
[e9ghelsq] Race condition in crypto initialization causes denial-of-service.
[8kg2ltrj] Denial-of-service in XFS whiteout renames.
[djt21tl9] NULL pointer dereference when mounting a GFS2 filesystem.
[fmlfqa0h] NULL-pointer dereference when driver logs in/out of system.
[r0hywzwk] Soft lockup in low memory situation due to misused allocator in LPFC.
[o6ivsuer] Use-after-free due to race condition in LPFC NVME write handling.
[muzxn90m] Hard lock up when handling aborts for LPFC.
[297glmum] Soft lockup when multiple threads read /proc/stat simultaneously.
[p2wsrgbk] Denial-of-service in the batman-adv subsystem.
[tg92ldhm] Spurious signals during TTY reopen.
[e6k3gzxq] CVE-2019-18809: Memory leak when identifying state in Afatech AF9005 DVB-T USB1.1 driver.
[9ccfw3yo] CVE-2019-18806: Memory leak when allocating large buffers in QLogic QLA3XXX Network driver.
[73fkk23h] Use-after-free when using NFS with page cache.
[d4thcifo] NULL pointer dereference during UBIFS mount.
[jdwrgfic] CVE-2020-10942: Out-of-bounds memory access in the Virtual host driver.
[iizw2yj1] Use-after-free when constructing ERSPAN packet header.
[221vs9ih] Deadlock when deleting NVMe namespace fails.
[1outnjhr] Out-of-bounds read when transmitting packet using XFRM.
[i6sjtrm9] Point-to-Point Protocol IOCDETACH ioctl causes use-after-free.
[8grqdp2d] Flawed logic in read/write semaphore implementation causes crash.
[jsndggsn] System fails to generate vmcore dump after panic.
[p6dow9c8] CVE-2018-5953: Information leak in software IO TLB driver.

Effective kernel version is 4.14.35-1902.301.1.el7uek
[root@tvdexa07db01 Ksplice]#


One last personal feedback about Oracle Kesplice, this tool is really cool! Few times I used to quickly and effectively fix Kernel Bug online, avoiding unplanned service interruption.

Bulk Exadata Patching

After more than 11 year from the launch Oracle Exadata Machine has become popular on many companies across industries, making administrators, developers and final users almost unanimously satisfied about performance and availability.

But also, on Exadata there are cumbersome maintenance activities like patching.

Most of my Exadata customers have acquired 2 non-full RACKs, which makes the patching effort quite reasonable; but recently I started working on a project with multiple full RACKs, with tens of Storage Servers, Compute Nodes and hundreds of Virtual Machines…

A very challenging environment, especially when it came to patching…

Patching all the systems using the standard patchmgr utiliy was not acceptable, therefore I had to replace my standard patching procedure with a new one offering automation and scalability.

At this subject Oracle provides few handy options:

Patching Exadata Infrastructure

  • Storage Server Patching via http/https server: starting with Oracle Exadata System Software release 18.1.0.0.0, it is possible to patch the Storage Servers using an external http server hosting the new software image. The activitiy can be scheduled up to one week before the installation, allowing on each Cell the Management Server (MS) to start downloading and run pre-checks in advance. MS interrupts the software upgrade and generates an alert if the Cell does not comply with all pre-requisites.
  • Unbreakable Linux Network: ULN offers software patches, updates, and fixes for Oracle Linux and Oracle VM. The implementation of a local YUM repository leverages the patch automation of the bare metal OS or dom0/domU.
  • InfiniBand Switch: standard rolling upgrade patching procedure using patchmgr.

Patching Grid Infrastructure & RDBMS

  • GI & RDBMS: those components are patched using the standard Oracle tools common to all platforms, but the entire process has been parallalized using OS tools like dcli commands.

Overview Bulk Exadata Patching


Main Patching Commands

Storage Server – Scheduling Automated Storage Server Update via HTTP/HTTPS

On the Storage Cell set the local Apache location hosting the cell software

[root@efucndb01-a ~]# dcli -l root -g ~/cells cellcli -e 'alter softwareUpdate store=\"http://uln-yum.emilianofusaglia.net/cellsw\"'
efucncel01-a: Software Update successfully altered.
efucncel02-a: Software Update successfully altered.
efucncel03-a: Software Update successfully altered.
efucncel04-a: Software Update successfully altered.
efucncel05-a: Software Update successfully altered.
efucncel06-a: Software Update successfully altered.
efucncel07-a: Software Update successfully altered.
efucncel08-a: Software Update successfully altered.
efucncel09-a: Software Update successfully altered.
efucncel10-a: Software Update successfully altered.
efucncel11-a: Software Update successfully altered.
efucncel12-a: Software Update successfully altered.
efucncel13-a: Software Update successfully altered.
efucncel14-a: Software Update successfully altered.
[root@efucndb01-a ~]#

Schedule the update

[root@efucndb01-a ~]# dcli -l root -g ~/cells cellcli -e 'alter softwareUpdate time=\"03:20 AM WEDNESDAY\"'
efucncel01-a: Software update is scheduled to begin at: 2020-02-05T03:20:00+01:00.
efucncel02-a: Software update is scheduled to begin at: 2020-02-05T03:20:00+01:00.
efucncel03-a: Software update is scheduled to begin at: 2020-02-05T03:20:00+01:00.
efucncel04-a: Software update is scheduled to begin at: 2020-02-05T03:20:00+01:00.
efucncel05-a: Software update is scheduled to begin at: 2020-02-05T03:20:00+01:00.
efucncel06-a: Software update is scheduled to begin at: 2020-02-05T03:20:00+01:00.
efucncel07-a: Software update is scheduled to begin at: 2020-02-05T03:20:00+01:00.
efucncel08-a: Software update is scheduled to begin at: 2020-02-05T03:20:00+01:00.
efucncel09-a: Software update is scheduled to begin at: 2020-02-05T03:20:00+01:00.
efucncel10-a: Software update is scheduled to begin at: 2020-02-05T03:20:00+01:00.
efucncel11-a: Software update is scheduled to begin at: 2020-02-05T03:20:00+01:00.
efucncel12-a: Software update is scheduled to begin at: 2020-02-05T03:20:00+01:00.
efucncel13-a: Software update is scheduled to begin at: 2020-02-05T03:20:00+01:00.
efucncel14-a: Software update is scheduled to begin at: 2020-02-05T03:20:00+01:00.
[root@efucndb01-a ~]#

Verify the scheduled upgrade

[root@efucndb01-a ~]# dcli -l root -g ~/cells cellcli -e 'list softwareupdate detail'
efucncel01-a: name: 19.3.4.0.0.200130
efucncel01-a: status: PreReq OK. Ready to update at: 2020-02-05T03:20:00+01:00
efucncel01-a: store: http://uln-yum.emilianofusaglia.net/cellsw
efucncel01-a: time: 2020-02-05T03:20:00+01:00
efucncel02-a: name: 19.3.4.0.0.200130
efucncel02-a: status: PreReq OK. Ready to update at: 2020-02-05T03:20:00+01:00
efucncel02-a: store: http://uln-yum.emilianofusaglia.net/cellsw
efucncel02-a: time: 2020-02-05T03:20:00+01:00
efucncel03-a: name: 19.3.4.0.0.200130
efucncel03-a: status: PreReq OK. Ready to update at: 2020-02-05T03:20:00+01:00
efucncel03-a: store: http://uln-yum.emilianofusaglia.net/cellsw
efucncel03-a: time: 2020-02-05T03:20:00+01:00
efucncel04-a: name: 19.3.4.0.0.200130
efucncel04-a: status: PreReq OK. Ready to update at: 2020-02-05T03:20:00+01:00
efucncel04-a: store: http://uln-yum.emilianofusaglia.net/cellsw
efucncel04-a: time: 2020-02-05T03:20:00+01:00
efucncel05-a: name: 19.3.4.0.0.200130
efucncel05-a: status: PreReq OK. Ready to update at: 2020-02-05T03:20:00+01:00
efucncel05-a: store: http://uln-yum.emilianofusaglia.net/cellsw
efucncel05-a: time: 2020-02-05T03:20:00+01:00
efucncel06-a: name: 19.3.4.0.0.200130
efucncel06-a: status: PreReq OK. Ready to update at: 2020-02-05T03:20:00+01:00
efucncel06-a: store: http://uln-yum.emilianofusaglia.net/cellsw
efucncel06-a: time: 2020-02-05T03:20:00+01:00
efucncel07-a: name: 19.3.4.0.0.200130
efucncel07-a: status: PreReq OK. Ready to update at: 2020-02-05T03:20:00+01:00
efucncel07-a: store: http://uln-yum.emilianofusaglia.net/cellsw
efucncel07-a: time: 2020-02-05T03:20:00+01:00
efucncel08-a: name: 19.3.4.0.0.200130
efucncel08-a: status: PreReq OK. Ready to update at: 2020-02-05T03:20:00+01:00
efucncel08-a: store: http://uln-yum.emilianofusaglia.net/cellsw
efucncel08-a: time: 2020-02-05T03:20:00+01:00
efucncel09-a: name: 19.3.4.0.0.200130
efucncel09-a: status: PreReq OK. Ready to update at: 2020-02-05T03:20:00+01:00
efucncel09-a: store: http://uln-yum.emilianofusaglia.net/cellsw
efucncel09-a: time: 2020-02-05T03:20:00+01:00
efucncel10-a: name: 19.3.4.0.0.200130
efucncel10-a: status: PreReq OK. Ready to update at: 2020-02-05T03:20:00+01:00
efucncel10-a: store: http://uln-yum.emilianofusaglia.net/cellsw
efucncel10-a: time: 2020-02-05T03:20:00+01:00
efucncel11-a: name: 19.3.4.0.0.200130
efucncel11-a: status: PreReq OK. Ready to update at: 2020-02-05T03:20:00+01:00
efucncel11-a: store: http://uln-yum.emilianofusaglia.net/cellsw
efucncel11-a: time: 2020-02-05T03:20:00+01:00
efucncel12-a: name: 19.3.4.0.0.200130
efucncel12-a: status: PreReq OK. Ready to update at: 2020-02-05T03:20:00+01:00
efucncel12-a: store: http://uln-yum.emilianofusaglia.net/cellsw
efucncel12-a: time: 2020-02-05T03:20:00+01:00
efucncel13-a: name: 19.3.4.0.0.200130
efucncel13-a: status: PreReq OK. Ready to update at: 2020-02-05T03:20:00+01:00
efucncel13-a: store: http://uln-yum.emilianofusaglia.net/cellsw
efucncel13-a: time: 2020-02-05T03:20:00+01:00
efucncel14-a: name: 19.3.4.0.0.200130
efucncel14-a: status: PreReq OK. Ready to update at: 2020-02-05T03:20:00+01:00
efucncel14-a: store: http://uln-yum.emilianofusaglia.net/cellsw
efucncel14-a: time: 2020-02-05T03:20:00+01:00
[root@efucndb01-a ~]#

Unbreakable Linux Network

dom0 checks

[root@efuconsole dbserver_patch_19.200120]# ./patchmgr -dbnodes ~/dom0 -precheck -yum_repo http://uln-yum.emilianofusaglia.net/yum/EngineeredSystems/exadata/dbserver/dom0/19.3.4.0.0/base/x86_64 -target_version 19.3.4.0.0.200130

NOTE patchmgr release: 19.200120 (always check MOS 1553103.1 for the latest release of dbserver.patch.zip)
NOTE
WARNING Do not interrupt the patchmgr session.
WARNING Do not resize the screen. It may disturb the screen layout.
WARNING Do not reboot database nodes during update or rollback.
WARNING Do not open logfiles in write mode and do not try to alter them.

2020-02-06 14:06:17 +0100 :Working: Verify SSH equivalence for the root user to node(s)
2020-02-06 14:06:19 +0100 :SUCCESS: Verify SSH equivalence for the root user to node(s)
2020-02-06 14:06:22 +0100 :Working: Initiate precheck on 8 node(s)
2020-02-06 14:07:36 +0100 :Working: Check free space on node(s)
2020-02-06 14:07:42 +0100 :SUCCESS: Check free space on node(s)
2020-02-06 14:08:07 +0100 :Working: dbnodeupdate.sh running a precheck on node(s).
2020-02-06 14:09:43 +0100 :SUCCESS: Initiate precheck on node(s).
2020-02-06 14:09:45 +0100 :SUCCESS: Completed run of command: ./patchmgr -dbnodes /root/dom0 -precheck -yum_repo http://uln-yum.emilianofusaglia.net/yum/EngineeredSystems/exadata/dbserver/dom0/19.3.4.0.0/base/x86_64 -target_version 19.3.4.0.0.200130
2020-02-06 14:09:45 +0100 :INFO : Precheck attempted on nodes in file /root/dom0: [efucndb01-a efucndb02-a efucndb03-a efucndb04-a efucndb05-a efucndb06-a efucndb07-a efucndb08-a]
2020-02-06 14:09:45 +0100 :INFO : Current image version on dbnode(s) is:
2020-02-06 14:09:45 +0100 :INFO : efucndb01-a: 19.2.6.0.0.190911.1
2020-02-06 14:09:45 +0100 :INFO : efucndb02-a: 19.2.6.0.0.190911.1
2020-02-06 14:09:45 +0100 :INFO : efucndb03-a: 19.2.6.0.0.190911.1
2020-02-06 14:09:45 +0100 :INFO : efucndb04-a: 19.2.6.0.0.190911.1
2020-02-06 14:09:45 +0100 :INFO : efucndb05-a: 19.2.6.0.0.190911.1
2020-02-06 14:09:45 +0100 :INFO : efucndb06-a: 19.2.6.0.0.190911.1
2020-02-06 14:09:45 +0100 :INFO : efucndb07-a: 19.2.6.0.0.190911.1
2020-02-06 14:09:45 +0100 :INFO : efucndb08-a: 19.2.6.0.0.190911.1
2020-02-06 14:09:45 +0100 :INFO : For details, check the following files in /EXAVMIMAGES/Patch/patchmgr_DBSERVER/dbserver_patch_19.200120:
2020-02-06 14:09:45 +0100 :INFO : - _dbnodeupdate.log
2020-02-06 14:09:45 +0100 :INFO : - patchmgr.log
2020-02-06 14:09:45 +0100 :INFO : - patchmgr.trc
2020-02-06 14:09:45 +0100 :INFO : Exit status:0
2020-02-06 14:09:45 +0100 :INFO : Exiting.
[root@efucndb01-a dbserver_patch_19.200120]#

dom0 upgrade

[root@efuconsole dbserver_patch_19.200120]# ./patchmgr -dbnodes ~/dom0 -upgrade -yum_repo http://uln-yum.emilianofusaglia.net/yum/EngineeredSystems/exadata/dbserver/dom0/19.3.4.0.0/base/x86_64 -target_version 19.3.4.0.0.200130

NOTE patchmgr release: 19.200120 (always check MOS 1553103.1 for the latest release of dbserver.patch.zip)
NOTE
NOTE Database nodes will reboot during the update process.
NOTE
WARNING Do not interrupt the patchmgr session.
WARNING Do not resize the screen. It may disturb the screen layout.
WARNING Do not reboot database nodes during update or rollback.
WARNING Do not open logfiles in write mode and do not try to alter them.

2020-02-06 14:29:11 +0100 :Working: Verify SSH equivalence for the root user to node(s)
2020-02-06 14:29:13 +0100 :SUCCESS: Verify SSH equivalence for the root user to node(s)
2020-02-06 14:29:15 +0100 :Working: Initiate prepare steps on node(s).
2020-02-06 14:29:17 +0100 :Working: Check free space on node(s)
2020-02-06 14:29:23 +0100 :SUCCESS: Check free space on node(s)
2020-02-06 14:29:59 +0100 :SUCCESS: Initiate prepare steps on node(s).
2020-02-06 14:29:59 +0100 :Working: Initiate update on 8 node(s).
2020-02-06 14:29:59 +0100 :Working: dbnodeupdate.sh running a backup on 8 node(s).
2020-02-06 14:36:16 +0100 :SUCCESS: dbnodeupdate.sh running a backup on 8 node(s).
2020-02-06 14:36:16 +0100 :Working: Initiate update on node(s)
2020-02-06 14:36:16 +0100 :Working: Get information about any required OS upgrades from node(s).
2020-02-06 14:36:28 +0100 :SUCCESS: Get information about any required OS upgrades from node(s).
2020-02-06 14:36:28 +0100 :Working: dbnodeupdate.sh running an update step on all nodes.
2020-02-06 14:56:38 +0100 :INFO : efucndb01-a is ready to reboot.
2020-02-06 14:56:38 +0100 :INFO : efucndb02-a is ready to reboot.
2020-02-06 14:56:38 +0100 :INFO : efucndb03-a is ready to reboot.
2020-02-06 14:56:38 +0100 :INFO : efucndb04-a is ready to reboot.
2020-02-06 14:56:38 +0100 :INFO : efucndb05-a is ready to reboot.
2020-02-06 14:56:38 +0100 :INFO : efucndb06-a is ready to reboot.
2020-02-06 14:56:38 +0100 :INFO : efucndb07-a is ready to reboot.
2020-02-06 14:56:38 +0100 :INFO : efucndb08-a is ready to reboot.
2020-02-06 14:56:39 +0100 :SUCCESS: dbnodeupdate.sh running an update step on all nodes.
2020-02-06 14:56:51 +0100 :Working: Initiate reboot on node(s)
2020-02-06 14:56:55 +0100 :SUCCESS: Initiate reboot on node(s)
2020-02-06 14:56:55 +0100 :Working: Waiting to ensure node(s) is down before reboot.
2020-02-06 14:58:20 +0100 :SUCCESS: Waiting to ensure node(s) is down before reboot.
2020-02-06 14:58:20 +0100 :Working: Waiting to ensure node(s) is up after reboot.
2020-02-06 15:04:23 +0100 :SUCCESS: Waiting to ensure node(s) is up after reboot.
2020-02-06 15:04:23 +0100 :Working: Waiting to connect to node(s) with SSH. During Linux upgrades this can take some time.
2020-02-06 15:27:46 +0100 :SUCCESS: Waiting to connect to node(s) with SSH. During Linux upgrades this can take some time.
2020-02-06 15:27:46 +0100 :Working: Wait for node(s) is ready for the completion step of update.
2020-02-06 15:31:29 +0100 :SUCCESS: Wait for node(s) is ready for the completion step of update.
2020-02-06 15:31:30 +0100 :Working: Initiate completion step from dbnodeupdate.sh on node(s)
2020-02-06 15:48:10 +0100 :SUCCESS: Initiate completion step from dbnodeupdate.sh on efucndb01-a
2020-02-06 15:48:14 +0100 :SUCCESS: Initiate completion step from dbnodeupdate.sh on efucndb02-a
2020-02-06 15:48:19 +0100 :SUCCESS: Initiate completion step from dbnodeupdate.sh on efucndb03-a
2020-02-06 15:48:30 +0100 :SUCCESS: Initiate completion step from dbnodeupdate.sh on efucndb04-a
2020-02-06 15:48:35 +0100 :SUCCESS: Initiate completion step from dbnodeupdate.sh on efucndb05-a
2020-02-06 15:48:46 +0100 :SUCCESS: Initiate completion step from dbnodeupdate.sh on efucndb06-a
2020-02-06 15:48:50 +0100 :SUCCESS: Initiate completion step from dbnodeupdate.sh on efucndb07-a
2020-02-06 15:49:02 +0100 :SUCCESS: Initiate completion step from dbnodeupdate.sh on efucndb08-a
2020-02-06 15:49:18 +0100 :SUCCESS: Initiate update on node(s).
2020-02-06 15:49:18 +0100 :SUCCESS: Initiate update on 0 node(s).
[INFO ] Collected dbnodeupdate diag in file: Diag_patchmgr_dbnode_upgrade_060220142909.tbz
-rw-r--r-- 1 root root 6381043 Feb 6 15:49 Diag_patchmgr_dbnode_upgrade_060220142909.tbz
2020-02-06 15:49:22 +0100 :SUCCESS: Completed run of command: ./patchmgr -dbnodes /root/dom0 -upgrade -yum_repo http://uln-yum.emilianofusaglia.net/yum/EngineeredSystems/exadata/dbserver/dom0/19.3.4.0.0/base/x86_64 -target_version 19.3.4.0.0.200130
2020-02-06 15:49:22 +0100 :INFO : Upgrade attempted on nodes in file /root/dom0: [efucndb01-a efucndb02-a efucndb03-a efucndb04-a efucndb05-a efucndb06-a efucndb07-a efucndb08-a]
2020-02-06 15:49:22 +0100 :INFO : Current image version on dbnode(s) is:
2020-02-06 15:49:22 +0100 :INFO : efucndb01-a: 19.3.4.0.0.200130
2020-02-06 15:49:22 +0100 :INFO : efucndb02-a: 19.3.4.0.0.200130
2020-02-06 15:49:22 +0100 :INFO : efucndb03-a: 19.3.4.0.0.200130
2020-02-06 15:49:22 +0100 :INFO : efucndb04-a: 19.3.4.0.0.200130
2020-02-06 15:49:22 +0100 :INFO : efucndb05-a: 19.3.4.0.0.200130
2020-02-06 15:49:22 +0100 :INFO : efucndb06-a: 19.3.4.0.0.200130
2020-02-06 15:49:22 +0100 :INFO : efucndb07-a: 19.3.4.0.0.200130
2020-02-06 15:49:22 +0100 :INFO : efucndb08-a: 19.3.4.0.0.200130
2020-02-06 15:49:22 +0100 :INFO : For details, check the following files in /EXAVMIMAGES/Patch/patchmgr_DBSERVER/dbserver_patch_19.200120:
2020-02-06 15:49:22 +0100 :INFO : - _dbnodeupdate.log
2020-02-06 15:49:22 +0100 :INFO : - patchmgr.log
2020-02-06 15:49:22 +0100 :INFO : - patchmgr.trc
2020-02-06 15:49:22 +0100 :INFO : Exit status:0
2020-02-06 15:49:22 +0100 :INFO : Exiting.

InfiniBand Switch

IB switch checks

[root@efucndb01-a patch_switch_19.3.4.0.0.200130]# ./patchmgr -ibswitches ~/ibs -upgrade -ibswitch_precheck
2020-02-10 07:57:44 +0100 :Working: Verify SSH equivalence for the root user to node(s)
2020-02-10 07:57:46 +0100 :SUCCESS: Verify SSH equivalence for the root user to node(s)
2020-02-10 07:57:47 +0100 1 of 1 :Working: Initiate pre-upgrade validation check on InfiniBand switch(es).
----- InfiniBand switch update process started 2020-02-10 07:57:48 +0100 -----
[NOTE ] Log file at /EXAVMIMAGES/Patch/IBs_19.3.4.0.0/patch_switch_19.3.4.0.0.200130/upgradeIBSwitch.log
[INFO ] List of InfiniBand switches for upgrade: ( efucnsw-iba01-a efucnsw-ibb01-a )
[SUCCESS ] Verifying Network connectivity to efucnsw-iba01-a
[SUCCESS ] Verifying Network connectivity to efucnsw-ibb01-a
[SUCCESS ] Validating verify-topology output
[INFO ] Master Subnet Manager is set to "efucnsw-iba01-a" in all Switches
[INFO ] ---------- Starting with InfiniBand Switch efucnsw-iba01-a
[WARNING ] Infiniband switch meets minimal version requirements, but downgrade is only available to 2.2.13-2 with the current package.
To downgrade to other versions:
Manually download the InfiniBand switch firmware package to the patch directory
Set export variable "EXADATA_IMAGE_IBSWITCH_DOWNGRADE_VERSION" to the appropriate version
Run patchmgr command to initiate downgrade.
[SUCCESS ] Verify SSH access to the patchmgr host efucndb01-a.emilianofusaglia.net from the InfiniBand Switch efucnsw-iba01-a.
[INFO ] Starting pre-update validation on efucnsw-iba01-a
[SUCCESS ] Verifying that /tmp has 150M in efucnsw-iba01-a, found 492M
[SUCCESS ] Verifying that / has 20M in efucnsw-iba01-a, found 28M
[SUCCESS ] NTP daemon is running on efucnsw-iba01-a.
[INFO ] Manually validate the following entries Date:(YYYY-aM-DD) 2020-02-10 Time:(HH:MM:SS) 07:58:05
[INFO ] Validating the current firmware on the InfiniBand Switch
[SUCCESS ] Firmware verification on InfiniBand switch efucnsw-iba01-a
[SUCCESS ] Verifying that the patchmgr host efucndb01-a.emilianofusaglia.net is recognized on the InfiniBand Switch efucnsw-iba01-a through getHostByName
[SUCCESS ] Execute plugin check for Patch Check Prereq on efucnsw-iba01-a
[INFO ] Finished pre-update validation on efucnsw-iba01-a
[SUCCESS ] Pre-update validation on efucnsw-iba01-a
[SUCCESS ] Prereq check on efucnsw-iba01-a
[INFO ] ---------- Starting with InfiniBand Switch efucnsw-ibb01-a
[WARNING ] Infiniband switch meets minimal version requirements, but downgrade is only available to 2.2.13-2 with the current package.
To downgrade to other versions:
Manually download the InfiniBand switch firmware package to the patch directory
Set export variable "EXADATA_IMAGE_IBSWITCH_DOWNGRADE_VERSION" to the appropriate version
Run patchmgr command to initiate downgrade.
[SUCCESS ] Verify SSH access to the patchmgr host efucndb01-a.emilianofusaglia.net from the InfiniBand Switch efucnsw-ibb01-a.
[INFO ] Starting pre-update validation on efucnsw-ibb01-a
[SUCCESS ] Verifying that /tmp has 150M in efucnsw-ibb01-a, found 492M
[SUCCESS ] Verifying that / has 20M in efucnsw-ibb01-a, found 28M
[SUCCESS ] NTP daemon is running on efucnsw-ibb01-a.
[INFO ] Manually validate the following entries Date:(YYYY-aM-DD) 2020-02-10 Time:(HH:MM:SS) 07:58:25
[INFO ] Validating the current firmware on the InfiniBand Switch
[SUCCESS ] Firmware verification on InfiniBand switch efucnsw-ibb01-a
[SUCCESS ] Verifying that the patchmgr host efucndb01-a.emilianofusaglia.net is recognized on the InfiniBand Switch efucnsw-ibb01-a through getHostByName
[SUCCESS ] Execute plugin check for Patch Check Prereq on efucnsw-ibb01-a
[INFO ] Finished pre-update validation on efucnsw-ibb01-a
[SUCCESS ] Pre-update validation on efucnsw-ibb01-a
[SUCCESS ] Prereq check on efucnsw-ibb01-a
[SUCCESS ] Overall status
----- InfiniBand switch update process ended 2020-02-10 07:58:42 +0100 -----
2020-02-10 07:58:42 +0100 1 of 1 :SUCCESS: Initiate pre-upgrade validation check on InfiniBand switch(es).
2020-02-10 07:58:42 +0100 :SUCCESS: Completed run of command: ./patchmgr -ibswitches /root/ibs -upgrade -ibswitch_precheck
2020-02-10 07:58:42 +0100 :INFO : upgrade attempted on nodes in file /root/ibs: [efucnsw-iba01-a efucnsw-ibb01-a]
2020-02-10 07:58:42 +0100 :INFO : For details, check the following files in /EXAVMIMAGES/Patch/IBs_19.3.4.0.0/patch_switch_19.3.4.0.0.200130:
2020-02-10 07:58:42 +0100 :INFO : - upgradeIBSwitch.log
2020-02-10 07:58:42 +0100 :INFO : - upgradeIBSwitch.trc
2020-02-10 07:58:42 +0100 :INFO : - patchmgr.stdout
2020-02-10 07:58:42 +0100 :INFO : - patchmgr.stderr
2020-02-10 07:58:42 +0100 :INFO : - patchmgr.log
2020-02-10 07:58:42 +0100 :INFO : - patchmgr.trc
2020-02-10 07:58:42 +0100 :INFO : Exit status:0
2020-02-10 07:58:42 +0100 :INFO : Exiting.
[root@efucndb01-a patch_switch_19.3.4.0.0.200130]#

IB switch upgrade

[root@efucndb01-a patch_switch_19.3.4.0.0.200130]# ./patchmgr -ibswitches ~/ibs -upgrade
2020-02-10 07:59:22 +0100 :Working: Verify SSH equivalence for the root user to node(s)
2020-02-10 07:59:24 +0100 :SUCCESS: Verify SSH equivalence for the root user to node(s)
2020-02-10 07:59:25 +0100 1 of 1 :Working: Initiate upgrade of InfiniBand switches to 2.2.14-1. Expect up to 40 minutes for each switch
----- InfiniBand switch update process started 2020-02-10 07:59:25 +0100 -----
[NOTE ] Log file at /EXAVMIMAGES/Patch/IBs_19.3.4.0.0/patch_switch_19.3.4.0.0.200130/upgradeIBSwitch.log
[INFO ] List of InfiniBand switches for upgrade: ( efucnsw-iba01-a efucnsw-ibb01-a )
[SUCCESS ] Verifying Network connectivity to efucnsw-iba01-a
[SUCCESS ] Verifying Network connectivity to efucnsw-ibb01-a
[SUCCESS ] Validating verify-topology output
[INFO ] Proceeding with upgrade of InfiniBand switches to version 2.2.14_1
[INFO ] Master Subnet Manager is set to "efucnsw-iba01-a" in all Switches
[INFO ] ---------- Starting with InfiniBand Switch efucnsw-iba01-a
[WARNING ] Infiniband switch meets minimal version requirements, but downgrade is only available to 2.2.13-2 with the current package.
To downgrade to other versions:
Manually download the InfiniBand switch firmware package to the patch directory
Set export variable "EXADATA_IMAGE_IBSWITCH_DOWNGRADE_VERSION" to the appropriate version
Run patchmgr command to initiate downgrade.
[SUCCESS ] Verify SSH access to the patchmgr host efucndb01-a.emilianofusaglia.net from the InfiniBand Switch efucnsw-iba01-a.
[INFO ] Starting pre-update validation on efucnsw-iba01-a
[SUCCESS ] Verifying that /tmp has 150M in efucnsw-iba01-a, found 492M
[SUCCESS ] Verifying that / has 20M in efucnsw-iba01-a, found 26M
[SUCCESS ] Service opensmd is running on InfiniBand Switch efucnsw-iba01-a
[SUCCESS ] NTP daemon is running on efucnsw-iba01-a.
[INFO ] Manually validate the following entries Date:(YYYY-aM-DD) 2020-02-10 Time:(HH:MM:SS) 07:59:41
[INFO ] Validating the current firmware on the InfiniBand Switch
[SUCCESS ] Firmware verification on InfiniBand switch efucnsw-iba01-a
[SUCCESS ] Verifying that the patchmgr host efucndb01-a.emilianofusaglia.net is recognized on the InfiniBand Switch efucnsw-iba01-a through getHostByName
[SUCCESS ] Execute plugin check for Patch Check Prereq on efucnsw-iba01-a
[INFO ] Finished pre-update validation on efucnsw-iba01-a
[SUCCESS ] Pre-update validation on efucnsw-iba01-a
[INFO ] Package will be downloaded at firmware update time via scp
[SUCCESS ] Execute plugin check for Patching on efucnsw-iba01-a
[INFO ] Starting upgrade on efucnsw-iba01-a to 2.2.14_1. Please give upto 15 mins for the process to complete. DO NOT INTERRUPT or HIT CTRL+C during the upgrade
[INFO ] Rebooting efucnsw-iba01-a to complete the firmware update. Wait for 15 minutes before continuing. DO NOT MANUALLY REBOOT THE INFINIBAND SWITCH
Connection to efucndb01-a closed by remote host.
Connection to efucndb01-a closed.
2020-02-10 08:27:49 +0100 :Working: Verify SSH equivalence for the root user to node(s)
2020-02-10 08:27:51 +0100 :SUCCESS: Verify SSH equivalence for the root user to node(s)
2020-02-10 08:27:52 +0100 1 of 1 :Working: Initiate upgrade of InfiniBand switches to 2.2.14-1. Expect up to 40 minutes for each switch
----- InfiniBand switch update process started 2020-02-10 08:27:52 +0100 -----
[NOTE ] Log file at /EXAVMIMAGES/Patch/IBs_19.3.4.0.0/patch_switch_19.3.4.0.0.200130/upgradeIBSwitch.log
[INFO ] List of InfiniBand switches for upgrade: ( efucnsw-iba01-a efucnsw-ibb01-a )
[SUCCESS ] Verifying Network connectivity to efucnsw-iba01-a
[SUCCESS ] Verifying Network connectivity to efucnsw-ibb01-a
[INFO ] InfiniBand switch efucnsw-iba01-a is already at target version.
[SUCCESS ] Validating verify-topology output
[INFO ] Proceeding with upgrade of InfiniBand switches to version 2.2.14_1
[INFO ] Master Subnet Manager is set to "efucnsw-ibb01-a" in all Switches
[INFO ] ---------- Starting with InfiniBand Switch efucnsw-ibb01-a
[WARNING ] Infiniband switch meets minimal version requirements, but downgrade is only available to 2.2.13-2 with the current package.
To downgrade to other versions:
Manually download the InfiniBand switch firmware package to the patch directory
Set export variable "EXADATA_IMAGE_IBSWITCH_DOWNGRADE_VERSION" to the appropriate version
Run patchmgr command to initiate downgrade.
[SUCCESS ] Verify SSH access to the patchmgr host efucndb01-a.emilianofusaglia.net from the InfiniBand Switch efucnsw-ibb01-a.
[INFO ] Starting pre-update validation on efucnsw-ibb01-a
[SUCCESS ] Verifying that /tmp has 150M in efucnsw-ibb01-a, found 492M
[SUCCESS ] Verifying that / has 20M in efucnsw-ibb01-a, found 26M
[SUCCESS ] Service opensmd is running on InfiniBand Switch efucnsw-ibb01-a
[SUCCESS ] NTP daemon is running on efucnsw-ibb01-a.
[INFO ] Manually validate the following entries Date:(YYYY-aM-DD) 2020-02-10 Time:(HH:MM:SS) 08:28:07
[INFO ] Validating the current firmware on the InfiniBand Switch
[SUCCESS ] Firmware verification on InfiniBand switch efucnsw-ibb01-a
[SUCCESS ] Verifying that the patchmgr host efucndb01-a.emilianofusaglia.net is recognized on the InfiniBand Switch efucnsw-ibb01-a through getHostByName
[SUCCESS ] Execute plugin check for Patch Check Prereq on efucnsw-ibb01-a
[INFO ] Finished pre-update validation on efucnsw-ibb01-a
[SUCCESS ] Pre-update validation on efucnsw-ibb01-a
[INFO ] Package will be downloaded at firmware update time via scp
[SUCCESS ] Execute plugin check for Patching on efucnsw-ibb01-a
[INFO ] Starting upgrade on efucnsw-ibb01-a to 2.2.14_1. Please give upto 15 mins for the process to complete. DO NOT INTERRUPT or HIT CTRL+C during the upgrade
[INFO ] Rebooting efucnsw-ibb01-a to complete the firmware update. Wait for 15 minutes before continuing. DO NOT MANUALLY REBOOT THE INFINIBAND SWITCH
Connection to efucndb01-a closed by remote host.
Connection to efucndb01-a closed.

Exadata X8M introduces BIG Architectural Changes

Launched at the 2019 Oracle Open Word Conference the Exadata X8M introduces few big architectural changes which make the leading Oracle Database Machine even more attractive.

Among the most relevant changes there are:

  • InfiniBand Network replacement with an Ethernet network fabric
  • Intel Optane DC Persistent Memory inside the Storage Cell
  • New Remote Direct Memory Access (RDMA) functionalities
  • Replacement of the XEN Hypervisor with KVM

InfiniBand Network replacement with an Ethernet network fabric

The characteristic 40Gbit/second InfiniBand network used for all private network communications among database nodes and storage cells has been replaced by a new 100Gbit/second RDMA over Converged Ethernet Fabric (RoCE) based on the Cisco Switch 9336c RoCE .

The new network not only increase 2.5x the throughput but also reduces the communication latancy.

The schema below highlight the network architecture change for all private communications

Intel Optane DC Persistent Memory inside the Storage Cell

Oracle has introduced 1.5TB of Intel Optane DC Persistent Memory as additional storage device inside all Exadata X8M Storage Cell, (no matter if equipped with HC and EF devices), and it is used as accelerator in front of the Flash Memory Cards. In term of speed this new type of ultra fast storage device is located between the DRAM and the Flash Memory, bringing to three the number of multi-tiered storage devices present inside the Storage Cell.

The Exadata unique software is than capable to extract the maximum performance from this HW configuration, automatically detecting and placing the hottest data on the Persistent Memory, reducing the I/O latency of the most critical tasks.

Below is described the list of Storage Cell’s devices ordered by speed.

New Remote Direct Memory Access (RDMA) functionalities

Until now the RDMA was used among database nodes for exchanging Exafusion messages or for Smart Fusion Block Transfer. Starting with Exadata X8M, the RDMA technology is also used to perform direct I/O access to the Persistent Memory of the Storage Cells, bypassing the network and I/O stack and eliminating expensive CPU interrupts and context switches. This optimization reduces the latency by 10x, from 200μs to less than 19μs.

The picture below highlight the “Database Node to Database Node” and the new “Database Node to Storage Cell” communication using RDMA functionalities.

Replacement of the XEN Hypervisor with KVM

Oracle virtualization technology is called Oracle Virtual Machine (OVM) and in a productive invironment it can be implemented with one of this two different products:

  • Xen
  • KVM

Starting with Exadata X8M-2 the virtualization technology in use is KVM instead of Xen. Oracle started replacing Xen with KVM few years ago, for example on the smaller engineered system ODA X7-2M & X7-2S, but for the Exadata took longer, and I think the root cause was the InfiniBand network. Infact KVM is not fully integrated with InfiniBand, and it does not support bridging.

Exadata Deployment with Elastic Configuration

Recently, for one of my customers, I had the chance to install a couples of Exadata X7-2 using the new Elastic Configuration. The major benefits of using Elastic Configuration consists in the possibility to acquire the Exadata Machine with almost any possible combination of Database Nodes and Storage Cells.

In the past we were used to standard Oracle pre-defined Exadata Machine configurations: Eighth Rack, Quarter Rack, Half Rack and Full Rack, which is still possible, but not flexible enough.

The pictures below highlight the differences between the two configurations:

Edadats_Classiv_vs_Elastic

source: Oracle Data Sheet Exadata Database Machine X7-2


Deployment Exadata Elactic Configuration

The elastic configuration process automates the initial IP address allocations to databasenodes and storage cells, regardless the ordered configuration.  The Exadata Machine is connected to the InfiniBand switches using a standard cabling methodology which allows to determinate the node’s location in the rack. This information is therefore used when the nodes are powered up for the first time in order to assign the initial default IPs.

[root@exatest-iba0 ~]# ibhosts
Ca : 0x579b0123796ba0 ports 2 "node10 elasticNode 192.168.10.17,192.168.10.18 ETH0"
Ca : 0x579b01237966e0 ports 2 "node8 elasticNode 192.168.10.15,192.168.10.16 ETH0"
Ca : 0x579b0123844ab0 ports 2 "node6 elasticNode 192.168.10.11,192.168.10.12 ETH0"
Ca : 0x579b0123845e50 ports 2 "node5 elasticNode 192.168.10.7,192.168.10.8 ETH0"
Ca : 0x579b0123845fe0 ports 2 "node4 elasticNode 192.168.10.40,172.16.2.40 ETH0"
Ca : 0x579b0123845ea0 ports 2 "node3 elasticNode 192.168.10.9,192.168.10.10 ETH0"
Ca : 0x579b0123812b90 ports 2 "node2 elasticNode 192.168.10.1,192.168.10.2 ETH0"
Ca : 0x579b0123812970 ports 2 "node1 elasticNode 192.168.10.3,192.168.10.4 ETH0"
[root@exatest-iba0 ~]#


Because the Virtualization option was required,  it has to be activated at this stage:

[root@node8 ~]# /opt/oracle.SupportTools/switch_to_ovm.sh
2019-03-07 01:05:22 -0800 [INFO] Switch to DOM0 system partition /dev/VGExaDb/LVDbSys3 (/dev/mapper/VGExaDb-LVDbSys3)
2019-03-07 01:05:22 -0800 [INFO] Active system device: /dev/mapper/VGExaDb-LVDbSys1
2019-03-07 01:05:22 -0800 [INFO] Active system device in boot area: /dev/mapper/VGExaDb-LVDbSys1
2019-03-07 01:05:23 -0800 [INFO] Set active system device to /dev/VGExaDb/LVDbSys3 in /boot/I_am_hd_boot
2019-03-07 01:05:23 -0800 [INFO] Creating /.elasticConfig on DOM0 boot partition /boot
2019-03-07 01:05:34 -0800 [INFO] Reboot has been initiated to switch to the DOM0 system partition
Connection to 192.168.1.8 closed by remote host.
Connection to 192.168.1.8 closed.
✘


After the switch to OVM command it is time to reclaim the space initially used by the Linux bare metal Logical Volumes:

[root@node8 ~]# /opt/oracle.SupportTools/reclaimdisks.sh -free -reclaim
Model is ORACLE SERVER X7-2
Number of LSI controllers: 1
Physical disks found: 4 (252:0 252:1 252:2 252:3)
Logical drives found: 1
Linux logical drive: 0
RAID Level for the Linux logical drive: 5
Physical disks in the Linux logical drive: 4 (252:0 252:1 252:2 252:3)
Dedicated Hot Spares for the Linux logical drive: 0
Global Hot Spares: 0
[INFO ] Check for DOM0 with inactive Linux system disk
[INFO ] Valid DOM0 with inactive Linux system disk is detected
[INFO ] Number of partitions on the system device /dev/sda: 3
[INFO ] Higher partition number on the system device /dev/sda: 3
[INFO ] Last sector on the system device /dev/sda: 3509760000
[INFO ] End sector of the last partition on the system device /dev/sda: 3509759966
[INFO ] Remove inactive system logical volume /dev/VGExaDb/LVDbSys1
[INFO ] Remove logical volume /dev/VGExaDb/LVDbOra1
[INFO ] Extend logical volume /dev/VGExaDb/LVDbExaVMImages
[INFO ] Resize ocfs2 on logical volume /dev/VGExaDb/LVDbExaVMImages
[INFO ] XEN boot version and rpm versions are in sync
[INFO ] XEN EFI files will not be updated
[INFO ] Force setup grub
[root@node8 ~]#


Check the success of the reclaim disks procedure:

[root@node8 ~]# /opt/oracle.SupportTools/reclaimdisks.sh -check
Model is ORACLE SERVER X7-2
Number of LSI controllers: 1
Physical disks found: 4 (252:0 252:1 252:2 252:3)
Logical drives found: 1
Linux logical drive: 0
RAID Level for the Linux logical drive: 5
Physical disks in the Linux logical drive: 4 (252:0 252:1 252:2 252:3)
Dedicated Hot Spares for the Linux logical drive: 0
Global Hot Spares: 0
Valid. Disks configuration: RAID5 from 4 disks with no global and dedicated hot spare disks.
Valid. Booted: DOM0. Layout: DOM0.
[root@node8 ~]#


Upload the Oracle Exadata Database Machine Deployment Assistant configuration files to the database server, together with all software images, and run the One command procedure.

List of all Steps

[root@exatestdbadm01 linux-x64]# ./install.sh -cf TVD-exatest.xml -l
Initializing

1. Validate Configuration File
2. Update Nodes for Eighth Rack
3. Create Virtual Machine
4. Create Users
5. Setup Cell Connectivity
6. Calibrate Cells
7. Create Cell Disks
8. Create Grid Disks
9. Install Cluster Software
10. Initialize Cluster Software
11. Install Database Software
12. Relink Database with RDS
13. Create ASM Diskgroups
14. Create Databases
15. Apply Security Fixes
16. Install Exachk
17. Create Installation Summary
18. Resecure Machine
[root@exatestdbadm01 linux-x64]#


Run Step One to validate the setup

This example includes the creation of three different Clusters.

[root@exatestdbadm01 linux-x64]# ./install.sh -cf TVD-exatest.xml -s 1
Initializing
Executing Validate Configuration File
Validating cluster: Cluster-EFU
Locating machines...
Verifying operating systems...
Validating cluster networks...
Validating network connectivity...
Validating private ips on virtual cluster
Validating NTP setup...
Validating physical disks on storage cells...
Validating users...
Validating cluster: Cluster-PR1
Locating machines...
Verifying operating systems...
Validating cluster networks...
Validating network connectivity...
Validating private ips on virtual cluster
Validating NTP setup...
Validating physical disks on storage cells...
Validating users...
Validating cluster: Cluster-VAL
Locating machines...
Verifying operating systems...
Validating cluster networks...
Validating network connectivity...
Validating private ips on virtual cluster
Validating NTP setup...
Validating physical disks on storage cells...
Validating users...
Validating platinum...
Validating switches...
Checking disk reclaim status...
Checking Disk Tests Status....
Completed validation...

SUCCESS: Ip address: 10.x8.xx.40 is configured correctly
SUCCESS: Ip address: 10.x9.xx.55 is configured correctly
SUCCESS: Ip address: 10.x8.xx.41 is configured correctly
SUCCESS: Ip address: 10.x9.xx.56 is configured correctly
SUCCESS: Ip address: 10.x8.xx.45 is configured correctly
SUCCESS: Ip address: 10.x8.xx.46 is configured correctly
SUCCESS: Ip address: 10.x8.xx.44 is configured correctly
SUCCESS: Ip address: 10.x8.xx.43 is configured correctly
SUCCESS: Ip address: 10.x8.xx.42 is configured correctly
SUCCESS: 10.x8.xx.40 configured correctly on exatestceladm01.my.domain.com
SUCCESS: 10.x9.xx.55 configured correctly on exatestceladm01.my.domain.com
SUCCESS: 10.x8.xx.41 configured correctly on exatestceladm01.my.domain.com
SUCCESS: 10.x9.xx.56 configured correctly on exatestceladm01.my.domain.com
SUCCESS: 10.x8.xx.45 configured correctly on exatestceladm01.my.domain.com
SUCCESS: 10.x8.xx.46 configured correctly on exatestceladm01.my.domain.com
SUCCESS: 10.x8.xx.44 configured correctly on exatestceladm01.my.domain.com
SUCCESS: 10.x8.xx.43 configured correctly on exatestceladm01.my.domain.com
SUCCESS: 10.x8.xx.42 configured correctly on exatestceladm01.my.domain.com
SUCCESS: 10.x8.xx.40 configured correctly on exatestceladm02.my.domain.com
SUCCESS: 10.x9.xx.55 configured correctly on exatestceladm02.my.domain.com
SUCCESS: 10.x8.xx.41 configured correctly on exatestceladm02.my.domain.com
SUCCESS: 10.x9.xx.56 configured correctly on exatestceladm02.my.domain.com
SUCCESS: 10.x8.xx.45 configured correctly on exatestceladm02.my.domain.com
SUCCESS: 10.x8.xx.46 configured correctly on exatestceladm02.my.domain.com
SUCCESS: 10.x8.xx.44 configured correctly on exatestceladm02.my.domain.com
SUCCESS: 10.x8.xx.43 configured correctly on exatestceladm02.my.domain.com
SUCCESS: 10.x8.xx.42 configured correctly on exatestceladm02.my.domain.com
SUCCESS: 10.x8.xx.40 configured correctly on exatestceladm03.my.domain.com
SUCCESS: 10.x9.xx.55 configured correctly on exatestceladm03.my.domain.com
SUCCESS: 10.x8.xx.41 configured correctly on exatestceladm03.my.domain.com
SUCCESS: 10.x9.xx.56 configured correctly on exatestceladm03.my.domain.com
SUCCESS: 10.x8.xx.45 configured correctly on exatestceladm03.my.domain.com
SUCCESS: 10.x8.xx.46 configured correctly on exatestceladm03.my.domain.com
SUCCESS: 10.x8.xx.44 configured correctly on exatestceladm03.my.domain.com
SUCCESS: 10.x8.xx.43 configured correctly on exatestceladm03.my.domain.com
SUCCESS: 10.x8.xx.42 configured correctly on exatestceladm03.my.domain.com
SUCCESS: Ip address: 10.x8.xx.47 is configured correctly
SUCCESS: Ip address: 10.x9.xx.57 is configured correctly
SUCCESS: Ip address: 10.x8.xx.48 is configured correctly
SUCCESS: Ip address: 10.x9.xx.58 is configured correctly
SUCCESS: Ip address: 10.x8.xx.52 is configured correctly
SUCCESS: Ip address: 10.x8.xx.51 is configured correctly
SUCCESS: Ip address: 10.x8.xx.53 is configured correctly
SUCCESS: Ip address: 10.x8.xx.50 is configured correctly
SUCCESS: Ip address: 10.x8.xx.49 is configured correctly
SUCCESS: 10.x8.xx.47 configured correctly on exatestceladm01.my.domain.com
SUCCESS: 10.x9.xx.57 configured correctly on exatestceladm01.my.domain.com
SUCCESS: 10.x8.xx.48 configured correctly on exatestceladm01.my.domain.com
SUCCESS: 10.x9.xx.58 configured correctly on exatestceladm01.my.domain.com
SUCCESS: 10.x8.xx.52 configured correctly on exatestceladm01.my.domain.com
SUCCESS: 10.x8.xx.51 configured correctly on exatestceladm01.my.domain.com
SUCCESS: 10.x8.xx.53 configured correctly on exatestceladm01.my.domain.com
SUCCESS: 10.x8.xx.50 configured correctly on exatestceladm01.my.domain.com
SUCCESS: 10.x8.xx.49 configured correctly on exatestceladm01.my.domain.com
SUCCESS: 10.x8.xx.47 configured correctly on exatestceladm02.my.domain.com
SUCCESS: 10.x9.xx.57 configured correctly on exatestceladm02.my.domain.com
SUCCESS: 10.x8.xx.48 configured correctly on exatestceladm02.my.domain.com
SUCCESS: 10.x9.xx.58 configured correctly on exatestceladm02.my.domain.com
SUCCESS: 10.x8.xx.52 configured correctly on exatestceladm02.my.domain.com
SUCCESS: 10.x8.xx.51 configured correctly on exatestceladm02.my.domain.com
SUCCESS: 10.x8.xx.53 configured correctly on exatestceladm02.my.domain.com
SUCCESS: 10.x8.xx.50 configured correctly on exatestceladm02.my.domain.com
SUCCESS: 10.x8.xx.49 configured correctly on exatestceladm02.my.domain.com
SUCCESS: 10.x8.xx.47 configured correctly on exatestceladm03.my.domain.com
SUCCESS: 10.x9.xx.57 configured correctly on exatestceladm03.my.domain.com
SUCCESS: 10.x8.xx.48 configured correctly on exatestceladm03.my.domain.com
SUCCESS: 10.x9.xx.58 configured correctly on exatestceladm03.my.domain.com
SUCCESS: 10.x8.xx.52 configured correctly on exatestceladm03.my.domain.com
SUCCESS: 10.x8.xx.51 configured correctly on exatestceladm03.my.domain.com
SUCCESS: 10.x8.xx.53 configured correctly on exatestceladm03.my.domain.com
SUCCESS: 10.x8.xx.50 configured correctly on exatestceladm03.my.domain.com
SUCCESS: 10.x8.xx.49 configured correctly on exatestceladm03.my.domain.com
SUCCESS: Ip address: 10.x8.xx.54 is configured correctly
SUCCESS: Ip address: 10.x9.xx.59 is configured correctly
SUCCESS: Ip address: 10.x8.xx.55 is configured correctly
SUCCESS: Ip address: 10.x9.xx.60 is configured correctly
SUCCESS: Ip address: 10.x8.xx.58 is configured correctly
SUCCESS: Ip address: 10.x8.xx.60 is configured correctly
SUCCESS: Ip address: 10.x8.xx.59 is configured correctly
SUCCESS: Ip address: 10.x8.xx.57 is configured correctly
SUCCESS: Ip address: 10.x8.xx.56 is configured correctly
SUCCESS: 10.x8.xx.54 configured correctly on exatestceladm01.my.domain.com
SUCCESS: 10.x9.xx.59 configured correctly on exatestceladm01.my.domain.com
SUCCESS: 10.x8.xx.55 configured correctly on exatestceladm01.my.domain.com
SUCCESS: 10.x9.xx.60 configured correctly on exatestceladm01.my.domain.com
SUCCESS: 10.x8.xx.58 configured correctly on exatestceladm01.my.domain.com
SUCCESS: 10.x8.xx.60 configured correctly on exatestceladm01.my.domain.com
SUCCESS: 10.x8.xx.59 configured correctly on exatestceladm01.my.domain.com
SUCCESS: 10.x8.xx.57 configured correctly on exatestceladm01.my.domain.com
SUCCESS: 10.x8.xx.56 configured correctly on exatestceladm01.my.domain.com
SUCCESS: 10.x8.xx.54 configured correctly on exatestceladm02.my.domain.com
SUCCESS: 10.x9.xx.59 configured correctly on exatestceladm02.my.domain.com
SUCCESS: 10.x8.xx.55 configured correctly on exatestceladm02.my.domain.com
SUCCESS: 10.x9.xx.60 configured correctly on exatestceladm02.my.domain.com
SUCCESS: 10.x8.xx.58 configured correctly on exatestceladm02.my.domain.com
SUCCESS: 10.x8.xx.60 configured correctly on exatestceladm02.my.domain.com
SUCCESS: 10.x8.xx.59 configured correctly on exatestceladm02.my.domain.com
SUCCESS: 10.x8.xx.57 configured correctly on exatestceladm02.my.domain.com
SUCCESS: 10.x8.xx.56 configured correctly on exatestceladm02.my.domain.com
SUCCESS: 10.x8.xx.54 configured correctly on exatestceladm03.my.domain.com
SUCCESS: 10.x9.xx.59 configured correctly on exatestceladm03.my.domain.com
SUCCESS: 10.x8.xx.55 configured correctly on exatestceladm03.my.domain.com
SUCCESS: 10.x9.xx.60 configured correctly on exatestceladm03.my.domain.com
SUCCESS: 10.x8.xx.58 configured correctly on exatestceladm03.my.domain.com
SUCCESS: 10.x8.xx.60 configured correctly on exatestceladm03.my.domain.com
SUCCESS: 10.x8.xx.59 configured correctly on exatestceladm03.my.domain.com
SUCCESS: 10.x8.xx.57 configured correctly on exatestceladm03.my.domain.com
SUCCESS: 10.x8.xx.56 configured correctly on exatestceladm03.my.domain.com
SUCCESS: Validated NTP server 10.x3.xx.xx0
SUCCESS: Validated NTP server 10.x3.xx.xx1
SUCCESS: Required file /EXAVMIMAGES/onecommand/linux-x64/WorkDir/p28514222_122118_Linux-x86-64.zip exists...
SUCCESS: Required file /EXAVMIMAGES/onecommand/linux-x64/WorkDir/p28762988_12201181016GIOCT2018RU_Linux-x86-64.zip exists...
SUCCESS: Required file /EXAVMIMAGES/onecommand/linux-x64/WorkDir/p28762989_12201181016DBOCT2018RU_Linux-x86-64.zip exists...
SUCCESS: Required file config/exachk.zip exists...
SUCCESS: Found Operating system LinuxPhysical and configuration file expects LinuxPhysical on machine exatestceladm03.my.domain.com, machine type: storage
SUCCESS: Found Operating system LinuxPhysical and configuration file expects LinuxPhysical on machine exatestceladm02.my.domain.com, machine type: storage
SUCCESS: Found Operating system LinuxPhysical and configuration file expects LinuxPhysical on machine exatestceladm01.my.domain.com, machine type: storage
SUCCESS: Expected machine exatestdbadm01.my.domain.com to have OS Type of Linux Dom0, and found OsType LinuxDom0
SUCCESS: Expected machine exatestdbadm02.my.domain.com to have OS Type of Linux Dom0, and found OsType LinuxDom0
SUCCESS: NTP servers on machine exatestceladm02.my.domain.com verified successfully
SUCCESS: NTP servers on machine exatestceladm01.my.domain.com verified successfully
SUCCESS: NTP servers on machine exatestceladm03.my.domain.com verified successfully
SUCCESS: NTP servers on machine exatestdbadm01.my.domain.com verified successfully
SUCCESS: NTP servers on machine exatestdbadm02.my.domain.com verified successfully
SUCCESS: Sufficient memory for all the guests on database node exatestdbadm02.my.domain.com
SUCCESS: Sufficient memory for all the guests on database node exatestdbadm01.my.domain.com
SUCCESS: Expected machine exatestdbadm02.my.domain.com to have OS Type of Linux Dom0, and found OsType LinuxDom0
SUCCESS: Found Operating system LinuxPhysical and configuration file expects LinuxPhysical on machine exatestceladm01.my.domain.com, machine type: storage
SUCCESS: Found Operating system LinuxPhysical and configuration file expects LinuxPhysical on machine exatestceladm02.my.domain.com, machine type: storage
SUCCESS: Expected machine exatestdbadm01.my.domain.com to have OS Type of Linux Dom0, and found OsType LinuxDom0
SUCCESS: Found Operating system LinuxPhysical and configuration file expects LinuxPhysical on machine exatestceladm03.my.domain.com, machine type: storage
SUCCESS: NTP servers on machine exatestceladm03.my.domain.com verified successfully
SUCCESS: NTP servers on machine exatestceladm01.my.domain.com verified successfully
SUCCESS: NTP servers on machine exatestceladm02.my.domain.com verified successfully
SUCCESS: NTP servers on machine exatestdbadm02.my.domain.com verified successfully
SUCCESS: NTP servers on machine exatestdbadm01.my.domain.com verified successfully
SUCCESS: Sufficient memory for all the guests on database node exatestdbadm02.my.domain.com
SUCCESS: Sufficient memory for all the guests on database node exatestdbadm01.my.domain.com
SUCCESS: Found Operating system LinuxPhysical and configuration file expects LinuxPhysical on machine exatestceladm03.my.domain.com, machine type: storage
SUCCESS: Found Operating system LinuxPhysical and configuration file expects LinuxPhysical on machine exatestceladm02.my.domain.com, machine type: storage
SUCCESS: Found Operating system LinuxPhysical and configuration file expects LinuxPhysical on machine exatestceladm01.my.domain.com, machine type: storage
SUCCESS: Expected machine exatestdbadm02.my.domain.com to have OS Type of Linux Dom0, and found OsType LinuxDom0
SUCCESS: Expected machine exatestdbadm01.my.domain.com to have OS Type of Linux Dom0, and found OsType LinuxDom0
SUCCESS: NTP servers on machine exatestceladm03.my.domain.com verified successfully
SUCCESS: NTP servers on machine exatestceladm02.my.domain.com verified successfully
SUCCESS: NTP servers on machine exatestceladm01.my.domain.com verified successfully
SUCCESS: NTP servers on machine exatestdbadm01.my.domain.com verified successfully
SUCCESS: NTP servers on machine exatestdbadm02.my.domain.com verified successfully
SUCCESS: Sufficient memory for all the guests on database node exatestdbadm02.my.domain.com
SUCCESS: Sufficient memory for all the guests on database node exatestdbadm01.my.domain.com
SUCCESS: Switch IP 10.x9.xx.51 resolves successfully to host exatest-iba0.my.domain.com on node exatestceladm03.my.domain.com
SUCCESS:
SUCCESS: Switch IP 10.x9.xx.51 resolves successfully to host exatest-iba0.my.domain.com on node exatestceladm02.my.domain.com
SUCCESS: Switch IP 10.x9.xx.52 resolves successfully to host exatest-ibb0.my.domain.com on node exatestceladm03.my.domain.com
SUCCESS:
SUCCESS:
SUCCESS:
SUCCESS: Switch IP 10.x9.xx.52 resolves successfully to host exatest-ibb0.my.domain.com on node exatestceladm02.my.domain.com
SUCCESS:
SUCCESS: Switch IP 10.x9.xx.51 resolves successfully to host exatest-iba0.my.domain.com on node exatestceladm01.my.domain.com
SUCCESS: Switch IP 10.x9.xx.52 resolves successfully to host exatest-ibb0.my.domain.com on node exatestceladm01.my.domain.com
SUCCESS:
SUCCESS: X7 compute node exatestdbadm01.my.domain.com has updated Broadcom firmware
SUCCESS: X7 compute node exatestdbadm02.my.domain.com has updated Broadcom firmware
SUCCESS: Disk Tests are not running/active on any of the Storage Servers.
SUCCESS: Cluster Version 12.2.0.1.181016 is compatible with OL7 on exatestdbadm01
SUCCESS: Cluster Version 12.2.0.1.181016 is compatible with OL7 on exatestdbadm02
SUCCESS: Cluster Version 12.2.0.1.181016 is compatible with OL7 on exatestdbadm01
SUCCESS: Cluster Version 12.2.0.1.181016 is compatible with OL7 on exatestdbadm02
SUCCESS: Cluster Version 12.2.0.1.181016 is compatible with OL7 on exatestdbadm01
SUCCESS: Cluster Version 12.2.0.1.181016 is compatible with OL7 on exatestdbadm02
SUCCESS: Disk size 10000GB on cell exatestceladm01.my.domain.com matches the value specified in the OEDA configuration file
SUCCESS: Disk size 10000GB on cell exatestceladm02.my.domain.com matches the value specified in the OEDA configuration file
SUCCESS: Disk size 10000GB on cell exatestceladm03.my.domain.com matches the value specified in the OEDA configuration file
SUCCESS: Disk size 10000GB on cell exatestceladm04.my.domain.com matches the value specified in the OEDA configuration file
SUCCESS: Disk size 10000GB on cell exatestceladm05.my.domain.com matches the value specified in the OEDA configuration file
SUCCESS: Disk size 10000GB on cell exatestceladm06.my.domain.com matches the value specified in the OEDA configuration file
Successfully completed execution of step Validate Configuration File [elapsed Time [Elapsed = 250301 mS [4.0 minutes] Thu Mar 07 12:35:31 CET 2019]]
[root@exatestdbadm01 linux-x64]#


Execution of all remaining steps

Than, because we felt confident, we decide to invoke all remaining steps together:

root@exatestdbadm01 linux-x64]# ./install.sh -cf TVD-exatest.xml -r 1-18
...
..


The final result is the Exadata Machine installed with six Oracle VMs, and three Grid Infrastructure clusters each one running a test RAC database.


My OOW18 Summary


For those who are interested here my major takeaways from the OOW18


As we all know, since few years the HOTTEST topic advertized at the OOW is “Cloud Computing”, but this time Oracle Cloud was no longer alone!

In fact the focus was divided between the new Oracle OCI Cloud, also named by Larry as Second Generation of Cloud and the Autonomous Database.


OCI Second Gen of Cloud

Here a summary of the major advantages compared to the previous version:

– Security, guaranteed by robots which scan the network for any malicious attack.  

– The cutting edge virtual network, which brings up to 50GB speed and extreme flexibility.

– Bare Metal Infrastructure based on Exadata Machines.

– Aggressive pricing, compared to the competitors.


Autonomous Database.

The Autonomous Database option is now available for OLTP and DWH databases and includes new capabilities like automatic index creation and column stored table conversion. In version 19 it will manage online memory increase and additional tuning options.

As announces during Larry’s keynote, the  Autonomous database will be also available with the Cloud @ Customer option (on Exadata only), ant it will no longer require human labor (DBA and Sys Admin intervention), because Self Provisioning, Self Driving, Self Tuning and Self Repairing.

For non-technical people it looks magic, but it is few steps from what we already use in a standard Oracle 12c Database. In fact Autonomous Database leverages a bunch of database advisors and tuning options, now orchestrated by an Artificial Intelligence and Machine Learning software, in order to provide data-driven predictions and decisions.

Over the next few years, Autonomous Database will be enriched with several new options, improving the quality of live of many DBAs, which will be relieved of the majority of the tedious and recurring tasks, leaving the most added value tasks under their own responsibility.

Last but not least, the Autonomous Database runs in a very high end configurations (Oracle guarantees 99,995% of availability), which is quite expensive to acquire due to the list of mandatory requirements: Exadata, RAC, Active DG, Multitenant, Tuning Pack, Diagnostic Pack etc..


Exadata Machine

Several interesting features are coming next year with the introduction of the INTEL Optane DC Persistent Memory for even faster OLTP.

This new type of memory will be installed on the Storage Cell and used as accelerator in front of Flash memory.

The database node will  access to the Persistent Memory via RDMA with a gain up to 20 x faster access latency.

Oracle is developing the more and more Remote Direct Memory Access (RDMA) instructions for Cache Fusion and Storage Cell operations in order to offload the database nodes and increase the overall performance.

Stay tuned on Exadata Machine because the next generation will also include BIG architectural change…


Oracle Virtual Machine (OVM)

One curiosity directly collected at Linux Virtualization booth is that even though the next generation of hypervisor will be based on KVM, Oracle will keep calling it OVM and of course the current OVM product based on XEN (OVS, OVM) will still be in use by many companies.

How possibly the customers can get confused ?!?


With this I finished, although there would be much more to write.


Exadata How Safely Erase All Data

When the time arrives to decommission an environment with sesitive data, we are frequently confronted to the problem how to certify to our customer or management the erase of all data and logs.

On Exadata Machine starting from the software release 12.2.1.1.0, this problem has been elegantly solved by Oracle introducing a new utility called Secure Eraser; which securely erases data on hard drives, flash devices, internal USBs, and resets ILOM to factory default.


In earlier software versions, the Exadata Storage Software includes CellCli commands to securely erase the user data:

CellCLI> DROP GRIDDISK ALL FLASHDISK PREFIX=DATA, ERASE=7pass
CellCLI> DROP GRIDDISK ALL PREFIX=DATA, ERASE=3pass

and

CellCLI> DROP CELLDISK ALL FLASHDISK ERASE=7pass 
CellCLI> DROP CELL ERASE=3pass

Unfortunatly those commands only cover the user data stored on the Storage Cell, and none of them produces an official certificate with the summary of the actions taken to guarantee the wipe of the data. While all this is done by Secure Eraser on all Compute and Storage nodes, sanitizing on all type of devices: user data, OS logs and network configurations.


Depending from the Exadata model, a subset of all of available options to execute Secure Eraser is possible:

  • Automatic Secure Eraser Ethrough PXE Boot
  • Interactive Secure Eraser through PXE Boot
  • Interactive Secure Eraser through Network Boot
  • Interactive Secure Eraser through External USB


Recently I used Secure Eraser through External USB on one Exadata X7-2 Machine and here are reported the different steps.


Copy the Secure Eraser Diagnostic image from MOS 2180963.1 to a USB stick.

 # dd if=image_diagnostics_18.1.4.0.0_LINUX.X64_180125.3-1.x86_64.usb of=/dev/sdb


Boot the server using the USB device with the Secure Eraser Diagnostic image

Exa_BootList.jpg


After login, start the Secure Erase process

/usr/sbin/secureeraser --erase --all --flash_erasure_method=7pass --hdd_erasure_method=3pass --technician=Emiliano_Fusaglia --witness=Mario_Bros --output=/mnt/iso


At the end of the erase process a Data Erasure Certificate similar to the one on the example below will be available in TXT, HTML and PDF format.

Exa_SecureErase_Report


Exadata Storage Snapshots

This post describes how to implement Oracle Database Snapshot Technology on Exadata Machine.

Because Exadata Storage Cell Smart Features, Storage Indexes, IORM and Network Resource Manager work at level of ASM Volume Manager only, (and they don’t work on top of ACFS Cluster File System), the implementation of the snapshot technology is different compared to any other non-Exadata environment.

At this purpuse Oracle has developed a new type of ASM Disk Group called SPARSE Disk Group. It uses ASM SPARSE Grid Disk based on Thin Provisioning to save the database snapshot copies and the associated metadata, and it supports non-CDB and PDB snapshot copy.

The implementation requires the following minimal software versions :

  • Exadata Storage Software version 12.1.2.1.0.
  • Oracle Database version 12.1.0.2 with bundle patch 5.
One major restriction applies to Exadata Storage Sanpshot compared to ACFS;
the source database must be a shared copy open on read only and called Test Master. The Test Master Database can not be modified or deleted as long the latest child snapshot is in use.
This restriction exists because Exadata Snapshot technology uses “allocate on first write”, and not “copy on write” (like for ACFS), and the snapshot is per-database-datafile.
When a child snapshot issue a write, the write goes to a private copy of that block inside the snapshot, preserving the original block value which can be accessed by other child snapshots of the same Test Master.

How to Implement Exadata Storage Snapshots in a PDB Environment

Check the celldisks for available free space to allocate to a new SPARSE Disk Group

[root@strgceladm01 ~]# cellcli -e list celldisk attributes name,freespace
 CD_00_strgceladm01 853.34375G
 CD_01_strgceladm01 853.34375G
 CD_02_strgceladm01 853.34375G
 CD_03_strgceladm01 853.34375G
 CD_04_strgceladm01 853.34375G
 CD_05_strgceladm01 853.34375G
 CD_06_strgceladm01 853.34375G
 CD_07_strgceladm01 853.34375G
 CD_08_strgceladm01 853.34375G
 CD_09_strgceladm01 853.34375G
 CD_10_strgceladm01 853.34375G
 CD_11_strgceladm01 853.34375G
 FD_00_strgceladm01 0
 FD_01_strgceladm01 0
 FD_02_strgceladm01 0
 FD_03_strgceladm01 0
[root@strgceladm01 ~]#


[root@strgceladm02 ~]# cellcli -e list celldisk attributes name,freespace
 CD_00_strgceladm02 853.34375G
 CD_01_strgceladm02 853.34375G
 CD_02_strgceladm02 853.34375G
 CD_03_strgceladm02 853.34375G
 CD_04_strgceladm02 853.34375G
 CD_05_strgceladm02 853.34375G
 CD_06_strgceladm02 853.34375G
 CD_07_strgceladm02 853.34375G
 CD_08_strgceladm02 853.34375G
 CD_09_strgceladm02 853.34375G
 CD_10_strgceladm02 853.34375G
 CD_11_strgceladm02 853.34375G
 FD_00_strgceladm02 0
 FD_01_strgceladm02 0
 FD_02_strgceladm02 0
 FD_03_strgceladm02 0
[root@strgceladm02 ~]#


[root@strgceladm03 ~]# cellcli -e list celldisk attributes name,freespace
 CD_00_strgceladm03 853.34375G
 CD_01_strgceladm03 853.34375G
 CD_02_strgceladm03 853.34375G
 CD_03_strgceladm03 853.34375G
 CD_04_strgceladm03 853.34375G
 CD_05_strgceladm03 853.34375G
 CD_06_strgceladm03 853.34375G
 CD_07_strgceladm03 853.34375G
 CD_08_strgceladm03 853.34375G
 CD_09_strgceladm03 853.34375G
 CD_10_strgceladm03 853.34375G
 CD_11_strgceladm03 853.34375G
 FD_00_strgceladm03 0
 FD_01_strgceladm03 0
 FD_02_strgceladm03 0
 FD_03_strgceladm03 0
[root@strgceladm03 ~]#

For each Storage Cell Create a SPARSE Grid Disks as described below

[root@strgceladm01 ~]# cellcli -e CREATE GRIDDISK ALL PREFIX=SPARSE, sparse=true, SIZE=853.34375G
Cell disks were skipped because they had no freespace for grid disks: FD_00_strgceladm01, FD_01_strgceladm01, FD_02_strgceladm01, FD_03_strgceladm01.
GridDisk SPARSE_CD_00_strgceladm01 successfully created
GridDisk SPARSE_CD_01_strgceladm01 successfully created
GridDisk SPARSE_CD_02_strgceladm01 successfully created
GridDisk SPARSE_CD_03_strgceladm01 successfully created
GridDisk SPARSE_CD_04_strgceladm01 successfully created
GridDisk SPARSE_CD_05_strgceladm01 successfully created
GridDisk SPARSE_CD_06_strgceladm01 successfully created
GridDisk SPARSE_CD_07_strgceladm01 successfully created
GridDisk SPARSE_CD_08_strgceladm01 successfully created
GridDisk SPARSE_CD_09_strgceladm01 successfully created
GridDisk SPARSE_CD_10_strgceladm01 successfully created
GridDisk SPARSE_CD_11_strgceladm01 successfully created
[root@strgceladm01 ~]#

For each Storage Cell List all Grid Disks

[root@strgceladm01 ~]# cellcli -e list griddisk attributes name,size
 DATAC1_CD_00_strgceladm01 6.294586181640625T
 DATAC1_CD_01_strgceladm01 6.294586181640625T
 DATAC1_CD_02_strgceladm01 6.294586181640625T
 DATAC1_CD_03_strgceladm01 6.294586181640625T
 DATAC1_CD_04_strgceladm01 6.294586181640625T
 DATAC1_CD_05_strgceladm01 6.294586181640625T
 DATAC1_CD_06_strgceladm01 6.294586181640625T
 DATAC1_CD_07_strgceladm01 6.294586181640625T
 DATAC1_CD_08_strgceladm01 6.294586181640625T
 DATAC1_CD_09_strgceladm01 6.294586181640625T
 DATAC1_CD_10_strgceladm01 6.294586181640625T
 DATAC1_CD_11_strgceladm01 6.294586181640625T
 FGRID_FD_00_strgceladm01 2.0717315673828125T
 FGRID_FD_01_strgceladm01 2.0717315673828125T
 FGRID_FD_02_strgceladm01 2.0717315673828125T
 FGRID_FD_03_strgceladm01 2.0717315673828125T
 RECOC1_CD_00_strgceladm01 1.78143310546875T
 RECOC1_CD_01_strgceladm01 1.78143310546875T
 RECOC1_CD_02_strgceladm01 1.78143310546875T
 RECOC1_CD_03_strgceladm01 1.78143310546875T
 RECOC1_CD_04_strgceladm01 1.78143310546875T
 RECOC1_CD_05_strgceladm01 1.78143310546875T
 RECOC1_CD_06_strgceladm01 1.78143310546875T
 RECOC1_CD_07_strgceladm01 1.78143310546875T
 RECOC1_CD_08_strgceladm01 1.78143310546875T
 RECOC1_CD_09_strgceladm01 1.78143310546875T
 RECOC1_CD_10_strgceladm01 1.78143310546875T
 RECOC1_CD_11_strgceladm01 1.78143310546875T
 SPARSE_CD_00_strgceladm01 853.34375G
 SPARSE_CD_01_strgceladm01 853.34375G
 SPARSE_CD_02_strgceladm01 853.34375G
 SPARSE_CD_03_strgceladm01 853.34375G
 SPARSE_CD_04_strgceladm01 853.34375G
 SPARSE_CD_05_strgceladm01 853.34375G
 SPARSE_CD_06_strgceladm01 853.34375G
 SPARSE_CD_07_strgceladm01 853.34375G
 SPARSE_CD_08_strgceladm01 853.34375G
 SPARSE_CD_09_strgceladm01 853.34375G
 SPARSE_CD_10_strgceladm01 853.34375G
 SPARSE_CD_11_strgceladm01 853.34375G
[root@strgceladm01 ~]#

From ASM Instance Create a SPARSE Disk Group

SQL> CREATE DISKGROUP SPARSEC1 EXTERNAL REDUNDANCY DISK 'o/*/SPARSE_CD_*'
ATTRIBUTE
'compatible.asm' = '12.2.0.1',
'compatible.rdbms' = '12.2.0.1',
'cell.smart_scan_capable'='TRUE',
'cell.sparse_dg' = 'allsparse',
'AU_SIZE' = '4M';

Diskgroup created.

Set the following ASM attributes on the Disk Group hosting the Test Master Database

ALTER DISKGROUP DATAC1 SET ATTRIBUTE 'access_control.enabled' = 'true';

Grant access to the OS RDBMS user used to access to the Disk Group

ALTER DISKGROUP DATAC1 ADD USER 'oracle';

From an ASM Instance Set ownership permissions for every file that belongs solely to the PDB being snapped cloned as per example below

alter diskgroup DATAC1 set ownership owner='oracle' for file '+DATAC1/CDBT/<xxxxxxxxxxxxxxxxxxx>/DATAFILE/system.xxx.xxxxxxx';
alter diskgroup DATAC1 set ownership owner='oracle' for file '+DATAC1/CDBT/<xxxxxxxxxxxxxxxxxxx>/DATAFILE/sysaux.xxx.xxxxxxx';
alter diskgroup DATAC1 set ownership owner='oracle' for file '+DATAC1/CDBT/<xxxxxxxxxxxxxxxxxxx>/DATAFILE/users.xxx.xxxxxxx';
...
..

Restart the Master Test PDB in Read Only

alter pluggable database PDBTESTMASTER close immediate instances=all;
alter pluggable database PDBTESTMASTER open read only;

Create the first PDB Snapshot Copy on Exadata SPARSE Disk Group

Create pluggable database PDBDEV01 from PDBTESTMASTER tempfile reuse create_file_dest='+SPARSEC1' snapshot copy;

Feedback of the Exadata Storage Snapshots

The ability to create storage efficient database copies in a few seconds, independently from the size of the Test Master is very useful for today IT departments; but such extreme velocity and flexibility is not entirely free. In fact performance tests on a I/O bound workload have highlighted important performance degradation. This reminds us that as defined by Oracle Corporation, the Snapshot Technology, included on Exadata Machine remains a non-production option.

Oracle DB stored on ASM vs ACFS

Nowadays a new Oracle database environment with Grid Infrastructure has three main storage options:

  1. Third party clustered file system
  2. ASM Disk Groups
  3. ACFS File System

While the first option was not in scope, this blog compares the result of the tests between ASM and ACFS, highlighting when to use one or the other to store 12c NON-CDB or CDB Databases.

The tests conducted on different environments using Oracle version 12.1.0.2 July PSU have shown controversial results compared to what Oracle  is promoting for the Oracle Database Appliance (ODA) in the following paper: “Frequently Asked Questions Storing Database Files in ACFS on Oracle Database Appliance


Outcome of the tests

ASM remains the preferred option to achieve the best I/O performance, while ACFS introduces interesting features like DB snapshot to quickly and space efficiently provision new databases.

The performance gap between the two solutions is not negligible as reported below by the  AWR – TOP Timed Events sections of two PDBs, sharing the same infrastructure, executing the same workload but respectively using ASM and ACFS storage:

  • PDBASM: Pluggable Database stored on  ASM Disk Group
  • PDBACFS:Pluggable Database stored on ACFS File System


PDBASM AWR – TOP Timed Events and Other Stats

topevents_asm

fg_asm


PDBACFS AWR – TOP Timed Events and Other Stats

TopEvents_ACFS.png

fg_acfs


Due to the different characteristics and results when ASM or ACFS is in use, it is not possible to give a generic recommendation. But case by case the choise should be driven by business needs like maximum performance versus fast and efficient database clone.


ODA X5-2 how to cap the number of active CPU Cores

I recently had to cap the number of active CPUs on a bare metal ODA X5-2, and I noticed that the procedure is slightly different from what I used in the past (link to initial post).


Perform the following steps to generate the Core Key:

  • Login to My Oracle Support (MOS) and click the submenu Systems.
  • Select the serial number of the appliance and click on “Core Configuration”in the Asset Details Screen
  • Select Manage Key
  • From the Combo list select the number of cores to activate  and click Generate Key to generate the key.
  • Click Copy Key to Clipboard to copy the key to the clipboard.
  • Paste the key into an empty text file and save the file to a location on the Oracle Database Appliance.


ODA X5-2 initial number of CPU Cores

[root@odax5-2n0 ~]# cat /proc/cpuinfo | grep -i processor
processor : 0
processor : 1
processor : 2
processor : 3
...
...
..
.
processor : 70
processor : 71

[root@odax5-2n0 ~]# cat /proc/cpuinfo | grep -i processor |wc -l
72
[root@odax5-2n0 ~]#


Checks before enforcing the CPU restriction:

[root@odax5-2n0 ~]# oakcli show server

Power State : On
 Open Problems : 0
 Model : ODA X5-2
 Type : Rack Mount
 Part Number : xxxxxxxxxxx
 Serial Number : nnnnXXXXnnX <<<<<<<<<<<< This serial MUST match on BOTH of the ODA servers
 Primary OS : Not Available
 ILOM Address : 192.168.21.35
 ILOM MAC Address : xx:xx:xx:xx:xx:xx
 Description : Oracle Database Appliance X5-2 nnnnXXXXnnX
 Locator Light : Off
 Actual Power Consumption : 345 watts
 Ambient Temperature : 21.250 degree C
 Open Problems Report : System is healthy

[root@odax5-2n0 ~]#


[root@odax5-2n1 /]# oakcli show server

Power State : On
 Open Problems : 0
 Model : ODA X5-2
 Type : Rack Mount
 Part Number : xxxxxxxxxxx
 Serial Number : nnnnXXXXnnX <<<<<<<<<<<< This serial MUST match on BOTH of the ODA servers 
 Primary OS : Not Available
 ILOM Address : 192.168.21.36
 ILOM MAC Address : xx:xx:xx:xx:xx:xx
 Description : Oracle Database Appliance X5-2 nnnnXXXXnnX
 Locator Light : Off
 Actual Power Consumption : 342 watts
 Ambient Temperature : 21.750 degree C
 Open Problems Report : System is healthy

[root@odax5-2n1 /]#

[root@odax5-2n0 ~]# oakcli show env_hw
BM ODA X5-2
Public interface : COPPER
[root@odax5-2n0 ~]#


[root@odax5-2n1 /]# oakcli show env_hw
BM ODA X5-2
Public interface : COPPER
[root@odax5-2n1 /]#


[root@odax5-2n0 ~]# ipmitool -I open sunoem getval /X/system_identifier
Target Value: Oracle Database Appliance X5-2 nnnnXXXXnnX
[root@odax5-2n0 ~]# fwupdate list sp_bios
==================================================
SP + BIOS
==================================================
ID Product Name ILOM Version BIOS/OBP Version XML Support
---------------------------------------------------------------------------------------------------------------
sp_bios ORACLE SERVER X5-2 v3.2.4.52 r101649 30050100 N/A
[root@odax5-2n0 ~]#

[root@odax5-2n1 /]# ipmitool -I open sunoem getval /X/system_identifier
Target Value: Oracle Database Appliance X5-2 nnnnXXXXnnX
[root@odax5-2n1 /]# fwupdate list sp_bios
==================================================
SP + BIOS
==================================================
ID Product Name ILOM Version BIOS/OBP Version XML Support
---------------------------------------------------------------------------------------------------------------
sp_bios ORACLE SERVER X5-2 v3.2.4.52 r101649 30050100 N/A
[root@odax5-2n1 /]#


Apply the CPU Key form the first ODA node

[root@odax5-2n0 ~]# /opt/oracle/oak/bin/oakcli apply core_config_key /root/ODA_PROD_CPU_KEY_SerialNumber_NumberofCores_Configkey.txt
INFO: Both nodes will be rebooted automatically after applying the license
Do you want to continue: [Y/N]?:
Y
INFO: User has confirmed for reboot


Please enter the root password:

............Completed

INFO: Applying core_config_key on '192.168.16.25'
... 
INFO : Running as root: /usr/bin/ssh -l root 192.168.16.25 /tmp/tmp_lic_exec.pl
INFO : Running as root: /usr/bin/ssh -l root 192.168.16.25 /opt/oracle/oak/bin/oakcli enforce core_config_key /tmp/.lic_file
Waiting for the Node '192.168.16.25' to reboot..................................
Node '192.168.16.25' is rebooted
Waiting for the Node '192.168.16.25' to be up before applying the license on the node '192.168.16.24'.
INFO: Applying core_config_key on '192.168.16.24'
...
INFO : Running as root: /usr/bin/ssh -l root 192.168.16.24 /tmp/tmp_lic_exec.pl
INFO : Running as root: /usr/bin/ssh -l root 192.168.16.24 /opt/oracle/oak/bin/oakcli enforce core_config_key /tmp/.lic_file

Broadcast message from root@odax5-2n0
 (unknown) at 11:03 ...

The system is going down for reboot NOW!
[root@odax5-2n0 ~]#


New CPU cores configuration

[root@odax5-2n0 ~]# /opt/oracle/oak/bin/oakcli show core_config_key

Host's serialnumber = nnnnXXXXnnX
Enabled Cores (per server) = 6
Total Enabled Cores (on two servers) = 12
Server type = X5-2 -> Oracle Server X5-2
Hyperthreading is enabled. Each core has 2 threads. Operating system displays 12 processors per server
[root@odax5-2n0 ~]#

[root@odax5-2n1 ~]# /opt/oracle/oak/bin/oakcli show core_config_key

Host's serialnumber = nnnnXXXXnnX
Enabled Cores (per server) = 6
Total Enabled Cores (on two servers) = 12
Server type = X5-2 -> Oracle Server X5-2
Hyperthreading is enabled. Each core has 2 threads. Operating system displays 12 processors per server
[root@odax5-2n1 ~]#

The “Great” ODA overwhelming the Exadata

Introduction

This article try to explain the technical reasons of the Oracle Database Appliance success, a well-known appliance with whom Oracle targets small and medium businesses, or specific departments of big companies looking for privacy and isolation from the rest of the IT. Nowadays this small and relatively cheap appliance (around 65’000$ price list) has evolved a lot, the storage has reached an important capacity 128TB raw expansible to 256TB, and the two X5-2 servers are the same used on the database node of the Exadata machine. Many customers, while defining the new database architecture evaluate the pros and cons of acquiring an ODA compared to the smallest Exadata configuration (one eight of a Rack). If the customer is not looking for a system with extreme performance and horizontal scalability beyond the two X5-2 servers, the Oracle Database Appliance is frequently the retained option.

Some of the ODA major features are:

  • High Availability: no single point of failure on all hardware and software components.
  • Performance: each server is equipped with 2×18-core Intel Xeon and 256GB of RAM extensible up to 768GB, cluster communication over InfiniBand. The shared storage offers a multi-tiers configuration with HDDs at 7.2K rpm and two type of SSDs for frequently accessed data and for database redo logs.
  • Flexibility & Scalability: running RAC, RAC One node and Single Instance databases.
  • Virtualized configuration: designed for offering Solution in-a-box, with high available virtual machines.
  • Optimized licensing model: pay-as-you-grow model activating a crescendo number of CPU-cores on demand, with the Bare Metal configuration; or capping the resources combining Oracle VM with the Hard Partitioning setup.
  • Time-to-market: no-matter if the ODA has to be installed bare metal or virtualized, this is a standardized and automated process generally completed in one or two day of work.
  • Price: the ODA is very competitive when comparing the cost to an equivalent commodity architecture; which in addition, must be engineered, integrated and maintained by the customer.


At the time of the writing of this article, the latest hardware model is ODA X5-2 and 12.1.2.6.0 is the software version. This HW and SW combination offers unique features, few of them not even available on the Exadata machine, like the possibility to host databases and applications in one single box, or the possibility to rapidly and space efficiently clone an 11gR2 and 12c database using ACFS Snapshot.


ODA HW & SW Architecture

Oracle Database Appliance is composed by two X5-2 servers and a shared storage shelf, which optionally can be doubled. Each Server disposes of: two 18-core Intel Xeon E5-2699 v3; 256GB RAM (optionally upgradable to 768GB) and two 600GB 10k rpm internal disks in RAID 1 for OS and software binaries.

This appliance is equipped with redundant networking connectivity up to 10Gb, redundant SAS HBAs and Storage I/O modules, redundant InfiniBand interconnect for cluster communication enabling 40 Gb/second server-to-server communication.

The software components are all part of Oracle “Red Stack” with Oracle Linux 6 UEK or OVM 3, Grid Infrastructure 12c, Oracle RDBMS 12c & 11gR2 and Oracle Appliance Manager.
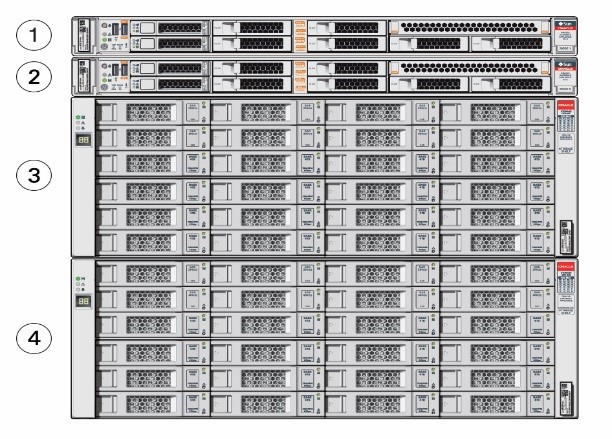


ODA Front view

Components number 1 & 2 are the X5-2 Servers. Components 3 & 4 are the Storage and the optionally Storage extension.

ODA_Front


ODA Rear view

Highlight of the multiple redundant connections, including InfiniBand for Oracle Clusterware, ASM and RAC communications. No single point of HW or SW failure.

ODA_Back


Storage Organization

With 16x8TB SAS HDDs a total raw space of 128TB is available on each storage self (64TB in configuration ASM double-mirrored and 42.7TB with ASM triple-mirrored). To offer better I/O performance without exploding the price, Oracle has implemented the following SSD devices: 4x400GB ASM double-mirrored, for frequently accessed data, and 4x200GB ASM triple-mirrored, for database redo logs.

As shown on the picture aside, each rotating disk has two slices, the external, and more performant partition assigned to the +DATA ASM disk group, and the internal one allocated to +RECO ASM disk group.


ODA_Disk

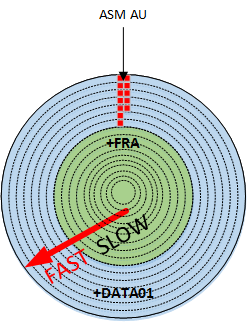
This storage optimization allows the ODA to achieve competitive I/O performance. In a production-like environment, using the three type of disks, as per ODA Database template odb-24 (https://docs.oracle.com/cd/E22693_01/doc.12/e55580/sizing.htm), Trivadis has measured 12k I/O per second and a throughput of 2300 MB/s with an average latency of 10ms. As per Oracle documentation, the maximum number of I/O per second of the rotating disks, with a single storage shelf is 3300; but this value increases significantly relocating the hottest data files to +FLASH disk group created on SSD devices.


ACFS becomes the default database storage of ODA

Starting from the ODA software version 12.1.0.2, any fresh installation enforces ASM Cluster File System (ACFS) as lonely type of database storage support, restricting the supported database versions to 11.2.0.4 and greater. In case of ODA upgrade from previous release, all pre-existing databases are not automatically migrated to ACFS, but Oracle provides a tool called acfs_mig.pl for executing this mandatory step on all Non-CDB databases of version >= 11.2.0.4.

Oracle has decided to promote ACFS as default database storage on ODA environment for the following reasons:

  • ACFS provides almost equivalent performance than Oracle ASM disk groups.
  • Additional functionalities on industry standard POSIX file system.
  • Database snapshot copy of PDBs, and NON-CDB of version 11.2.0.4 or greater.
  • Advanced functionality for general-purpose files such as replication, tagging, encryption, security, and auditing.

Database created on ACFS follows the same Oracle Managed Files (OMF) standard used by ASM.

As in the past, the database provisioning requires the utilization of the command line interface oakcli and the selection of a database template, which defines several characteristics including the amount of space to allocate on each file system. Container and Non-Container databases can coexist on the same Oracle Database Appliance.

The ACFS file systems are created during the database provisioning process on top of the ASM disk groups +DATA, +RECO, +REDO, and optionally +FLASH. The file systems have two possible setups, depending on the database type Container or Non-Container.

  • Container database: for each CDB the ODA database-provisioning job creates dedicated ACFS file systems with the following characteristics:
Disk Characteristics ASM Disk group ACFS Mount Point
SAS Disk external partition +DATA /u02/app/oracle/oradata/datc<db_unique_name>
SAS Disk internal partition +RECO /u01/app/oracle/fast_recovery_area/rcoc<db_unique_name>
SSD Triple-mirrored +REDO /u01/app/oracle/oradata/rdoc<db_unique_name>
SSD Double-mirrored +FLASH (*) /u02/app/oracle/oradata/flashdata


  • Non-Container database: in case of Non-CDB the ODA database-provisioning job creates or resizes the following shared ACFS file systems:
Disk Characteristics ASM Disk group ACFS Mount Point
SAS Disk external partition +DATA /u02/app/oracle/oradata/datastore
SAS Disk internal partition +RECO /u01/app/oracle/fast_recovery_area/datastore
SSD Triple-mirrored +REDO /u01/app/oracle/oradata/datastore
SSD Double-mirrored +FLASH (*) /u02/app/oracle/oradata/flashdata

(*) Optionally used by the databases as Smart Flash Cache (extension of the SGA buffer cache), or allocated to store the hottest data files leveraging the I/O performance of the SSD disks.


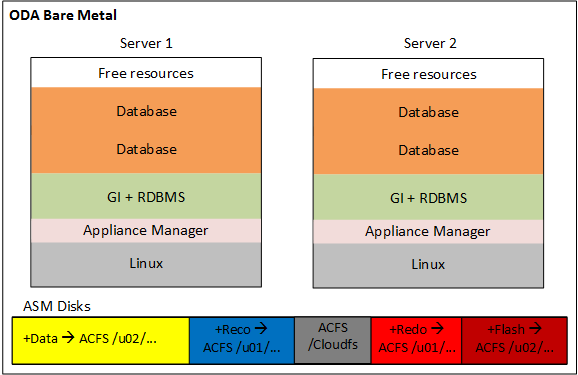
Oracle Database Appliance Bare Metal

The bare metal configuration has been available since version one of the appliance, and nowadays it remains the default option proposed by Oracle, which pre-install the OS Linux on any new system. Very simple and intuitive to install thanks to the pre-built bundle software, which automates most of the steps. At the end of the installation, the architecture is very similar to any other two node RAC setup based on commodity hardware; but even from an operation point of view there are great advantages, because the Oracle Appliance Manager framework simplifies and accelerates the execution of almost any system and database administrator task.

Here below is depicted the ODA architecture when the bare metal configuration is in use:

ODA_Bare_Metal


Oracle Database Appliance Virtualized

When the ODA is deployed with the virtualization, both servers run Oracle VM Server, also called Dom0. Each Dom0 hosts in a local dedicated repository the ODA Base (or Dom Base), a privileged virtual machine where it is installed the Appliance Manager, Grid Infrastructure and RDBMS binaries. The ODA Base takes advantage of the Xen PCI Pass-through technology to provide direct access to the ODA shared disks presented and managed by ASM. This configuration reduces the VM flexibility; in fact, no VM migration is allowed for the two ODA Base, but it guarantees almost no I/O penalty in term of performance. With the Dom Base setup, the basic installation is completed and it is possible to start provisioning databases using Oracle Appliance Manager.

At the same time, the administrator can create new-shared repositories hosted on ACFS and NFS exported to the hypervisor for hosting the application virtual machines. Those application virtual machines are also identified with the name of Domain U.  The Domain U and the templates can be stored on a local or shared Oracle VM Server repository, but to enable the functionality to migrate between the two Oracle VM Servers a shared repository on the ACFS file system should be used.

Even when the virtualization is in use, Oracle Appliance Manager is the only framework for system and database administration tasks like repository creation, import of template, deployment of virtual machine, network configuration, database provisioning and so on, relieving the administrator from all complexity.

The implementation of the Solution-in-a-box guarantees the maximum Return on Investment of the ODA; in fact, while restricting the virtual CPUs to license on the Dom Base it allows relocating spare resources to the application virtual machines as showed on the picture below.

ODA_Virtualized


ODA compared to Exadata Machine and Commodity Hardware

As described on the previous sections, Oracle Database Appliance offers unique features such as pay-as-you-grow, solution-in-a-box and so on, which can heavily influence the decision for a new database architecture. The aim of the table below is to list the main architecture characteristics to evaluate while defining a new database infrastructure, comparing the result between Oracle Database Appliance, Exadata Machine and a Commodity Architecture based on Intel Linux engineered to run RAC databases.

Table_Architectures

As shown by the different scores of the three architectures, each solution comes with points of strength and weakness; about the Oracle Database Appliance, it is evident that due to its characteristics, the smallest Oracle Engineered System remains a great option for small, medium database environments.


Conclusion

I hope this article keep the initial promise to explain the technical reasons of the Oracle Database Appliance success, and it has highlighted the great work done by Oracle, engineering this solution on the edge of the technology keeping the price under control.

One last summary of what in my opinion are the major benefits offered by the ODA:

  • Time-to-market: Thanks to automated processes and pre-build software images, the deployment phase is extremely rapid.
  • Simplicity: The use of standard software components, combined to the appliance orchestrator Oracle Appliance Manager makes the ODA very simple to operate.
  • Standardization & Automation: The Appliance Manager encapsulates and automatizes all repeatable and error-prone tasks like provisioning, decommissioning, patching and so on.
  • Vendor certified platform: Oracle validates and certifies the compatibility among all HW & SW components.
  • Evolution: Over the time, the ODA benefits of specific bug fixing and software evolution (introduced by Oracle though the quarterly patch sets); keeping the system on the edge for longer time when compared to a commodity architecture.

EXADATA: How to enable Flash Cache WriteBack on a running system

In a recent tuning activity it was necessary to change the Exadata Smart Flash Cache from “WriteThrough” to “WriteBack“. Because the system was used in a 24/7 environment we had to implement the change in a Rolling Upgrade Fashion.

Here below are described the different steps.


From one DB node using dcli check the currest status of the storage cells:

[root@efudbadm02 ~]# dcli -g ~/cell_group -l root cellcli -e "list cell attributes flashcachemode"
efuceladm01: WriteThrough
efuceladm02: WriteThrough
efuceladm03: WriteThrough
efuceladm04: WriteThrough
efuceladm05: WriteThrough
efuceladm06: WriteThrough
efuceladm07: WriteThrough
efuceladm08: WriteThrough
efuceladm09: WriteThrough
efuceladm10: WriteThrough
efuceladm11: WriteThrough

From one DB node using dcli check that the properties asmdeactivationoutcome and asmmodestatus of all griddisks are respectively “Yes” and “ONLINE” before continuing with the change.

[root@efudbadm02 ~]# dcli -g cell_group -l root cellcli -e list griddisk attributes asmdeactivationoutcome, asmmodestatus
efuceladm01: Yes ONLINE
efuceladm02: Yes ONLINE
...
..
.

From one DB node using dcli check that all flashcache modules are in “normal” state and no flash disk is in degraded or critical state.

[root@efudbadm02 ~]# dcli -g cell_group -l root cellcli -e list flashcache detail
efuceladm01: name: efuceladm01_FLASHCACHE
efuceladm01: cellDisk: FD_00_efuceladm01,FD_07_efuceladm01,FD_06_efuceladm01,FD_03_efuceladm01,FD_05_efuceladm01,FD_01_efuceladm01,FD_02_efuceladm01,FD_04_efuceladm01
efuceladm01: creationTime: 2013-06-18T15:21:13+02:00
efuceladm01: degradedCelldisks:
efuceladm01: effectiveCacheSize: 744.125G
efuceladm01: id: 35b61001-438f-4d66-8ce9-40704f758d3f
efuceladm01: size: 744.125G
efuceladm01: status: normal
efuceladm02: name: efuceladm02_FLASHCACHE
efuceladm02: cellDisk: FD_06_efuceladm02,FD_05_efuceladm02,FD_00_efuceladm02,FD_02_efuceladm02,FD_01_efuceladm02,FD_07_efuceladm02,FD_03_efuceladm02,FD_04_efuceladm02
efuceladm02: creationTime: 2013-06-18T15:21:12+02:00
efuceladm02: degradedCelldisks:
efuceladm02: effectiveCacheSize: 744.125G
efuceladm02: id: 2f7eedd6-cda2-496e-98ec-417b94fb8ee7
efuceladm02: size: 744.125G
efuceladm02: status: normal
efuceladm03: name: efuceladm03_FLASHCACHE
efuceladm03: cellDisk: FD_00_efuceladm03,FD_04_efuceladm03,FD_01_efuceladm03,FD_02_efuceladm03,FD_03_efuceladm03,FD_06_efuceladm03,FD_05_efuceladm03,FD_07_efuceladm03
efuceladm03: creationTime: 2013-06-18T15:21:10+02:00
efuceladm03: degradedCelldisks:
efuceladm03: effectiveCacheSize: 744.125G
efuceladm03: id: c271cdb8-dc70-4009-ba97-dfc4c26b00ef
efuceladm03: size: 744.125G
efuceladm03: status: normal
...
..
.

Logon on the first Cell Storage and using CellCli interface perform the following procedure to enable the WriteBack Flash Cache in a rolling upgrade fashion.


Drop the existing flash cache

CellCLI> drop flashcache
Flash cache efuceladm01_FLASHCACHE successfully dropped

Inactivate the griddisk on the cell

CellCLI> alter griddisk all inactive
GridDisk DATA_CD_00_efuceladm01 successfully altered
GridDisk DATA_CD_01_efuceladm01 successfully altered
GridDisk DATA_CD_02_efuceladm01 successfully altered
GridDisk DATA_CD_03_efuceladm01 successfully altered
GridDisk DATA_CD_04_efuceladm01 successfully altered
GridDisk DATA_CD_05_efuceladm01 successfully altered
GridDisk DBFS_DG_CD_02_efuceladm01 successfully altered
GridDisk DBFS_DG_CD_03_efuceladm01 successfully altered
GridDisk DBFS_DG_CD_04_efuceladm01 successfully altered
GridDisk DBFS_DG_CD_05_efuceladm01 successfully altered
GridDisk RECO_CD_00_efuceladm01 successfully altered
GridDisk RECO_CD_01_efuceladm01 successfully altered
GridDisk RECO_CD_02_efuceladm01 successfully altered
GridDisk RECO_CD_03_efuceladm01 successfully altered
GridDisk RECO_CD_04_efuceladm01 successfully altered
GridDisk RECO_CD_05_efuceladm01 successfully altered

Shut down cellsrv service

CellCLI> alter cell shutdown services cellsrv

Stopping CELLSRV services...
The SHUTDOWN of CELLSRV services was successful.

Enable the Smart Flash Cache WriteBack

CellCLI> alter cell flashCacheMode=writeback
Cell efuceladm01 successfully altered

Restart the cellsrv service

CellCLI> alter cell startup services cellsrv

Starting CELLSRV services...
The STARTUP of CELLSRV services was successful.

Reactivate the griddisk on the cell

CellCLI> alter griddisk all active
GridDisk DATA_CD_00_efuceladm01 successfully altered
GridDisk DATA_CD_01_efuceladm01 successfully altered
GridDisk DATA_CD_02_efuceladm01 successfully altered
GridDisk DATA_CD_03_efuceladm01 successfully altered
GridDisk DATA_CD_04_efuceladm01 successfully altered
GridDisk DATA_CD_05_efuceladm01 successfully altered
GridDisk DBFS_DG_CD_02_efuceladm01 successfully altered
GridDisk DBFS_DG_CD_03_efuceladm01 successfully altered
GridDisk DBFS_DG_CD_04_efuceladm01 successfully altered
GridDisk DBFS_DG_CD_05_efuceladm01 successfully altered
GridDisk RECO_CD_00_efuceladm01 successfully altered
GridDisk RECO_CD_01_efuceladm01 successfully altered
GridDisk RECO_CD_02_efuceladm01 successfully altered
GridDisk RECO_CD_03_efuceladm01 successfully altered
GridDisk RECO_CD_04_efuceladm01 successfully altered
GridDisk RECO_CD_05_efuceladm01 successfully altered

Recreate the flash cache

CellCLI> create flashcache all
Flash cache efuceladm01_FLASHCACHE successfully created


Verify that the Smart Flash Cache WriteBackWriteBack option is enabled

[root@efuceladm01 ~]# cellcli -e list cell detail | grep flashCacheMode
 flashCacheMode: writeback

Before applying the change to the next Exadata Storage Server  wait that all griddisk are synronized and online.

[root@efuceladm01 ~]# cellcli -e list griddisk attributes name,asmmodestatus,asmdeactivationoutcome
 DATA_CD_00_efuceladm01 SYNCING Yes
 DATA_CD_01_efuceladm01 SYNCING Yes
 DATA_CD_02_efuceladm01 SYNCING Yes
 DATA_CD_03_efuceladm01 SYNCING Yes
 DATA_CD_04_efuceladm01 SYNCING Yes
 DATA_CD_05_efuceladm01 SYNCING Yes
 DBFS_DG_CD_02_efuceladm01 ONLINE Yes
 DBFS_DG_CD_03_efuceladm01 ONLINE Yes
 DBFS_DG_CD_04_efuceladm01 ONLINE Yes
 DBFS_DG_CD_05_efuceladm01 ONLINE Yes
 RECO_CD_00_efuceladm01 OFFLINE Yes
 RECO_CD_01_efuceladm01 OFFLINE Yes
 RECO_CD_02_efuceladm01 OFFLINE Yes
 RECO_CD_03_efuceladm01 OFFLINE Yes
 RECO_CD_04_efuceladm01 OFFLINE Yes
 RECO_CD_05_efuceladm01 OFFLINE Yes

Once the asmmodestatus is ONLINE on all griddisks it is safe to move to the next Storage Server.


At the end of the procedure all Storage Servers are configured with Smart Flash Cache WriteBach option:

[root@efudbadm02 ~]# dcli -g ~/cell_group -l root cellcli -e "list cell attributes flashcachemode"
efuceladm01: writeback
efuceladm02: writeback
efuceladm03: writeback
efuceladm04: writeback
efuceladm05: writeback
efuceladm06: writeback
efuceladm07: writeback
efuceladm08: writeback
efuceladm09: writeback
efuceladm10: writeback
efuceladm11: writeback


Patching ODA X5-2 Virtualized to version 12.1.2.6

Here is described the procedure to upgrade the ODA to the Bundle Patch 12.1.2.6.0.

This Bundle contains a BIG change because it replaces Oracle Enterprise Linux 5.11 with the version 6.7.

One critical requirement: this patch can only be installed on top of 12.1.2.5.0, to check the exisitng ODA version run:

# /opt/oracle/oak/bin/oakcli show version
Version
12.1.2.5.0

The patch can be downloaded from MOS selecting the following note: 22328442 ORACLE DATABASE APPLIANCE PATCH BUNDLE 12.1.2.6.0 (Patch)


And now let’s start with the installation:

  • Upload the patch on both ODA_Base (Dom1)  on /tmp
  • Remove any Extra RPM installed by the user on the ODA_Base
  • Unpack both ZIP files of the patch on both ODA_Base using the following oakcli command:
[root@oda_base01 / ] # cd /tmp/Patch_12.1.2.6.0
[root@oda_base01 patch]# oakcli unpack -package /tmp/patch/p22328442_121260_Linux-x86-64_1of2.zip
Unpacking takes a while, pls wait....
Successfully unpacked the files to repository.
[root@oda_base01 patch]#
[root@oda_base01 patch]#
[root@oda_base01 patch]# oakcli unpack -package /tmp/patch/p22328442_121260_Linux-x86-64_2of2.zip
Unpacking takes a while, pls wait....
Successfully unpacked the files to repository.
[root@oda_base01 patch]#


Verify the patch compatibility on both ODA_Base with the following check:

[root@oda_base01 patch]# oakcli update -patch 12.1.2.6.0 -verify

INFO: 2016-03-31 17:07:29: Reading the metadata file now...
 Component Name Installed Version Proposed Patch Version
 --------------- ------------------ -----------------
 Controller_INT     4.230.40-3739       Up-to-date
 Controller_EXT     06.00.02.00         Up-to-date
 Expander           0018                Up-to-date
 SSD_SHARED {
 [ c1d20,c1d21,c1d22, A29A              Up-to-date
 c1d23 ]
 [ c1d16,c1d17,c1d18, A29A              Up-to-date
 c1d19 ]
 }
 HDD_LOCAL            A720              Up-to-date
 HDD_SHARED           P554              Up-to-date
 ILOM             3.2.4.42 r99377     3.2.4.52 r101649
 BIOS               30040200              30050100
 IPMI               1.8.12.0              1.8.12.4
 HMP                2.3.2.4.1             2.3.4.0.1
 OAK               12.1.2.5.0            12.1.2.6.0
 OL                    5.11                  6.7
 OVM                  3.2.9              Up-to-date
 GI_HOME           12.1.0.2.5(21359755, 12.1.0.2.160119(2194
                              21359758) 8354,21948344)
 DB_HOME {
 [ OraDb11204_home1 ] 11.2.0.4.8(21352635, 11.2.0.4.160119(2194
 21352649) 8347,21948348)
 [ OraDb12102_home2,O 12.1.0.2.5(21359755, 12.1.0.2.160119(2194
 raDb12102_home1 ] 21359758) 8354,21948344)
 }
[root@oda_base01 patch]#

Validate the Upgrade to OEL6 checking:

  • The minimum required version
  • The space requirement
  • The list of valid ol5 rpms.
[root@oda_base01 patch]# oakcli validate -c ol6upgrade -prechecks
INFO: Validating the OL6 upgrade -prechecks
INFO: 2016-04-09 17:11:41: Checking for minimum compatible version
SUCCESS: 2016-04-09 17:11:41: Minimum compatible version check passed

INFO: 2016-04-09 17:11:41: Checking available free space on /u01
INFO: 2016-04-09 17:11:41: Free space on /u01 is 39734588 1K-blocks
SUCCESS: 2016-04-09 17:11:41: Check for available free space passed

INFO: 2016-04-09 17:11:42: Checking for additional RPMs
SUCCESS: 2016-04-09 17:11:42: Check for additional RPMs passed

INFO: 2016-04-09 17:11:42: Checking for expected RPMs installed
INFO: 2016-04-09 17:11:42: Please take backup of ODA_BASE. Ensure ODA_BASE, Share Repos and all the VMs are shutdown cleanly before taking backup.
INFO: 2016-04-09 17:11:42: You may use eg tar -cvzf oakDom1.<node>.tar.gz /OVS/Repositories/odabaseRepo/VirtualMachines/oakDom1.
SUCCESS: 2016-04-09 17:11:42: All the expected ol5 RPMs are installed
SUCCESS: Node is ready for upgrade
[root@oda_base01 patch]#

Apply the patch to the first node using the flag -local

[root@oda_base01 patch]# /opt/oracle/oak/bin/oakcli update -patch 12.1.2.6.0 --infra -local
INFO: Local patch is running on the Node <0>
INFO: ***************************************************
INFO: ** Please do not patch both nodes simultaneously **
INFO: ***************************************************
INFO: DB, ASM, Clusterware may be stopped during the patch if required
INFO: Local Node may get rebooted automatically during the patch if necessary
Do you want to continue: [Y/N]?: Y
INFO: User has confirmed for the reboot
INFO: 2016-04-09 17:14:22: Checking for minimum compatible version
SUCCESS: 2016-04-09 17:14:22: Minimum compatible version check passed

INFO: 2016-04-09 17:14:22: Checking available free space on /u01
INFO: 2016-04-09 17:14:22: Free space on /u01 is 39733684 1K-blocks
SUCCESS: 2016-04-09 17:14:22: Check for available free space passed

INFO: 2016-04-09 17:14:22: Checking for additional RPMs
SUCCESS: 2016-04-09 17:14:22: Check for additional RPMs passed

INFO: 2016-04-09 17:14:22: Checking for expected RPMs installed
INFO: 2016-04-09 17:14:22: Please take backup of ODA_BASE. Ensure ODA_BASE, Share Repos and all the VMs are shutdown cleanly before taking backup.
INFO: 2016-04-09 17:14:22: You may use eg tar -cvzf oakDom1.<node>.tar.gz /OVS/Repositories/odabaseRepo/VirtualMachines/oakDom1.
SUCCESS: 2016-04-09 17:14:22: All the expected ol5 RPMs are installed
INFO: All the VMs except the ODABASE will be shutdown forcefully if needed
Do you want to continue : [Y/N]? : Y
INFO: Running pre-install scripts
INFO: Running prepatching on local node
INFO: Completed pre-install scripts
INFO: local patching code START
INFO: Stopping local VMs, repos and oakd...
INFO: Shutdown of local VM, Repo and OAKD on node <0>.
INFO: Stopping OAKD on the local node.
INFO: Stopped Oakd on local node
INFO: Waiting for processes to sync up...
INFO: Oakd running on remote node
INFO: Stopping local VMs...
INFO: Stopping local shared repos...
INFO: Patching Dom0 components

INFO: Patching dom0 components on Local Node... <12.1.2.6.0>
INFO: 2016-04-09 17:27:02: Attempting to patch the HMP on Dom0...
SUCCESS: 2016-04-09 17:27:08: Successfully updated the device HMP to the version 2.3.4.0.1 on Dom0
INFO: 2016-04-09 17:27:08: Attempting to patch the IPMI on Dom0...
INFO: 2016-04-09 17:27:08: Successfully updated the IPMI on Dom0
INFO: 2016-04-09 17:27:08: Attempting to patch OS on Dom0...
INFO: 2016-04-09 17:27:18: Clusterware is running on local node
INFO: 2016-04-09 17:27:18: Attempting to stop clusterware and its resources locally
SUCCESS: 2016-04-09 17:29:12: Successfully stopped the clusterware on local node

SUCCESS: 2016-04-09 17:31:36: Successfully updated the device OVM to 3.2.9

INFO: Patching ODABASE components

INFO: Patching Infrastructure on the Local Node...

INFO: 2016-04-09 17:31:38: ------------------Patching OS-------------------------
INFO: 2016-04-09 17:31:38: OSPatching : Patching will start from step 0
INFO: 2016-04-09 17:31:38: OSPatching : Performing the step 0
INFO: 2016-04-09 17:31:39: OSPatching : step 0 completed
==================================================================================
INFO: 2016-04-09 17:31:39: OSPatching : Performing the step 1
INFO: 2016-04-09 17:31:39: OSPatching : step 1 completed
==================================================================================
INFO: 2016-04-09 17:31:39: OSPatching : Performing the step 2
INFO: 2016-04-09 17:31:42: OSPatching : step 2 completed.
==================================================================================
INFO: 2016-04-09 17:31:42: OSPatching : Performing the step 3
INFO: 2016-04-09 17:31:51: OSPatching : step 3 completed
==================================================================================
INFO: 2016-04-09 17:31:51: OSPatching : Performing the step 4
INFO: 2016-04-09 17:31:51: OSPatching : step 4 completed.
==================================================================================
INFO: 2016-04-09 17:31:51: OSPatching : Performing the step 5
INFO: 2016-04-09 17:31:52: OSPatching : step 5 completed
==================================================================================
INFO: 2016-04-09 17:31:52: OSPatching : Performing the step 6
INFO: 2016-04-09 17:31:52: OSPatching : Installing OL6 RPMs. Please wait...
INFO: 2016-04-09 17:35:05: OSPatching : step 6 completed
==================================================================================
INFO: 2016-04-09 17:35:05: OSPatching : Performing the step 7
INFO: 2016-04-09 17:37:36: OSPatching : step 7 completed
==================================================================================
INFO: 2016-04-09 17:37:36: OSPatching : Performing the step 8
INFO: 2016-04-09 17:37:37: OSPatching : step 8 completed
==================================================================================
INFO: 2016-04-09 17:37:37: OSPatching : Performing the step 9
INFO: 2016-04-09 17:38:14: OSPatching : step 9 completed
==================================================================================
INFO: 2016-04-09 17:38:14: OSPatching : Performing the step 10
INFO: 2016-04-09 17:38:50: OSPatching : step 10 completed
==================================================================================
INFO: 2016-04-09 17:38:50: OSPatching : Performing the step 11
INFO: 2016-04-09 17:38:50: OSPatching : step 11 completed
==================================================================================
INFO: 2016-04-09 17:38:50: OSPatching : Performing the step 12
INFO: 2016-04-09 17:38:50: Checking for expected RPMs installed
SUCCESS: 2016-04-09 17:38:51: All the expected ol6 RPMs are installed
INFO: 2016-04-09 17:38:51: OSPatching : step 12 completed
==================================================================================
SUCCESS: 2016-04-09 17:38:51: Successfully upgraded the OS

INFO: 2016-04-09 17:38:52: ----------------------Patching IPMI---------------------
INFO: 2016-04-09 17:38:52: IPMI is already upgraded or running with the latest version

INFO: 2016-04-09 17:38:52: ------------------Patching HMP-------------------------
INFO: 2016-04-09 17:38:53: HMP is already Up-to-date
INFO: 2016-04-09 17:38:53: /usr/lib64/sun-ssm already exists.

INFO: 2016-04-09 17:38:53: ----------------------Patching OAK---------------------
SUCCESS: 2016-04-09 17:39:27: Successfully upgraded OAK

INFO: 2016-04-09 17:39:31: ----------------------Patching JDK---------------------
SUCCESS: 2016-04-09 17:39:36: Successfully upgraded JDK

INFO: local patching code END

INFO: patching summary on local node
SUCCESS: 2016-04-09 17:39:39: Successfully upgraded the HMP on Dom0
SUCCESS: 2016-04-09 17:39:39: Successfully updated the device OVM
SUCCESS: 2016-04-09 17:39:39: Successfully upgraded the OS
INFO: 2016-04-09 17:39:39: IPMI is already upgraded
INFO: 2016-04-09 17:39:39: HMP is already updated
SUCCESS: 2016-04-09 17:39:39: Successfully updated the OAK
SUCCESS: 2016-04-09 17:39:39: Successfully updated the JDK

INFO: Running post-install scripts
INFO: Running postpatch on local node
INFO: Dom0 Needs to be rebooted, will be rebooting the Dom0

Broadcast message from root@oda_base01
 (unknown) at 17:40 ...

The system is going down for power off NOW!

Validate the steps with the  infrastructure post patch checks:

[root@oda_base01 ~]# /u01/app/12.1.0.2/grid/bin/crsctl check crs
CRS-4638: Oracle High Availability Services is online
CRS-4537: Cluster Ready Services is online
CRS-4529: Cluster Synchronization Services is online
CRS-4533: Event Manager is online

[root@oda_base01 ~]# /opt/oracle/oak/bin/oakcli validate -c ol6upgrade -postchecks
INFO: Validating the OL6 upgrade -postchecks

INFO: 2016-04-09 19:50:40: Current kernel is OL6
INFO: 2016-04-09 19:50:43: Checking for expected RPMs installed
SUCCESS: 2016-04-09 19:50:43: All the expected ol6 RPMs are installed

Apply the patch to the second node using the flag -local

[root@oda_base02 patch]# /opt/oracle/oak/bin/oakcli update -patch 12.1.2.6.0 --infra -local
INFO: Local patch is running on the Node <1>
INFO: ***************************************************
INFO: ** Please do not patch both nodes simultaneously **
INFO: ***************************************************
INFO: DB, ASM, Clusterware may be stopped during the patch if required
INFO: Local Node may get rebooted automatically during the patch if necessary
Do you want to continue: [Y/N]?: Y
INFO: User has confirmed for the reboot
INFO: 2016-04-09 19:58:07: Checking for minimum compatible version
SUCCESS: 2016-04-09 19:58:07: Minimum compatible version check passed

INFO: 2016-04-09 19:58:07: Checking available free space on /u01
INFO: 2016-04-09 19:58:07: Free space on /u01 is 45790328 1K-blocks
SUCCESS: 2016-04-09 19:58:07: Check for available free space passed

INFO: 2016-04-09 19:58:07: Checking for additional RPMs
SUCCESS: 2016-04-09 19:58:07: Check for additional RPMs passed

INFO: 2016-04-09 19:58:07: Checking for expected RPMs installed
INFO: 2016-04-09 19:58:08: Please take backup of ODA_BASE. Ensure ODA_BASE, Share Repos and all the VMs are shutdown cleanly before taking backup.
INFO: 2016-04-09 19:58:08: You may use eg tar -cvzf oakDom1.<node>.tar.gz /OVS/Repositories/odabaseRepo/VirtualMachines/oakDom1.
SUCCESS: 2016-04-09 19:58:08: All the expected ol5 RPMs are installed
INFO: All the VMs except the ODABASE will be shutdown forcefully if needed
Do you want to continue : [Y/N]? : Y
INFO: Running pre-install scripts
INFO: Running prepatching on local node
INFO: Completed pre-install scripts
INFO: local patching code START
INFO: Stopping local VMs, repos and oakd...
INFO: Shutdown of local VM, Repo and OAKD on node <1>.
INFO: Stopping OAKD on the local node.
INFO: Stopped Oakd on local node
INFO: Waiting for processes to sync up...
INFO: Oakd running on remote node
INFO: Stopping local VMs...
INFO: Stopping local shared repos...
INFO: Patching Dom0 components

INFO: Patching dom0 components on Local Node... <12.1.2.6.0>
INFO: 2016-04-09 20:04:26: Attempting to patch the HMP on Dom0...
SUCCESS: 2016-04-09 20:04:33: Successfully updated the device HMP to the version 2.3.4.0.1 on Dom0
INFO: 2016-04-09 20:04:33: Attempting to patch the IPMI on Dom0...
INFO: 2016-04-09 20:04:33: Successfully updated the IPMI on Dom0
INFO: 2016-04-09 20:04:33: Attempting to patch OS on Dom0...
INFO: 2016-04-09 20:04:43: Clusterware is running on local node
INFO: 2016-04-09 20:04:43: Attempting to stop clusterware and its resources locally
SUCCESS: 2016-04-09 20:08:20: Successfully stopped the clusterware on local node

SUCCESS: 2016-04-09 20:10:44: Successfully updated the device OVM to 3.2.9

INFO: Patching ODABASE components

INFO: Patching Infrastructure on the Local Node...

INFO: 2016-04-09 20:10:48: ------------------Patching OS-------------------------
INFO: 2016-04-09 20:10:48: OSPatching : Patching will start from step 0
INFO: 2016-04-09 20:10:48: OSPatching : Performing the step 0
INFO: 2016-04-09 20:10:51: OSPatching : step 0 completed
==================================================================================
INFO: 2016-04-09 20:10:51: OSPatching : Performing the step 1
INFO: 2016-04-09 20:10:51: OSPatching : step 1 completed
==================================================================================
INFO: 2016-04-09 20:10:51: OSPatching : Performing the step 2
INFO: 2016-04-09 20:10:53: OSPatching : step 2 completed.
==================================================================================
INFO: 2016-04-09 20:10:53: OSPatching : Performing the step 3
INFO: 2016-04-09 20:11:00: OSPatching : step 3 completed
==================================================================================
INFO: 2016-04-09 20:11:00: OSPatching : Performing the step 4
INFO: 2016-04-09 20:11:00: OSPatching : step 4 completed.
==================================================================================
INFO: 2016-04-09 20:11:00: OSPatching : Performing the step 5
INFO: 2016-04-09 20:11:00: OSPatching : step 5 completed
==================================================================================
INFO: 2016-04-09 20:11:00: OSPatching : Performing the step 6
INFO: 2016-04-09 20:11:00: OSPatching : Installing OL6 RPMs. Please wait...
INFO: 2016-04-09 20:14:25: OSPatching : step 6 completed
==================================================================================
INFO: 2016-04-09 20:14:25: OSPatching : Performing the step 7
INFO: 2016-04-09 20:16:58: OSPatching : step 7 completed
==================================================================================
INFO: 2016-04-09 20:16:58: OSPatching : Performing the step 8
INFO: 2016-04-09 20:16:59: OSPatching : step 8 completed
==================================================================================
INFO: 2016-04-09 20:16:59: OSPatching : Performing the step 9
INFO: 2016-04-09 20:17:35: OSPatching : step 9 completed
==================================================================================
INFO: 2016-04-09 20:17:35: OSPatching : Performing the step 10
INFO: 2016-04-09 20:18:11: OSPatching : step 10 completed
==================================================================================
INFO: 2016-04-09 20:18:11: OSPatching : Performing the step 11
INFO: 2016-04-09 20:18:11: OSPatching : step 11 completed
==================================================================================
INFO: 2016-04-09 20:18:11: OSPatching : Performing the step 12
INFO: 2016-04-09 20:18:12: Checking for expected RPMs installed
SUCCESS: 2016-04-09 20:18:12: All the expected ol6 RPMs are installed
INFO: 2016-04-09 20:18:12: OSPatching : step 12 completed
==================================================================================
SUCCESS: 2016-04-09 20:18:12: Successfully upgraded the OS

INFO: 2016-04-09 20:18:12: ----------------------Patching IPMI---------------------
INFO: 2016-04-09 20:18:13: IPMI is already upgraded or running with the latest version

INFO: 2016-04-09 20:18:13: ------------------Patching HMP-------------------------
INFO: 2016-04-09 20:18:15: HMP is already Up-to-date
INFO: 2016-04-09 20:18:15: /usr/lib64/sun-ssm already exists.

INFO: 2016-04-09 20:18:15: ----------------------Patching OAK---------------------
SUCCESS: 2016-04-09 20:18:53: Successfully upgraded OAK

INFO: 2016-04-09 20:18:56: ----------------------Patching JDK---------------------
SUCCESS: 2016-04-09 20:19:02: Successfully upgraded JDK

INFO: local patching code END

INFO: patching summary on local node
SUCCESS: 2016-04-09 20:19:06: Successfully upgraded the HMP on Dom0
SUCCESS: 2016-04-09 20:19:06: Successfully updated the device OVM
SUCCESS: 2016-04-09 20:19:06: Successfully upgraded the OS
INFO: 2016-04-09 20:19:06: IPMI is already upgraded
INFO: 2016-04-09 20:19:06: HMP is already updated
SUCCESS: 2016-04-09 20:19:06: Successfully updated the OAK
SUCCESS: 2016-04-09 20:19:06: Successfully updated the JDK

INFO: Running post-install scripts
INFO: Running postpatch on local node
INFO: Dom0 Needs to be rebooted, will be rebooting the Dom0

Broadcast message from root@oda_base02
 (unknown) at 20:20 ...

The system is going down for power off NOW!

From the first ODA_Base apply the fix to the InfiniBand connection:

[root@oda_base01 ~]# python /opt/oracle/oak/bin/infiniFixSetup.py
IB Fix requires nodes reboot. Do you want to continue? [Y/N] : Y
INFO: Checking version for IB Fix setup
INFO: Checking whether IB Fix setup is already done or not
INFO: Checking default HAVIP for IB Fix setup
INFO: Setting up IB fix
INFO: Enabling IB fix and rebooting all nodes....
[root@oda_base01 ~]#
Broadcast message from root@oda_base01
 (unknown) at 20:40 ...

The system is going down for power off NOW!

Check the correct application of the InfiniBand patch, the value of the file below should be 1

[root@oda_base01 ~]#  view /opt/oracle/oak/conf/ib_fix
1

Installation of the Grid Infrastructure patch, two available methods:

  • Full Downtime
  • Rolling Upgrade

The example below show the first method

[root@oda_base01 ~]# oakcli update -patch 12.1.2.6.0 --gi

Please enter the 'SYSASM' password : (During deployment we set the SYSASM password to 'welcome1'):
Please re-enter the 'SYSASM' password:
INFO: Running pre-install scripts
INFO: Running prepatching on node 0
INFO: Running prepatching on node 1
INFO: Completed pre-install scripts
...
...
INFO: Stopped Oakd
...
...

......
SUCCESS: All nodes in /opt/oracle/oak/temp_clunodes.txt are pingable and alive.
INFO: 2016-04-09 22:32:16: Setting up SSH for grid User
......
SUCCESS: All nodes in /opt/oracle/oak/temp_clunodes.txt are pingable and alive.
INFO: 2016-04-09 22:32:34: Patching the GI Home on the Node oda_base01 ...
INFO: 2016-04-09 22:32:34: Updating OPATCH...
INFO: 2016-04-09 22:32:36: Rolling back GI on oda_base01 (if necessary)...
INFO: 2016-04-09 22:32:39: Rolling back GI on oda_base02 (if necessary)...
INFO: 2016-04-09 22:32:46: Patching the GI Home on the Node oda_base01
INFO: 2016-04-09 22:34:02: Performing the conflict checks...
SUCCESS: 2016-04-09 22:34:16: Conflict checks passed for all the Homes
INFO: 2016-04-09 22:34:16: Checking if the patch is already applied on any of the Homes
INFO: 2016-04-09 22:34:28: Home is not Up-to-date
SUCCESS: 2016-04-09 22:37:01: Successfully stopped the Database consoles
SUCCESS: 2016-04-09 22:37:18: Successfully stopped the EM agents
INFO: 2016-04-09 22:37:23: Applying patch on /u01/app/12.1.0.2/grid Homes
INFO: 2016-04-09 22:37:23: It may take upto 15 mins. Please wait...
SUCCESS: 2016-04-09 22:50:57: Successfully applied the patch on the Home : /u01/app/12.1.0.2/grid
SUCCESS: 2016-04-09 22:51:24: Successfully started the Database consoles
SUCCESS: 2016-04-09 22:51:40: Successfully started the EM Agents
INFO: 2016-04-09 22:51:41: Patching the GI Home on the Node oda_base02
...
INFO: 2016-04-09 23:16:27: ASM is running in Flex mode


INFO: GI patching summary on node: oda_base01
SUCCESS: 2016-04-09 23:16:28: Successfully applied the patch on the Home /u01/app/12.1.0.2/grid

INFO: GI patching summary on node: oda_base02
SUCCESS: 2016-04-09 23:16:28: Successfully applied the patch on the Home /u01/app/12.1.0.2/grid

INFO: GI versions: installed <12.1.0.2.160119> expected <12.1.0.2.160119>
INFO: Running post-install scripts
INFO: Running postpatch on node 1...
INFO: Running postpatch on node 0...
...
...
INFO: Started Oakd

Installation of the RDBMS patch, two available methods:

  • Full Downtime
  • Rolling Upgrade

The example below show the first method

[root@oda_base01 ~]# oakcli update -patch 12.1.2.6.0 --database
INFO: Running pre-install scripts
INFO: Running prepatching on node 0
INFO: Running prepatching on node 1
INFO: Completed pre-install scripts
...
...

......
SUCCESS: All nodes in /opt/oracle/oak/temp_clunodes.txt are pingable and alive.
INFO: 2016-04-09 23:27:31: Getting all the possible Database Homes for patching
...
INFO: 2016-04-09 23:27:42: Patching 11.2.0.4 Database Homes on the Node oda_base01

Found the following 11.2.0.4 homes possible for patching:

HOME_NAME HOME_LOCATION
--------- -------------
OraDb11204_home1 /u01/app/oracle/product/11.2.0.4/dbhome_1

[Please note that few of the above Database Homes may be already up-to-date. They will be automatically ignored]

Would you like to patch all the above homes: Y | N ? : Y
INFO: 2016-04-09 23:29:17: Setting up SSH for the User oracle
......
SUCCESS: All nodes in /opt/oracle/oak/temp_clunodes.txt are pingable and alive.
INFO: 2016-04-09 23:29:35: Updating OPATCH
Fixing home : /u01/app/oracle/product/11.2.0.4/dbhome_1...done
INFO: 2016-04-09 23:30:33: Performing the conflict checks...
SUCCESS: 2016-04-09 23:30:43: Conflict checks passed for all the Homes
INFO: 2016-04-09 23:30:43: Checking if the patch is already applied on any of the Homes
INFO: 2016-04-09 23:30:47: Home is not Up-to-date
SUCCESS: 2016-04-09 23:31:13: Successfully stopped the Database consoles
SUCCESS: 2016-04-09 23:31:31: Successfully stopped the EM agents
INFO: 2016-04-09 23:31:36: Applying the patch on oracle home : /u01/app/oracle/product/11.2.0.4/dbhome_1 ...
SUCCESS: 2016-04-09 23:32:52: Successfully applied the patch on the Home : /u01/app/oracle/product/11.2.0.4/dbhome_1
SUCCESS: 2016-04-09 23:32:52: Successfully started the Database consoles
SUCCESS: 2016-04-09 23:33:08: Successfully started the EM Agents
INFO: 2016-04-09 23:33:17: Patching 11.2.0.4 Database Homes on the Node oda_base02
INFO: 2016-04-09 23:40:45: Running the catbundle.sql
INFO: 2016-04-09 23:40:52: Running catbundle.sql on the Database XXXXXXX
INFO: 2016-04-09 23:41:29: Running catbundle.sql on the Database YYYYYYY
INFO: 2016-04-09 23:42:07: Running catbundle.sql on the Database ZZZZZZZ
INFO: 2016-04-09 23:42:42: Running catbundle.sql on the Database WWWWWWW
...
INFO: 2016-04-09 23:47:56: Patching 12.1.0.2 Database Homes on the Node oda_base01

Found the following 12.1.0.2 homes possible for patching:

HOME_NAME HOME_LOCATION
--------- -------------
OraDb12102_home1 /u01/app/oracle/product/12.1.0.2/dbhome_1
OraDb12102_home2 /u01/app/oracle/product/12.1.0.2/dbhome_2

[Please note that few of the above Database Homes may be already up-to-date. They will be automatically ignored]

Would you like to patch all the above homes: Y | N ? : Y
INFO: 2016-04-09 23:49:11: Updating OPATCH
INFO: 2016-04-09 23:49:55: Performing the conflict checks...
SUCCESS: 2016-04-09 23:50:21: Conflict checks passed for all the Homes
INFO: 2016-04-09 23:50:21: Checking if the patch is already applied on any of the Homes
INFO: 2016-04-09 23:50:28: Home is not Up-to-date
SUCCESS: 2016-04-09 23:50:47: Successfully stopped the Database consoles
SUCCESS: 2016-04-09 23:51:04: Successfully stopped the EM agents
INFO: 2016-04-09 23:51:10: Applying patch on /u01/app/oracle/product/12.1.0.2/dbhome_1,/u01/app/oracle/product/12.1.0.2/dbhome_2 Homes
INFO: 2016-04-09 23:51:10: It may take upto 30 mins. Please wait...
SUCCESS: 2016-04-09 23:54:20: Successfully applied the patch on the Home : /u01/app/oracle/product/12.1.0.2/dbhome_1,/u01/app/oracle/product/12.1.0.2/dbhome_2
SUCCESS: 2016-04-09 23:54:20: Successfully started the Database consoles
SUCCESS: 2016-04-09 23:54:37: Successfully started the EM Agents
INFO: 2016-04-09 23:54:47: Patching 12.1.0.2 Database Homes on the Node oda_base02


INFO: DB patching summary on node: oda_base01
SUCCESS: 2016-04-01 00:03:19: Successfully applied the patch on the Home /u01/app/oracle/product/11.2.0.4/dbhome_1
SUCCESS: 2016-04-01 00:03:19: Successfully applied the patch on the Home /u01/app/oracle/product/12.1.0.2/dbhome_1,/u01/app/oracle/product/12.1.0.2/dbhome_2

INFO: DB patching summary on node: oda_base02
SUCCESS: 2016-04-01 00:03:20: Successfully applied the patch on the Home /u01/app/oracle/product/11.2.0.4/dbhome_1
SUCCESS: 2016-04-01 00:03:20: Successfully applied the patch on the Home /u01/app/oracle/product/12.1.0.2/dbhome_1,/u01/app/oracle/product/12.1.0.2/dbhome_2

Post patching validation:

[root@oda_base01 ~]# /opt/oracle/oak/bin/oakcli validate -d
INFO: oak system information and Validations
RESULT: System Software inventory details
 Reading the metadata. It takes a while...
 System Version Component Name Installed Version Supported Version
 -------------- --------------- ------------------ -----------------
 12.1.2.6.0
                  Controller_INT   4.230.40-3739     Up-to-date
                  Controller_EXT   06.00.02.00       Up-to-date
                  Expander         0018              Up-to-date
 SSD_SHARED {
 [ c1d20,c1d21,c1d22,              A29A               Up-to-date
 c1d23 ]
 [ c1d16,c1d17,c1d18,              A29A               Up-to-date
 c1d19 ]
 }
 HDD_LOCAL                         A720               Up-to-date
 HDD_SHARED                        P554               Up-to-date
 ILOM                              3.2.4.42 r99377    Up-to-date
 BIOS                              30040200           Up-to-date
 IPMI                              1.8.12.4           Up-to-date
 HMP                               2.3.4.0.1          Up-to-date
 OAK                               12.1.2.6.0         Up-to-date
 OL                                6.7                Up-to-date
 OVM                               3.2.9              Up-to-date
 GI_HOME                         12.1.0.2.160119(2194 Up-to-date
                                 8354,21948344)
 DB_HOME {
 [ OraDb11204_home1 ]            11.2.0.4.160119(2194 Up-to-date
                                 8347,21948348)
 [ OraDb12102_home2,O            12.1.0.2.160119(2194 Up-to-date
 raDb12102_home1 ]               8354,21948344)
 }
RESULT: System Information:-
 Manufacturer:Oracle Corporation
 Product Name:ORACLE SERVER X5-2
 Serial Number:1548NM102F
RESULT: BIOS Information:-
 Vendor:American Megatrends Inc.
 Version:30040200
 Release Date:04/29/2015
 BIOS Revision:4.2
 Firmware Revision:3.2
SUCCESS: Controller p1 has the IR Bypass mode set correctly
SUCCESS: Controller p2 has the IR Bypass mode set correctly
INFO: Reading ilom data, may take short while..
INFO: Read the ilom data. Doing Validations
RESULT: System ILOM Version: 3.2.4.42 r99377
RESULT: System BMC firmware version 3.02
RESULT: Powersupply PS0 V_IN=230 Volts IN_POWER=180 Watts OUT_POWER=170 Watts
RESULT: Powersupply PS1 V_IN=230 Volts IN_POWER=190 Watts OUT_POWER=160 Watts
SUCCESS: Both the powersupply are ok and functioning
RESULT: Cooling Unit FM0 fan speed F0=5000 RPM F1=4500 RPM
RESULT: Cooling Unit FM1 fan speed F0=9100 RPM F1=8000 RPM
SUCCESS: Both the cooling unit are present
RESULT: Processor P0 present Details:-
 Version:Intel(R) Xeon(R) CPU E5-2699 v3 @ 2.30GHz
 Current Speed:2300 MHz Core Enabled:18 Thread Count:36
SUCCESS: All 4 memory modules of CPU P0 ok, each module is of Size:32767 MB Type:Other Speed:2133 MHz manufacturer:Samsung
RESULT: Processor P1 present Details:-
 Version:Intel(R) Xeon(R) CPU E5-2699 v3 @ 2.30GHz
 Current Speed:2300 MHz Core Enabled:18 Thread Count:36
SUCCESS: All 4 memory modules of CPU P1 ok, each module is of Size:32767 MB Type:Other Speed:2133 MHz manufacturer:Samsung
RESULT: Total Physical System Memory is 132037124 kB
SUCCESS: All OS Disks are present and in ok state
RESULT: Power Supply=24 degrees C
INFO: Checking Operating System Storage
SUCCESS: The OS disks have the boot stamp
RESULT: Device /dev/xvda2 is mounted on / of type ext3 in (rw)
RESULT: Device /dev/xvda1 is mounted on /boot of type ext3 in (rw)
RESULT: Device /dev/xvdb1 is mounted on /u01 of type ext3 in (rw)
RESULT: / has 19218 MB free out of total 55852 MB
RESULT: /boot has 384 MB free out of total 460 MB
RESULT: /u01 has 34501 MB free out of total 93868 MB
INFO: Checking Shared Storage
RESULT: Disk HDD_E0_S00_993971920 path1 status active device sdy with status active path2 status active device sda with status active
SUCCESS: HDD_E0_S00_993971920 has both the paths up and active
RESULT: Disk HDD_E0_S01_993379760 path1 status active device sdz with status active path2 status active device sdb with status active
SUCCESS: HDD_E0_S01_993379760 has both the paths up and active
RESULT: Disk HDD_E0_S02_993993052 path1 status active device sdaa with status active path2 status active device sdc with status active
SUCCESS: HDD_E0_S02_993993052 has both the paths up and active
RESULT: Disk HDD_E0_S03_993310956 path1 status active device sdab with status active path2 status active device sdd with status active
SUCCESS: HDD_E0_S03_993310956 has both the paths up and active
RESULT: Disk HDD_E0_S04_993385276 path1 status active device sdac with status active path2 status active device sde with status active
SUCCESS: HDD_E0_S04_993385276 has both the paths up and active
RESULT: Disk HDD_E0_S05_993388928 path1 status active device sdf with status active path2 status active device sdad with status active
SUCCESS: HDD_E0_S05_993388928 has both the paths up and active
RESULT: Disk HDD_E0_S06_993310572 path1 status active device sdae with status active path2 status active device sdg with status active
SUCCESS: HDD_E0_S06_993310572 has both the paths up and active
RESULT: Disk HDD_E0_S07_991849548 path1 status active device sdh with status active path2 status active device sdaf with status active
SUCCESS: HDD_E0_S07_991849548 has both the paths up and active
RESULT: Disk HDD_E0_S08_992415004 path1 status active device sdag with status active path2 status active device sdi with status active
SUCCESS: HDD_E0_S08_992415004 has both the paths up and active
RESULT: Disk HDD_E0_S09_992392444 path1 status active device sdj with status active path2 status active device sdah with status active
SUCCESS: HDD_E0_S09_992392444 has both the paths up and active
RESULT: Disk HDD_E0_S10_992233592 path1 status active device sdai with status active path2 status active device sdk with status active
SUCCESS: HDD_E0_S10_992233592 has both the paths up and active
RESULT: Disk HDD_E0_S11_992337644 path1 status active device sdl with status active path2 status active device sdaj with status active
SUCCESS: HDD_E0_S11_992337644 has both the paths up and active
RESULT: Disk HDD_E0_S12_993363524 path1 status active device sdm with status active path2 status active device sdak with status active
SUCCESS: HDD_E0_S12_993363524 has both the paths up and active
RESULT: Disk HDD_E0_S13_992394252 path1 status active device sdn with status active path2 status active device sdal with status active
SUCCESS: HDD_E0_S13_992394252 has both the paths up and active
RESULT: Disk HDD_E0_S14_993366344 path1 status active device sdam with status active path2 status active device sdo with status active
SUCCESS: HDD_E0_S14_993366344 has both the paths up and active
RESULT: Disk HDD_E0_S15_993407552 path1 status active device sdp with status active path2 status active device sdan with status active
SUCCESS: HDD_E0_S15_993407552 has both the paths up and active
RESULT: Disk SSD_E0_S16_1313537708 path1 status active device sdq with status active path2 status active device sdao with status active
SUCCESS: SSD_E0_S16_1313537708 has both the paths up and active
RESULT: Disk SSD_E0_S17_1313522352 path1 status active device sdr with status active path2 status active device sdap with status active
SUCCESS: SSD_E0_S17_1313522352 has both the paths up and active
RESULT: Disk SSD_E0_S18_1313531936 path1 status active device sds with status active path2 status active device sdaq with status active
SUCCESS: SSD_E0_S18_1313531936 has both the paths up and active
RESULT: Disk SSD_E0_S19_1313534520 path1 status active device sdt with status active path2 status active device sdar with status active
SUCCESS: SSD_E0_S19_1313534520 has both the paths up and active
RESULT: Disk SSD_E0_S20_1313568492 path1 status active device sdu with status active path2 status active device sdas with status active
SUCCESS: SSD_E0_S20_1313568492 has both the paths up and active
RESULT: Disk SSD_E0_S21_1313571440 path1 status active device sdv with status active path2 status active device sdat with status active
SUCCESS: SSD_E0_S21_1313571440 has both the paths up and active
RESULT: Disk SSD_E0_S22_1313568380 path1 status active device sdw with status active path2 status active device sdau with status active
SUCCESS: SSD_E0_S22_1313568380 has both the paths up and active
RESULT: Disk SSD_E0_S23_1313568480 path1 status active device sdx with status active path2 status active device sdav with status active
SUCCESS: SSD_E0_S23_1313568480 has both the paths up and active
INFO: Doing oak network checks
RESULT: Detected active link for interface eth0 with link speed 10000Mb/s and cable type as TwistedPair
RESULT: Detected active link for interface eth1 with link speed 10000Mb/s and cable type as TwistedPair
WARNING: No Link detected for interface eth2 with cable type as TwistedPair
WARNING: No Link detected for interface eth3 with cable type as TwistedPair
INFO: Checking bonding interface status
RESULT: No Bond Interface Found
SUCCESS: ibbond0 is running 192.168.16.27
 It may take a while. Please wait...
 INFO : ODA Topology Verification
 INFO : Running on Node0
 INFO : Check hardware type
 SUCCESS : Type of hardware found : X5-2
 INFO : Check for Environment(Bare Metal or Virtual Machine)
 SUCCESS : Type of environment found : Virtual Machine(ODA BASE)
 SUCCESS : Number of External SCSI controllers found : 2
 INFO : Check for Controllers correct PCIe slot address
 SUCCESS : External LSI SAS controller 0 : 00:04.0
 SUCCESS : External LSI SAS controller 1 : 00:05.0
 INFO : Check if JBOD powered on
 SUCCESS : 1JBOD : Powered-on
 INFO : Check for correct number of EBODS(2 or 4)
 SUCCESS : EBOD found : 2
 INFO : Check for External Controller 0
 SUCCESS : Controller connected to correct EBOD number
 SUCCESS : Controller port connected to correct EBOD port
 SUCCESS : Overall Cable check for controller 0
 INFO : Check for External Controller 1
 SUCCESS : Controller connected to correct EBOD number
 SUCCESS : Controller port connected to correct EBOD port
 SUCCESS : Overall Cable check for Controller 1
 INFO : Check for overall status of cable validation on Node0
 SUCCESS : Overall Cable Validation on Node0
 INFO : Check Node Identification status
 SUCCESS : Node Identification
 SUCCESS : Node name based on cable configuration found : NODE0
 INFO : Check JBOD Nickname
 SUCCESS : JBOD Nickname set correctly : Oracle Database Appliance - E0
 INFO : The details for Storage Topology Validation can also be found in the log file=/opt/oracle/oak/log/oda_base01/storagetopology/StorageTopology-2016-04-01-00:06:34_28446_1789.log

 One takeaway

Despite the fact that patching an Oracle Engineered system should be a straight forward task, it is recommended to carefully read the instructions (README), and the MOS notes continuously updated with bug, known issues and other related information.