Nowadays the business requirements force the IT to implement the more and more sophisticated and consolidated environments without compromising availability, performance and flexibility of each application running on it.
In this post, I explain how to improve the Grid Infrastructure Network flexibility, implementing multiple SCANs and how to associate one or multiple networks to the Oracle databases.
To better understand the reasons for such type of implementation, below are listed few common use cases:
- Applications are deployed on different/dedicated subnets.
- Network isolation due to security requirement.
- Different database protocols are in use (TCP, TCPS, etc.).
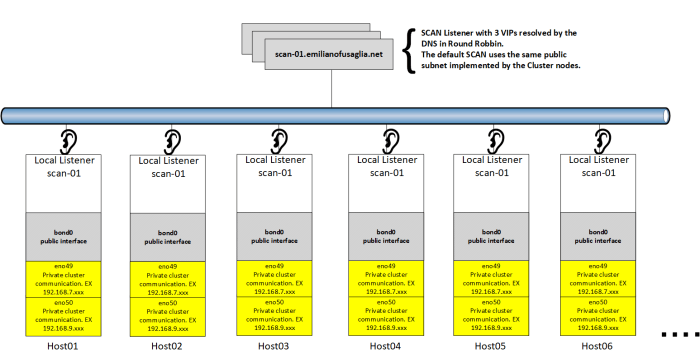
Single Client Access Name (SCAN)
By default on each Oracle Grid Infrastructure cluster, indipendently from the number of nodes, one SCAN with 3 SCAN VIPs is created.
Below is depicted the default Oracle Clusterware network/SCAN configuration.
Multiple Single Client Access Name (SCAN) implementation
Before implemeting additional SCANs, the OS provisioning of new network interfaces or new VLAN Tagging has to be completed.
The current example uses the second option (VLAN Tagging), and the bond0 interface is an Active/Active setup of two 10gbe cards, to which a VLAN tag has been added.
Below is represented the customized Oracle Clusterware network/SCAN configuration, having added a second SCAN.

Step-by-step implementation
After completing the OS network setup, as grid owner add the new interface to the Grid Infrastructure:
grid@host01a:~# oifcfg setif -global bond0.764/10.15.69.0:public

grid@host01a:~# oifcfg getif
eno49 192.168.7.32 global cluster_interconnect,asm
eno50 192.168.9.48 global cluster_interconnect,asm
bond0 10.11.8.0 global public
bond0.764 10.15.69.0 global public
grid@host01a:~#
Then as root create the network number 2 and disply the configuration:
root@host01a:~# /u01/app/12.2.0.1/grid/bin/srvctl add network -netnum 2 -subnet 10.15.69.0/255.255.255.0/bond0.764 -nettype STATIC

root@host01a:~# /u01/app/12.2.0.1/grid/bin/srvctl config network -netnum 2
Network 2 exists
Subnet IPv4: 10.15.69.0/255.255.255.0/, static
Subnet IPv6:
Ping Targets:
Network is enabled
Network is individually enabled on nodes:
Network is individually disabled on nodes:
As root user add the node VIPs:
root@host01a:~# /u01/app/12.2.0.1/grid/bin/srvctl add vip -node host01a -netnum 2 -address host01b-vip.emilianofusaglia.net/255.255.255.0
root@host01a:~# /u01/app/12.2.0.1/grid/bin/srvctl add vip -node host02a -netnum 2 -address host02b-vip.emilianofusaglia.net/255.255.255.0
root@host01a:~# /u01/app/12.2.0.1/grid/bin/srvctl add vip -node host03a -netnum 2 -address host03b-vip.emilianofusaglia.net/255.255.255.0
root@host01a:~# /u01/app/12.2.0.1/grid/bin/srvctl add vip -node host04a -netnum 2 -address host04b-vip.emilianofusaglia.net/255.255.255.0
root@host01a:~# /u01/app/12.2.0.1/grid/bin/srvctl add vip -node host05a -netnum 2 -address host05b-vip.emilianofusaglia.net/255.255.255.0
root@host01a:~# /u01/app/12.2.0.1/grid/bin/srvctl add vip -node host06a -netnum 2 -address host06b-vip.emilianofusaglia.net/255.255.255.0
As grid user create a new listener based on the network number 2:
grid@host01a:~# srvctl add listener -listener LISTENER2 -netnum 2 -endpoints "TCP:1532"
As root user add the new SCAN to the network number 2:
root@host01a:~# /u01/app/12.2.0.1/grid/bin/srvctl add scan -scanname scan-02.emilianofusaglia.net -netnum 2
As root user start the new node VIPs:
root@host01a:~# /u01/app/12.2.0.1/grid/bin/srvctl start vip -vip host01b-vip.emilianofusaglia.net
root@host01a:~# /u01/app/12.2.0.1/grid/bin/srvctl start vip -vip host02b-vip.emilianofusaglia.net
root@host01a:~# /u01/app/12.2.0.1/grid/bin/srvctl start vip -vip host03b-vip.emilianofusaglia.net
root@host01a:~# /u01/app/12.2.0.1/grid/bin/srvctl start vip -vip host04b-vip.emilianofusaglia.net
root@host01a:~# /u01/app/12.2.0.1/grid/bin/srvctl start vip -vip host05b-vip.emilianofusaglia.net
root@host01a:~# /u01/app/12.2.0.1/grid/bin/srvctl start vip -vip host06b-vip.emilianofusaglia.net
As grid user start the new node Listeners:
grid@host01a:~# srvctl start listener -listener LISTENER2
grid@host01a:~# srvctl status listener -listener LISTENER2
Listener LISTENER2 is enabled
Listener LISTENER2 is running on node(s): host01a,host02a,host03a,host04a,host05a,host06a
As root user start the new SCAN and as grid user check the configuration:
root@host01a:~# /u01/app/12.2.0.1/grid/bin/srvctl start scan -netnum 2

grid@host01a:~# srvctl config scan -netnum 2
SCAN name: scan-02.emilianofusaglia.net, Network: 2
Subnet IPv4: 10.15.69.0/255.255.255.0/, static
Subnet IPv6:
SCAN 1 IPv4 VIP: 10.15.69.44
SCAN VIP is enabled.
SCAN VIP is individually enabled on nodes:
SCAN VIP is individually disabled on nodes:
SCAN 2 IPv4 VIP: 10.15.69.45
SCAN VIP is enabled.
SCAN VIP is individually enabled on nodes:
SCAN VIP is individually disabled on nodes:
SCAN 3 IPv4 VIP: 10.15.69.43
SCAN VIP is enabled.
SCAN VIP is individually enabled on nodes:
SCAN VIP is individually disabled on nodes:

grid@host01a:~# srvctl status scan -netnum 2
SCAN VIP scan1_net2 is enabled
SCAN VIP scan1_net2 is running on node host02a
SCAN VIP scan2_net2 is enabled
SCAN VIP scan2_net2 is running on node host01a
SCAN VIP scan3_net2 is enabled
SCAN VIP scan3_net2 is running on node host03a
As grid user add the SCAN Listener and check the configuration:
grid@host01a:~# srvctl add scan_listener -netnum 2 -listener LISTENER2 -endpoints TCP:1532

grid@host01a:~# srvctl config scan_listener -netnum 2
SCAN Listener LISTENER2_SCAN1_NET2 exists. Port: TCP:1532
Registration invited nodes:
Registration invited subnets:
SCAN Listener is enabled.
SCAN Listener is individually enabled on nodes:
SCAN Listener is individually disabled on nodes:
SCAN Listener LISTENER2_SCAN2_NET2 exists. Port: TCP:1532
Registration invited nodes:
Registration invited subnets:
SCAN Listener is enabled.
SCAN Listener is individually enabled on nodes:
SCAN Listener is individually disabled on nodes:
SCAN Listener LISTENER2_SCAN3_NET2 exists. Port: TCP:1532
Registration invited nodes:
Registration invited subnets:
SCAN Listener is enabled.
SCAN Listener is individually enabled on nodes:
SCAN Listener is individually disabled on nodes:
As grid user start the SCAN Listener2 and check the status:
grid@host01a:~# srvctl start scan_listener -netnum 2

grid@host01a:~# srvctl status scan_listener -netnum 2
SCAN Listener LISTENER2_SCAN1_NET2 is enabled
SCAN listener LISTENER2_SCAN1_NET2 is running on node host02a
SCAN Listener LISTENER2_SCAN2_NET2 is enabled
SCAN listener LISTENER2_SCAN2_NET2 is running on node host01a
SCAN Listener LISTENER2_SCAN3_NET2 is enabled
SCAN listener LISTENER2_SCAN3_NET2 is running on node host03a
Defining the multi SCANs configuration per database
Once the above configuration is completed, it remains to define which SCAN/s should be used by each database.
When multiple SCANs exists, by default the CRS populate the LISTENER_NETWORKS parameter to register the database against all SCANs and LISTENERs.
To overwrite this default behavior, allowing for example the authentication of a specific database only against the SCAN scan-02.emilianofusaglia.net, the database parameter LISTENER_NETWORKS should be manually configured.
The parameter LISTENER_NETWORKS can be dynamically set but the new value is enforced during the next instance restart.